Velociraptor Security Configuration
Velociraptor is a highly privileged service with elevated access to thousands of endpoints across the enterprise. It is therefore crucial to secure the deployment as much as possible.
While Velociraptor is designed with security in mind, there are a number of architectural choices you can make related to security.
In this article we begin with a discussion of the communication protocol used by Velociraptor and suggest a number of alternative deployment methods to ensure it can be secured on the network. We then discuss the Velociraptor permission model and suggest some further steps to ensure user actions are audited and controlled.
Client verification
From the outset we need to highlight a fundamental limitation of agent based security software.
Because the agent (The Velociraptor
Client) is running on a potentially compromised platform, We can never fully trust what the client is telling us.
There is no guarantee that the client will work correctly - it may be subverted by an attacker (who has full control of the endpoint) to:
- Disable the client completely - it will not report to the server.
- The client may omit reporting some information - For example, the client may hide sensitive files or artifacts that the attacker wants to hide.
- The client may report incorrect information (for example fake processes, files etc).
This is a fundamental limitation in the server/client model and can not be mitigated. Typically the Velociraptor client is running at an elevated permissions level which makes it harder to interact with by low privileged users, this reduces the risk somewhat. If you have an EDR installed on the endpoint, you may add anti-tamper rules to the EDR to reduce the risk of client interference even further - however there is always a residual risk of interference when the platform may be compromised.
We refer to a compromised client as a Rogue Client. This type of
client can send malformed responses or fake data.
You should always keep this limitation in mind when interpreting results from Velociraptor. The results may be missing or incorrect, or a client may be completely disabled by an attacker.
The main concern for Velociraptor is to ensure that one client can not impersonate another client. This mitigates the risk of a compromised client injecting fake information about another client. Velociraptor mitigates this risk using cryptographic keys as described in the next section.
Velociraptor communications
How do Velociraptor clients communicate with the server? You can read a lot more details about Velociraptor’s encryption scheme and communication protocol in our Velociraptor Communications Blog post, but we will go through the most important aspects here.
Velociraptor’s internal PKI
Every Velociraptor deployment creates an internal PKI which underpins it. The configuration wizard create an internal CA with an X.509 certificate and a private key. This CA is used to
-
Creating initial server certificates and any additional certificates for key rotation.
-
Verifying the server during client-server communications. The CA public certificate is embedded in the client’s configuration and is used to verify (and therefore trust) the server.
-
Creating API keys for programmatic access. The server is then able to verify API clients.
-
Creating client certificates for (optional) mTLS. This allows clients to be authenticated using certificates.
The configuration file contains the CA’s X.509 certificate in the
Client.ca_certificate key (and is therefore included in the client
configuration). The private key is contained in the CA.private_key parameter.
Since the client’s configuration contains the (trusted) CA’s certificate, it is
able to verify the server’s certificate during communications.
The internal CA will be used to verify the different Velociraptor components in all cases, regardless of whether other TLS certificates are used. While it is possible to reissue/rotate server certificates the CA certificate can not be reissued without re-deploying all the clients.
In a secure installation you should remove the CA.private_key section from
the server config and keep it offline. You only need it to
create new API keys
and when
rotating server certificates
(typically after 1 year).
The server does not need it during normal operations.
Messages
Clients and servers communicate by sending each other messages (which
are simply protocol buffers), for example, a message may contain VQL
queries or result sets. Messages are collected into a list and sent in
a single POST operation in a MessageList protobuf. This protobuf
is encrypted using a session key with a symmetric cipher
(aes_128_cbc). The session key is chosen by the sending party and is
written into an encrypted Cipher protobuf and sent along with each
message.
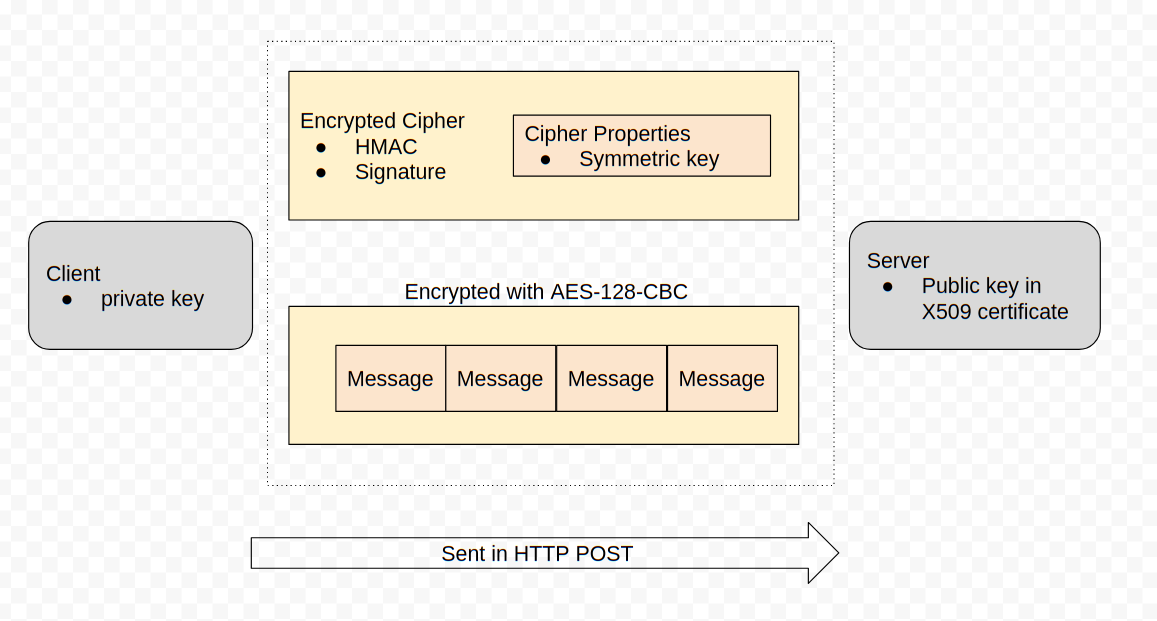
This symmetric key is encoded in a Cipher Properties protobuf which is encrypted in turn using the receiving party’s public key and signed using the sending party’s private key.
You might have noticed that MessageList protobufs are encrypted and signed, but they are usually still delivered within a TLS session - therefore there are two layers of encryption.
The internal encryption scheme’s main purpose is not only to encrypt the messages but to sign them. This prevents messages from one client from impersonating another client.
HTTP protocol
Velociraptor uses HTTPS POST messages to deliver message sets to the server. The server in turn sends messages to the client in the body of the POST request. The client connects to one of the server URLs provided in the Client.server_urls setting in its config file.
Before the client communicates with the server, the client must verify it is actually talking with the correct server. This happens at two levels:
-
If the URL is a HTTPS URL then the TLS connection needs to be verified
-
The client will fetch the url /server.pem to receive the server’s internal certificate. This certificate must be verified by the embedded CA.
Note that this verification is essential in order to prevent the client from accidentally talking with captive portals or MITM proxies.
It is important to understand that the server’s internal certificate
is always signed by the Velociraptor internal CA and is always
named with the name VelociraptorServer. It is completely
independent of the TLS certificates that control the HTTPS
connection (which may be external certificates).
The client will always verify the internal server certificate in order to decrypt the messages as described above. This means that even when a MITM proxy is able to decode the HTTPS connections, there is no visible plain text due to the included messages being encrypted again by the internal server certificate.
The client-only setting
Client.insecure_network_trace_file
is only for diagnosing connectivity issues. Any non-empty value writes
clear text protocol traces and disables TLS certificate
verification for outbound client connections — so intermediaries
could strip the TLS tunnel even though Velociraptor’s inner protobuf
encryption layer may remain. Never ship golden images or repacked
clients that leave this flag configured.
Securing Network communications
The following are some common network deployment scenarios. Simple scenarios are covered by the configuration generation wizard, but for more complex scenarios you will need to tweak the configuration file after generating it.
Self-signed deployment
This is the simplest deployment scenario handled by the configuration wizard.
When deploying in self-signed mode, Velociraptor will use its internal
CA to general TLS certificates as well. The TLS server certificate
will be generated with the common name VelociraptorServer and be
signed with the Velociraptor internal CA:
-
The setting
Client.use_self_signed_sslwill be set to true. This causes the client to require that the server certificate have a common name ofVelociraptorServerand it must be verified by the embedded CA certificate inClient.ca_certificate.This essentially pins the server’s certificate in the client — even if a MITM attacker was able to mint another certificate (even if it was trusted by the global roots!) it would not be valid since it was not issued by Velociraptor’s internal CA which is the only CA we trust in this mode! In this way self-signed mode is more secure than when using a public CA.
This mode also has the server use the
VelociraptorServerinternal certificate for securing the HTTPS connection as well. -
The GUI is also served using self-signed certificates which will generally result in a browser SSL warning. To avoid a MITM attack on a browser the GUI is forced to only bind to the localhost in this configuration. For increased security we recommend using the GUI using SSH to tunnel the connections into the localhost:
ssh user@velociraptor.server -L 8889:127.0.0.1:8889Now use your browser on https://127.0.0.1:8889/ on your port forwarded workstation.
Alternatively you can decide to expose the GUI on the public interface by changing the server configuration file:
GUI:
  bind_address: 0.0.0.0
  bind_port: 8889
In this configuration you may use standard port filtering or firewalls to restrict access to the GUI port while allowing clients to connect freely to the frontend port (since these can be different ports).
Deployment signed by Let’s encrypt
The next deployment scenario handled by the configuration wizard uses Let’s encrypt to automatically assign certificates to the HTTPS TLS connections.
In this scenario, the server will request Let’s Encrypt to mint certificates for the domain name provided. In order to this to work, Let’s Encrypt will go through a verification protocol requiring one of their servers to connect to the Velociraptor server over port 80 and 443.
Therefore, the server needs to be reachable over ports 80 and 443 (You can not serve over a non standard SSL port with Let’s Encrypt).
If you filter port 80 from the internet then Let’s Encrypt will be unable to verify the domain and will likely blacklist the domain name for a period.
It is crucial that port 80 and 443 be unfiltered to the world. It is difficult to recover from a blacklisting event other than waiting for a long period of time.
In this configuration:
-
The
Client.use_self_signed_sslis switched off. This tells the client that it should verify the TLS connection using public root CA’s. -
The GUI is configured to bind to all interfaces as above. This is required to allow connections from the Let’s Encrypt servers.
In this scenario the GUI must share the same port as the frontend because the TLS certificate can only be issued to port 443. This means that the GUI is accessible from the world as it is sharing the same port as the frontend service and we can not use traditional port filtering to restrict access.
Deployment with TLS certificates signed by external CA
This is a common scenario where there is an SSL inspection proxy between the client and server communications. In this case the proxy will present a certificate for the server signed by another CA (usually an internal self-signed CA associated with the inspection software).
Alternatively you may choose to buy TLS certificates from a commercial CA (this use case is very similar).
In this scenario, the client needs to verify the TLS connections using this custom CA certificate:
-
From the client’s point of view it is not in self-signed mode, because Velociraptor itself did not issue this certificate, therefore
Client.use_self_signed_sslshould be false. -
Additionally the certificate should be verified using the inspection CA’s certificate. Therefore that certificate should be added to
Client.Crypto.root_certs:Client: Crypto: root_certs: | -----BEGIN CERTIFICATE----- <certificate 1> -----END CERTIFICATE----- -----BEGIN CERTIFICATE----- <certificate 2> -----END CERTIFICATE----- -
The server may need to present custom certificates. Add those to the Frontend section (Certificates need to be in PEM format with unencrypted private keys to allow the server to start without user interaction):
Frontend:
    tls_certificate_filename: /etc/cert.pem
    tls_private_key_filename /etc/cert.key
Do not change the
Frontend.certificatefield as Velociraptor will still require to verify the server using it’s own CA.Note that only the TLS communications will be visible to the TLS interception proxy. It will be unable to see any clear text since there are always two layers of encryption.
Restricting access to the GUI from IP blocks
If your users normally access the GUI from a predictable network IP block you can add a list of network addresses in the GUI.allowed_cidr part of the config file. This setting will automatically reject connections to the GUI applications from IP addresses outside the allowed range.
Deploying mTLS authentication
An additional layer of security can be provided by enabling Mutual TLS (mTLS) authentication between clients and server. This mechanism requires the client to present a valid client certificate before the server even allows a connection to the frontend. The client certificate is included in the client configuration file.
Although clients cannot enroll or communicate without a valid configuration file, it is possible to connect and fingerprint the server if the mTLS policy is not enabled. For servers exposed to the public internet this may be undesirable even though this doesn’t present any substantial risk.
mTLS provides an additional layer of security in that connections from the internet (from clients or non-clients) to the frontend are required to present a valid certificate in order to complete the TLS connection.
To implement this strategy you need to:
- Generate client-side certificates signed by the internal Velociraptor CA.
- Specify that the frontend requires the client to present a valid client side certificate signed by the internal Velociraptor CA.
Generating client side certificates
The client side certificate is just a certificate signed by the internal CA. The server will verify the validity of the client certificate but does not track issued certificates or provide a CRL mechanism. The client certificate is not used to individually identify clients, so we only need to issue one certificate that allows us to verify all clients. All clients will present the same certificate when connecting.
Since the certificate needed is the same as an API client certificate, we can use the same process to generate one for mTLS:
$ velociraptor --config /etc/velociraptor/server.config.yaml config api_client --name "Client" /tmp/dummy.api.config.yaml
Creating API client file on /tmp/dummy.api.config.yaml.
No role added to user Client. You will need to do this later using the 'acl grant' command.
This will create an API configuration file for an API user called
“Client”, containing the key pair that we need. However the config api_client command shown above will not actually create a user on the
Velociraptor server since we deliberately didn’t specify the --role
flag.
It is critical that the user has no roles or permissions on the server
to prevent this key from being used to connect to the API
ports. Therefore the message concerning the use the acl_grant
command shown above should NOT be followed.
Once the key is generated you can see it in the resulting yaml file
encoded in PEM format. Simply copy the two blocks -
client_private_key and client_cert - into the client’s config file
Client.Crypto.client_certificate
and
Client.Crypto.client_certificate_private_key,
or into the server config if you intend to use the GUI to repack the
MSI or generate client configs for multiple orgs (service restart will
be required to read these new config items).
Client:
   Crypto:
      client_certificate: |
        -----BEGIN CERTIFICATE-----
        <certificate>
        -----END CERTIFICATE-----
      client_certificate_private_key: |
        -----BEGIN RSA PRIVATE KEY-----
        <key>
        -----END RSA PRIVATE KEY-----
Note that this client certificate will only be used if the server requests it, so it is fine to add the client certificate to the client config even if you only intend to enable mTLS later.
Client certificates generated as described above will be valid for 1 year. It is highly likely that you will upgrade your clients before this 1-year period elapses and so we recommended that you issue a new client cert during the upgrade process by including an updated (i.e. with a new client cert) client config in your client package, for example MSI for Windows clients.
Requiring client side certificates
On the server you can require frontend connections to present valid client side certificates by setting the Frontend.require_client_certificates config setting to true.
Once this setting is made it will not be possible to connect to the frontend without presenting a relevant client side certificate. This makes troubleshooting a bit more challenging.
For example the following will fail:
$ curl -k https://127.0.0.1:8000/server.pem
curl: (56) OpenSSL SSL_read: error:0A000412:SSL routines::sslv3 alert bad certificate, errno 0
To allow curl to connect you will need to create a PEM file with both the certificate and the private key in it (Copied from the YAML files above):
-----BEGIN CERTIFICATE-----
....
-----END CERTIFICATE-----
-----BEGIN RSA PRIVATE KEY-----
....
-----END RSA PRIVATE KEY-----
Now we can use curl to connect successfully
curl -k https://127.0.0.1:8000/server.pem --cert /tmp/client.pem | openssl x509 -text
Securing the server
In the following sections we discuss how the GUI application can be further secured. Since Velociraptor commands such privileged access to the network it is important to ensure this access can not be misused.
GUI Users
Velociraptor’s GUI is the nerve center for managing a Velociraptor deployment so we need to ensure we secure it with proper user authentication. Within Velociraptor, the user is central and is associated with a set if roles and permissions which control what the user is able to do.
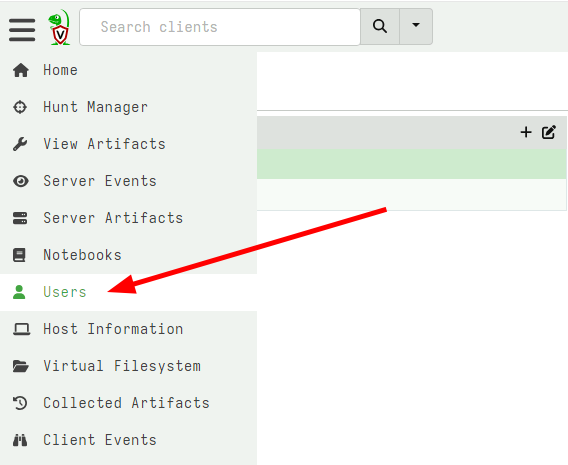
Users and permissions are managed in the GUI’s Users screen (which
is visible to administrators)
Velociraptor offers a number of options to authenticate users into the GUI. The type of authenticator is specified in the GUI.authenticator.type setting. The config wizard supports some basic authenticators but others have to be manually configured.
To make deployment easier the configuration wizard supports creating
Initial Users. These user accounts will be created automatically
when the server starts upon first installation and be given the
administrator role.
This provides a way to bootstrap the administrator into the server. If
the Basic authentication method is specified, the password hashes
and salt will be initialized from the configuration file. For other
authentication methods that do not use passwords, the password hashes
are ignored.
GUI:
  initial_users:
  - name: mic
    password_hash: aa3a779......
    password_salt: f8707a7......
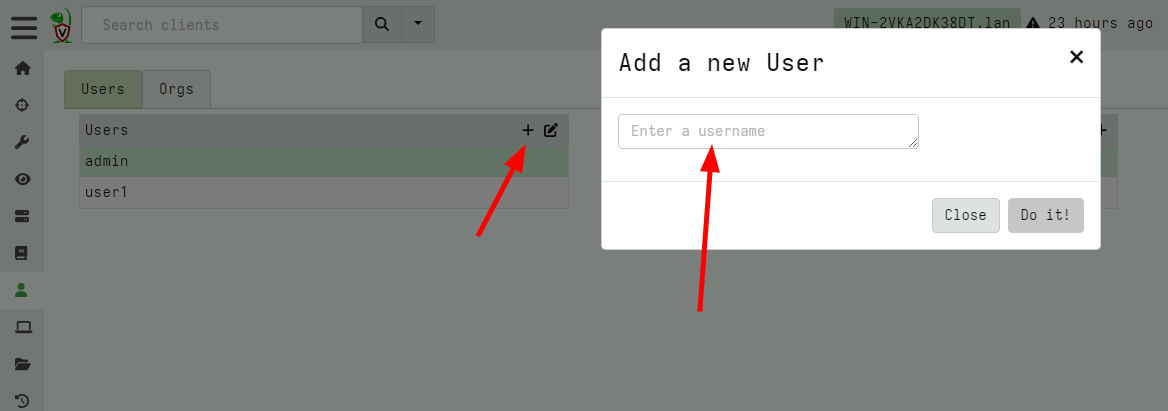
Adding a new user
To add a new user, the GUI can be used by clicking on the + icon and
setting a user name.
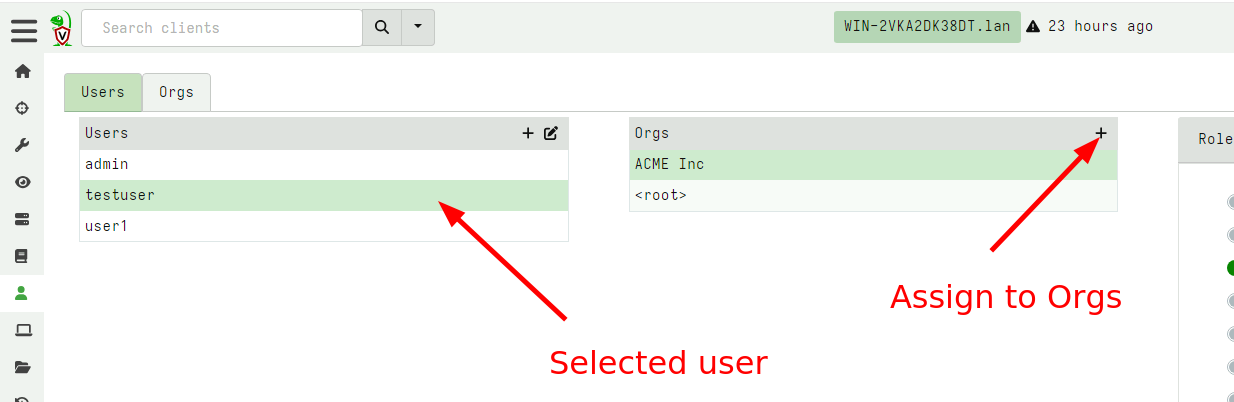
By default the user is added to the selected org with the Read Only
role. You can assign the new user to any number of orgs using the GUI
Roles and permissions
Velociraptor users are assigned various permissions to control their
actions in different Orgs. To make it easier to deal with a group of
permissions, Velociraptor has the concept of a role which can be
thought of as just a predefined set of permissions.
The actual permission check is made against the set of permissions the user has. Assigning a role to a user gives them a set of permissions, but you can also assign permissions separately.
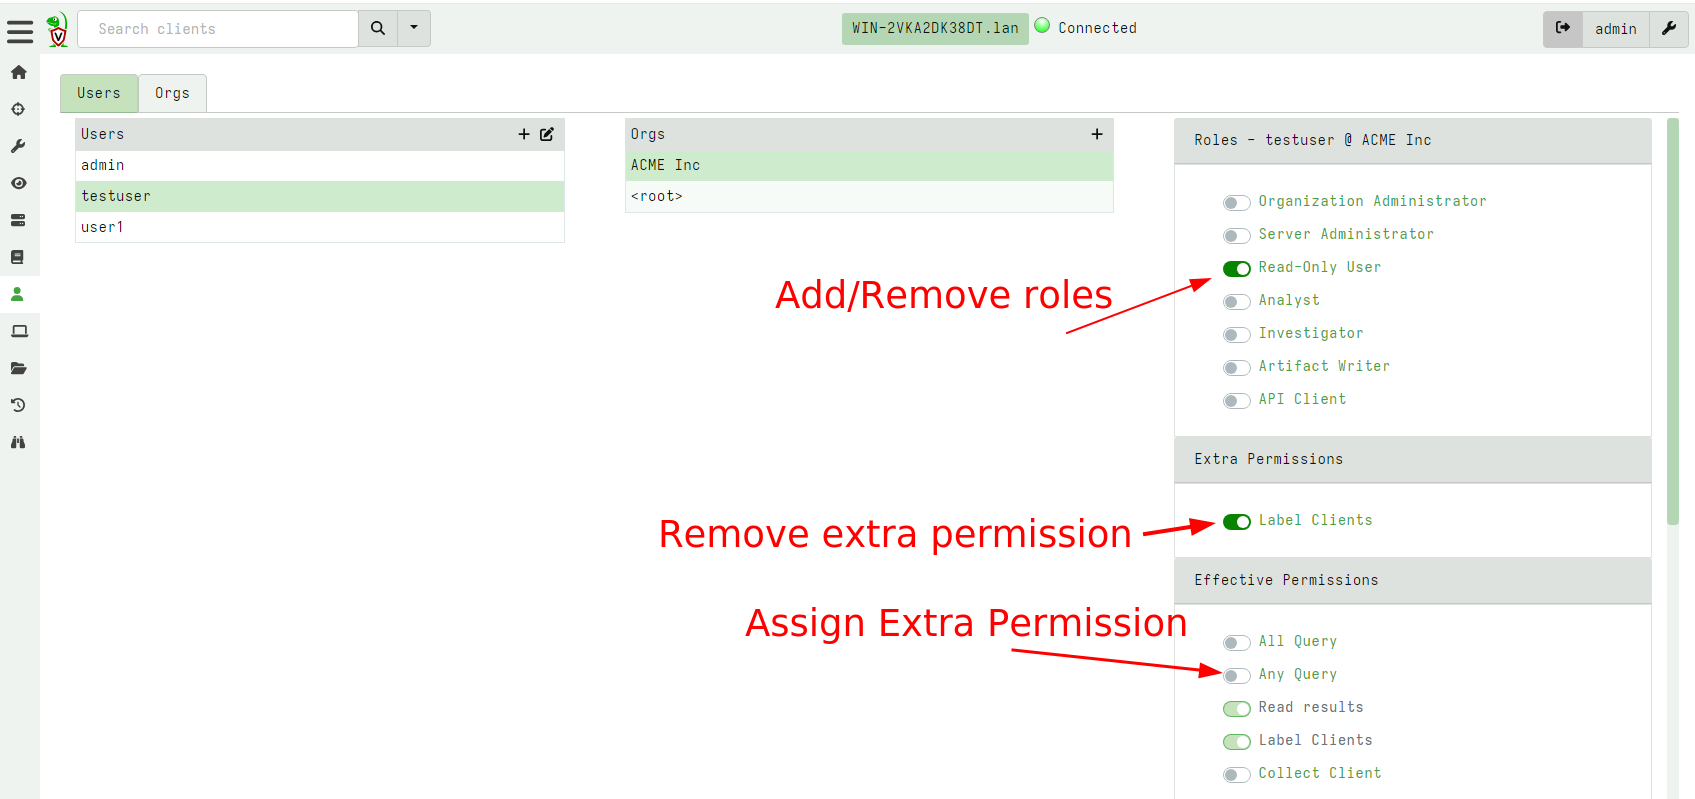
In the above screenshot we see the testuser has the read only role
which allows them to read already collected results from
clients. Additionally we also gave them the Label Clients permission
so they can assign labels to different clients (potentially affecting
their membership in hunts).
User roles and permissions extend far beyond the GUI itself though. Since Velociraptor is really a VQL engine and provides powerful capabilities for automation and post processing via notebooks, the VQL engine itself respects the user’s permissions.
Therefore while the VQL query is executed the user’s permissions are checked against the different VQL plugins and functions, and if the user does not have permissions to run these, the plugin will be prevented from running.
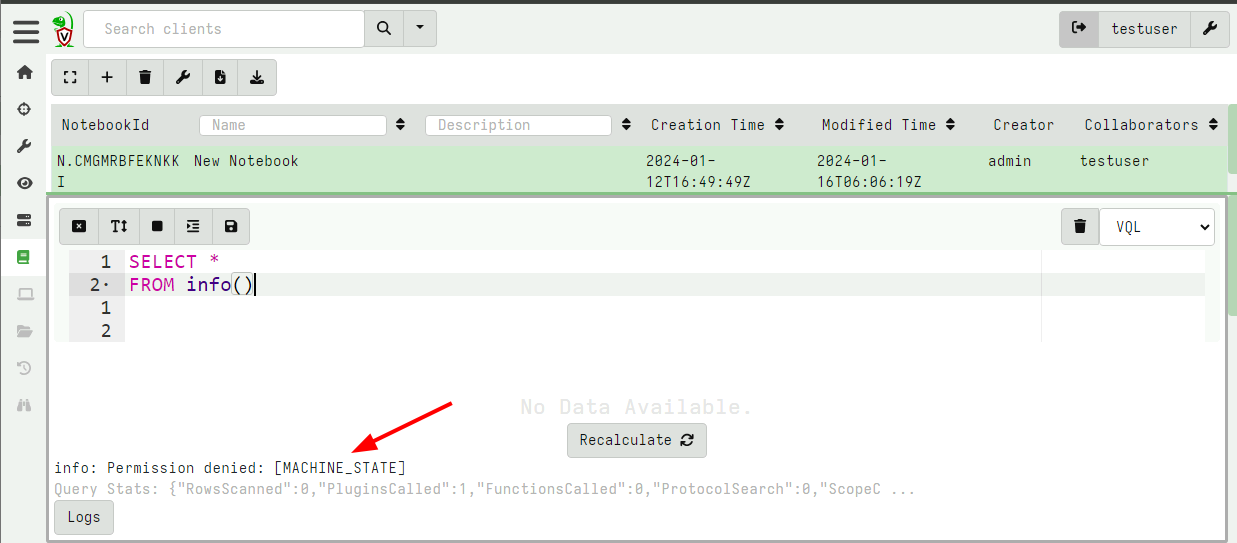
In the above screenshot, the testuser user attempted to run the
SELECT * FROM info() plugin but that plugin requires the
MACHINE_STATE permission (because it inspects properties of the
server like hostname etc). Therefore the plugin will be rejected and
an error log emitted.
However the user may still run other plugins like the hunt_results()
plugin to inspect results (because the user has the read permission).
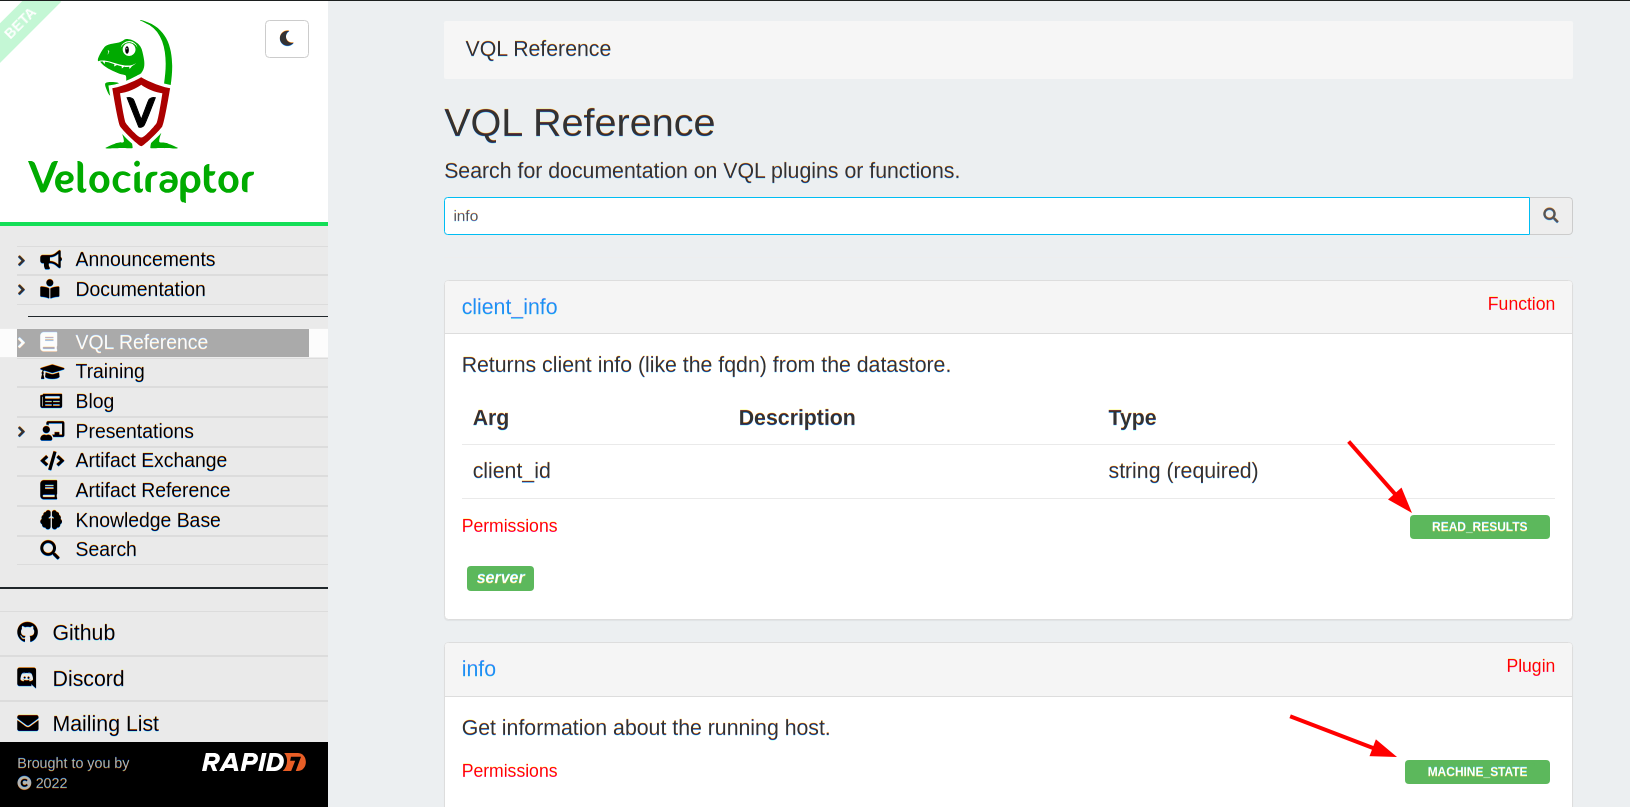
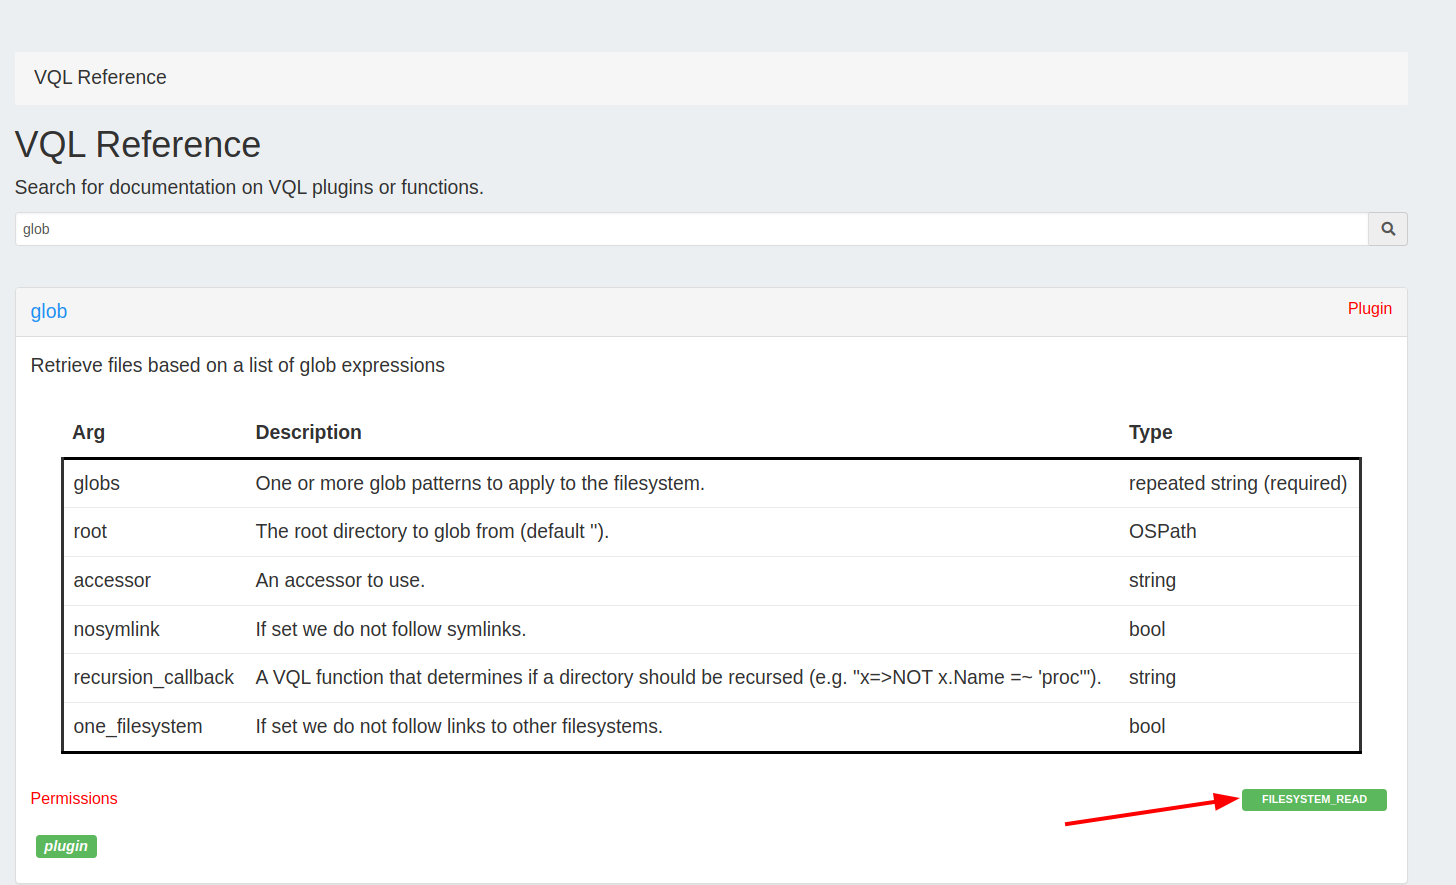
You can check which permission each plugin requires in the reference
site’s VQL Reference section.
Velociraptor’s security model is org scoped. This means that ACLs are
applied at the org level and are not granular to the client/flow
level - if a user has the READ_RESUTS permission (given to any user
who can log into the GUI), then they can read any file within the org,
including all client’s collections, hunts, exports and notebooks.
Similarly, while notebooks can be shared with other users (or marked private) - this is not a security measure it is just for convenience and to clean up the interface, so each user can see only relevant notebooks to them.
Any user that can log into the org (i.e. they have the READ_RESUTS
permission), can read any notebook within the org.
This underlines Velociraptor’s collaborative philosophy - all users assigned to the org are considered trusted. Velociraptor’s threat model does not assume untrusted or rogue users. You should always ensure that user access is protected via SSO, two factor and other best practice tools to ensure that account takeover is unlikely.
While you can have very fine control over the user’s roles and permissions we suggest that you stick to the built in roles and they way they should be used as much as possible.
This is because sometimes there are unexpected escalation paths
between permissions that you might not be aware of. For example,
giving a user the Server Artifact Writer role can easily lead to
privilege escalation as the user can modify an existing server
artifact to run VQL to grant them other roles, and trick an
administrator in running that artifact.
This is why we say that some roles are “Administrator Equivalent” because it is easy to escalate from them to more powerful roles. Typically we try to limit access to trusted users anyway and not rely too much on the user roles.
Velociraptor clients execute VQL queries without per-plugin ACL control, since they have no concept of users or ACLs.
This means that once an artifact is scheduled, it can do anything on the client side. ACL Permissions only apply to the ability to schedule the artifact in the first place.
Any hostile artifact authored into a hunt inherits full client privileges — defense there leans on code review of artifacts.
Auditing User actions
Some actions in the UI (Or in VQL notebooks) are important for server
security. We call these actions Auditable Actions because we want to
report them taking place.
Velociraptor records auditable actions in two ways:
- The Audit log is written to the audit directory
- The Audit event is written to the
Server.Audit.Logsevent artifact.
This allows events to be recorded and also be automatically acted
upon with a server event query using the watch_monitoring() plugin.
You can forward server event logs to a remote syslog server by setting the value in the Logging.remote_syslog_server setting in the config. We recommend this be done to archive audit logs.
However, much more interestingly, Velociraptor treats server audit
events as simply another event query called
Server.Audit.Logs. Therefore you can view it as just another server
event artifact in the GUI.
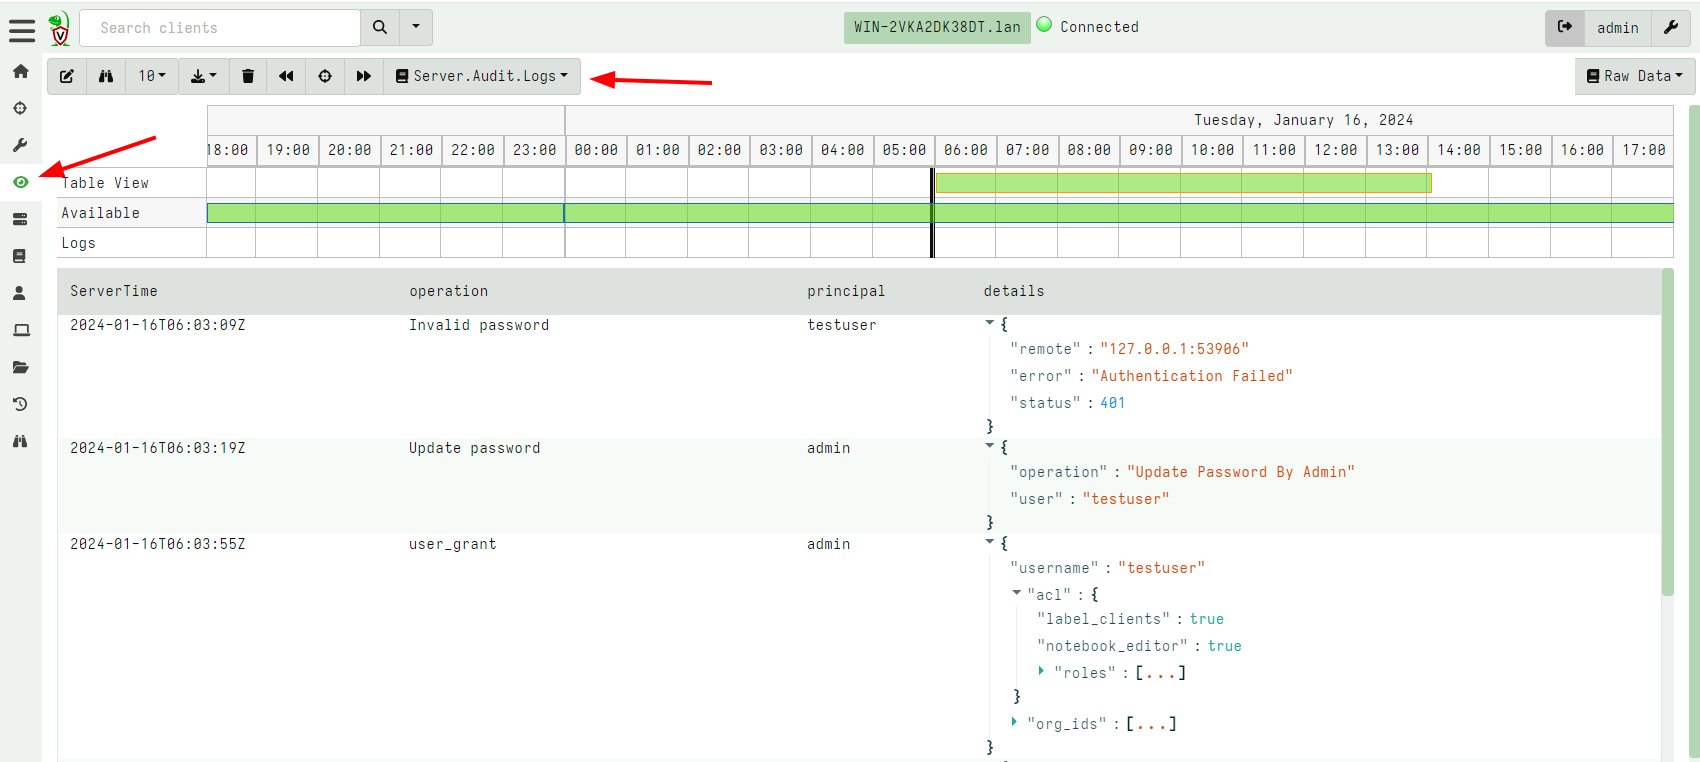
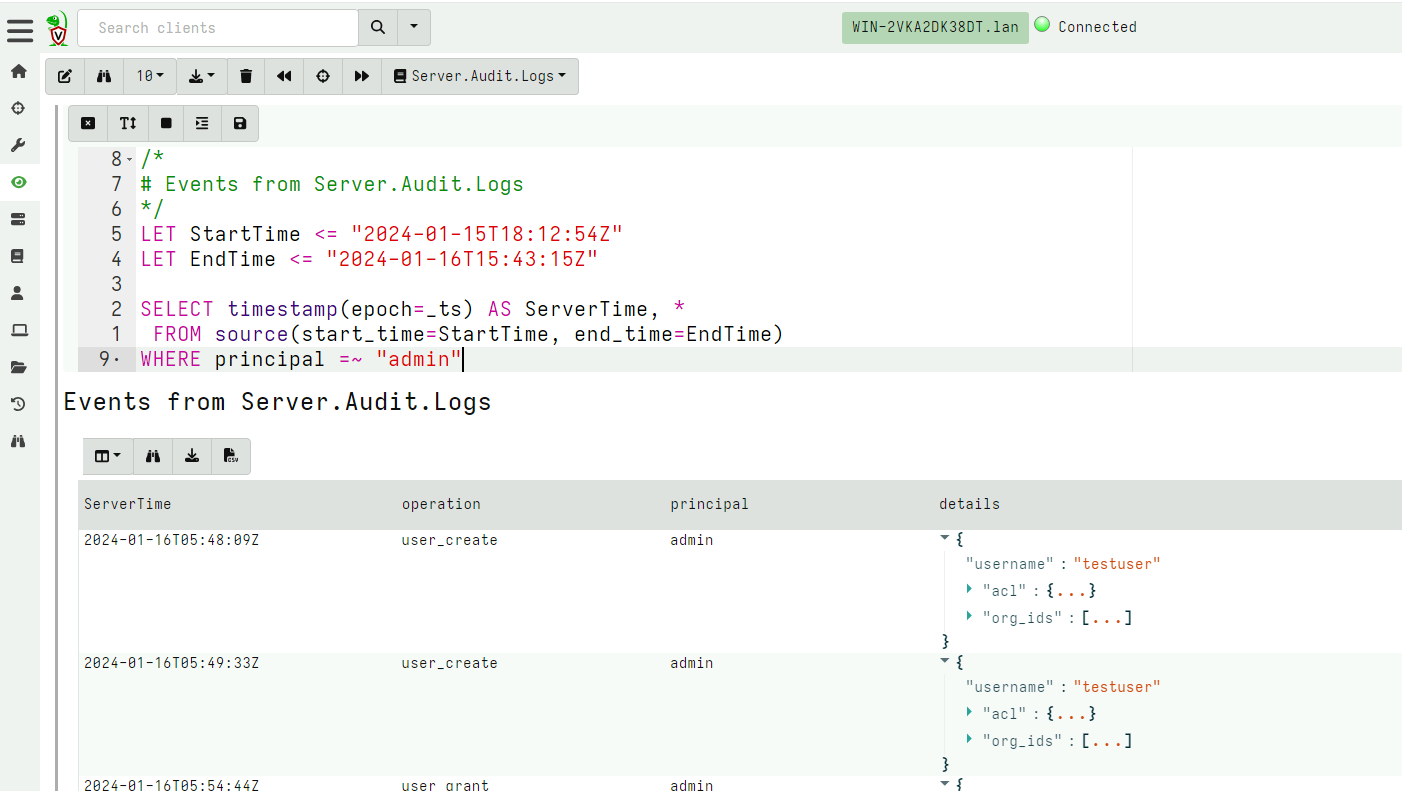
The audit event is divided into fixed fields (ServerTime,
operation and principal) and a variable column details with a
per event data.
By having the data recorded as a timed artifact we can apply filtering etc using the notebook. The below query isolates only administrator actions within the time of interest.
Additionally it is possible to forward audit events to external
systems. For example, Elastic.Events.Upload can forward audit events
to Elastic, while Server.Alerts.Notification can forward these to a
slack channel.
Authenticating the user
Users can be authenticated using a variety of ways, including Active
Directory, Client Certificates, Multi-Factor Authentication
etc. Velociraptor offers a number of different authenticators to
allow flexibility with authenticating users.
Basic Authentication
The simplest authentication is Basic authentication. In this mode,
the GUI requires the user to provide a username and password using the
HTTP Basic Authentication mode. While these credentials are
typically encrypted using HTTPS in transit, basic authentication is
not considered secure and should be avoided because Velociraptor
itself has to manage the passwords.
Velociraptor will store the password hashes and salts in the filestore for each user and verify them on each HTTP request.
When basic authentication is configured, a user can update their own password using the GUI
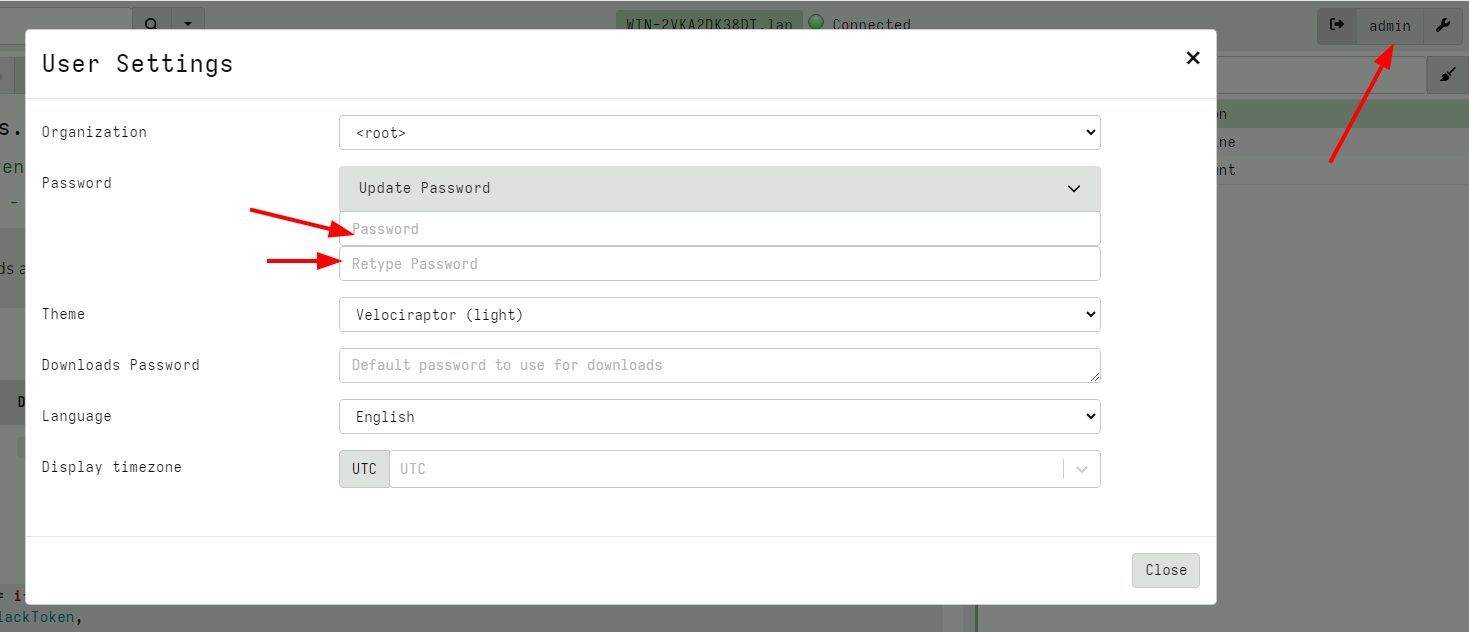
Sometimes administrators need to update another user’s password. This can be done from the user management screen.

Note that password management is supposed to be very simplistic because for production servers we recommend to use an external authentication service (e.g. OIDC)
Passwords enforced through Basic auth are salted and hashed with
SHA‑256 once per HTTP request for speed. Treat this as adequate only
for lab or short-lived evaluation systems; attackers who steal the
hashed credentials from backing storage can brute force common
passwords offline much faster than with dedicated password
hashing. Production deployments, especially internet-exposed fronts,
belong behind OIDC/OAuth2/SAML or another enterprise IdP described
under OAuth2 services.
OAuth2 services
A number of public identity providers are directly supported in Velociraptor and based on OAuth2 protocol.
You can read more about setting up GitHub, Azure and Google as an OAuth2 provider.
Lock down mode
Many users use Velociraptor for incident response purposes and collecting telemetry. While it is convenient to have Velociraptor already deployed and active in the environment, this may increase the risk for misuse when not used for response.
For this purpose Velociraptor has a “lockdown mode”. This mode prevents Velociraptor from performing any active modification to the environment.
This is implemented by denying all users from certain powerful permissions - even if the user is an administrator!
The following permissions are denied while in lockdown mode
ARTIFACT_WRITERSERVER_ARTIFACT_WRITEREXECVESERVER_ADMINFILESYSTEM_WRITEFILESYSTEM_READMACHINE_STATE
After initial deployment and configuration, the administrator can set
the server in lockdown by adding the following configuration directive
to the server.config.yaml and restarting the server:
lockdown: true
Therefore it will still be possible to read existing collections, and continue collecting client monitoring data but not edit artifacts or start new hunts or collections.
During an active IR the server may be taken out of lockdown by removing the directive from the configuration file and restarting the service. Usually the configuration file is only writable by root and the Velociraptor server process is running as a low privilege account which can not write to the config file. This combination makes it difficult for a compromised Velociraptor administrator account to remove the lockdown and use Velociraptor as a lateral movement vehicle.
API client security
Because the API allows external programs to run powerful Velociraptor Query Language (VQL) queries directly on your server, a poorly configured or compromised API client is a major security risk.
IP-based Access Control
By default the API server only listens on 127.0.0.1 - this allows scripts on the local machine to call into the API, but if you want to use an external caller you can change the server’s configuration file by setting the bind_address field under the API section to 0.0.0.0 allowing the API to bind on all interfaces.
See Protecting the API for more information.
Authentication
API clients authenticate using mTLS and their own key, which is issued to them by the built-in CA. This operates independently of the authentication methods you have set up for your users. The API client’s authentication credentials are stored in a plain text file which needs to be tightly guarded, however the keys in such files can be passphrase-secured.
API client certificates are valid for one year, by default. You must reissue them before they expire to avoid breaking your automation pipelines.
Encrypt Private Keys: When generating an API config using
velociraptor config api_client it is possible to set a
password/passphrase to encrypt the private key. This ensures that if
the config file is stolen, it cannot be used without the passphrase.
However, this is not useful for credentials used by automated API
clients because unlocking the key is a user-interactive process. For
interactive API access (for example when using the API client that’s
included in the Velociraptor binary) where the API config might reside
on a laptop, we recommend that you secure the key this way.
Offline CA: For high-security environments, keep your CA private key offline, which usually means keeping an offline copy of the full config with the CA key included in it, while removing the CA key from the config on your production server. This prevents an attacker who gains root on the Velociraptor server from being able to mint their own valid API keys. You can issue new API keys if you have the full offline config - access to the production server is not required, although you will also need to provision the new user on the server and grant it access.
Instant Revocation
If an API key is compromised, or suspected to be compromised, you
don’t need to struggle with complex certificate revocation lists
(CRLs). Simply use the acl grant command to set an empty policy for
that principal.
velociraptor acl grant --name "CompromisedKey" --role ""
This immediately strips all permissions, thus denying that user the ability to make an API calls. Any applications using that API user will need to be configured to use a new account with a new key.
API client accounts can alternatively have their roles and permissions revoked via the User Management screen in the GUI.
Be aware that allowing the user account to exist with no roles assigned is still a risky situation as someone could accidentally grant permissions to it.
To permanently delete the user you can run the user_delete() function in a notebook. There is currently no GUI option to delete a user.
Authorization
The “API Client” (api) role is mandatory for API access. Every
programmatic connection requires the “API Client” role as a baseline .
Without it, even a user with full administrator privileges will be met
with a “permission denied” error when trying to connect via the API
port. Think of it as the “passport” that gets you through the front
door of the API .
In addition, the client also needs permissions (usually assigned via the predefined Roles) to do the things you need it to do.
Apply the Principle of Least Privilege
It is tempting to grant your API clients the administrator role to
“just make it work,” but this is a dangerous shortcut. An API key
with admin rights is effectively root on your entire server.
Instead, evaluate exactly what the script needs to do and choose the appropriate “least privilege” role or permissions set:
- Need to read results for a dashboard? Use the
readerrole. - Need to perform data analysis or post-processing? Use the
analystrole. - Need to trigger specific collections? Use the
investigatorrole.
Beware of “Admin-Equivalent” Permissions
Some permissions are more dangerous than they might appear because they provide a path to full server control:
ARTIFACT_WRITER: This role allows a user to edit artifact definitions. Since VQL runs unrestricted on endpoints, an artifact writer effectively has root access to every client on your network.EXECVE: This permission allows the execution of arbitrary shell commands on clients or the server (subject to additional restrictions that are in place by default). It is typically reserved for administrators because it can be easily misused.FILESYSTEM_WRITE: On the server side, this allows creating files, which can be used to overwrite ACL objects and escalate privileges.
Use Wrapper Artifacts and Impersonation
One of the most elegant ways to manage security is to avoid giving
raw, dangerous permissions to users or API clients. Instead, create a
wrapper artifact. For example, instead of giving a an artifact
EXECVE access to run any command, write a custom artifact
that only runs a specific, safe command
(like ipconfig) with hard-coded
arguments. You can then
mark this artifact as “basic”
and allow a lower-privilege API client to run it.
You can use the impersonation field. This allows an artifact to run with the privileges of a different user (like a “sudo” for VQL), letting a low-privilege API client perform a specific high-privilege task in a controlled, audited environment.
Preventing new client enrollments
By default, new clients can enroll at any time if they have a valid client configuration file. Normally this is what you’d want because you may be using a client distribution method that provides ongoing deployment of new clients.
In some circumstances you may wish to suspend client deployment. For example, if you have decided that all intended clients are deployed and that your deployment phase is over then you may choose to switch to a more strict deployment process to ensure that rogue clients cannot be enrolled. This is unusual but in high-security environments it may be a requirement.
By “rogue client” we mean any client deployed outside of an approved process, regardless of whether the intention is benign or not - it could just be that you want to ensure that the IT department doesn’t accidentally deploy new clients beyond a certain point.
To ensure that no new clients can enroll, you can set the value of the
Frontend.resources.enrollments_per_second
configuration key to -1.
As with all server config changes, this will require a service restart. To reverse this policy you can either remove the config key or comment it out to resume accepting client enrollments.
Protecting stored secrets
Server-side secret
management
keeps API tokens, credentials, and webhook material out of raw
artifacts. At rest the material is encrypted using the key described
by
security.secrets_dek.
If you leave secrets_dek empty, the server falls back to deriving
keying material from the
obfuscation_nonce
(which itself defaults to data tied to the frontend private key
material). Attackers who steal the configuration file alongside the
cipher text can therefore recover the encryption key because both
live in the same configuration bundle. Treat that default as a
convenience for ephemeral labs only.
For hardened deployments:
-
Supply
secrets_dekthrough an indirection such asenv://SENSITIVE_DEKand inject that environment variable from your init system, container orchestrator, or secret manager. -
Consider bootstrapping the daemon with the YAML itself provided through a process environment (for example
VELOCIRAPTOR_CONFIG), then usesecurity.shadowed_env_varsto strip privileged variables from VQL’s view.
Removing plugins from a shared server
While Velociraptor allows user to run arbitrary VQL in notebooks it does control access to the things that the queries can do by applying a user’s ACL token to each plugin.
This means that administrators are typically allowed to run all
plugins, even those that might compromise the server (e.g. the
execve() plugin can run arbitrary shell commands!)
For shared server environments it is better to prevent these plugins from running at all - even for administrators.
Velociraptor allows the configuration file to specify which VQL plugins are allowed using the security.allowed_plugins, security.allowed_functions and security.allowed_accessors
The easiest way to populate these is to answer Yes to Do you want to restrict VQL functionality on the server? in the configuration
wizard. This will implement the default allow
list
(which you can tweak later as required).
If these lists are populated, only the plugins mentioned are allowed
to be registered at all. This results in an error message like Plugin Info Not Found when the plugin is used.
The purpose of this security measure is to completely remove functionality from the server, regardless of the permissions model. It is only needed when the server is shared between potentially untrusted users. Usually you should not implement this because it causes a lot of functionality to randomly break (e.g. any artifacts that might depend on a plugin which is not in the allow list will fail).
Securing VQL
Velociraptor uses VQL extensively in the form of artifacts and notebooks. Since a VQL query can do many potentially dangerous actions, it is important to restrict the type of actions the query can perform based on the user’s ACL token. When the VQL query is started, the user’s ACL token is loaded into the query environment. As the query continues executing, various VQL plugins and functions are evaluated by the VQL engine. VQL plugins and functions may have requirements as to the type of permission required to run. You can see the required permission for each plugin in the VQL reference page.
This mechanism allows lower privilege users to run VQL safely - those actions that require permissions the user does not have will simply be ignored (and a log message emitted).
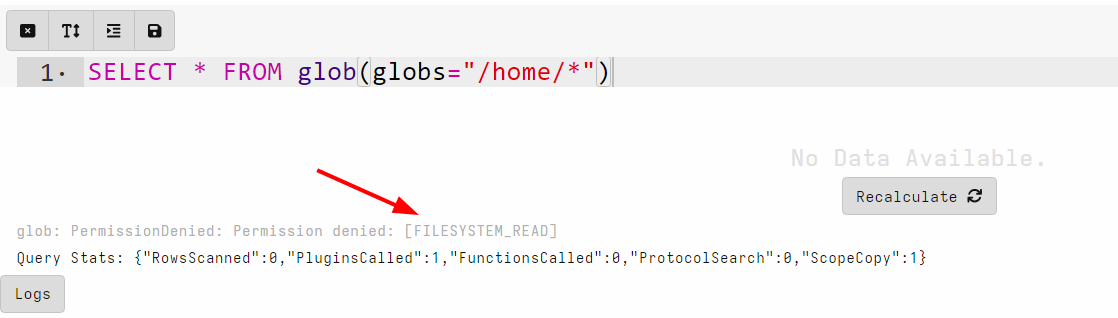
ACL checks are always enforced on the server, for example in notebooks
and server artifacts. A user with the Analystrole, has no
FILESYSTEM_READ permission, and therefore if they tried to run a
glob() based query in a notebook they will be denied.
Controlling access to artifacts
While ACL checks are enforced on the server, on the client all ACL checks are disabled. This means that as long as a user is able to schedule the collection on the client, the collection can do anything at all. This makes sense as we want the VQL to be evaluated the same way regardless of who launched the collection in the first place.
However this may give lower privilege users a lot of power over the entire network. For example the artifact Windows.System.PowerShell allows running arbitrary shell commands on the endpoint. While this is a useful capability in limited situations it may lead to severe compromise if misused!
Velociraptor allows for an artifact to specify the
required_permissions field.
name: Windows.System.PowerShell
description: |
  This artifact allows running arbitrary commands through the system
    powershell.
  ....
required_permissions:
  - EXECVE
This field specifies that the server check the user has all of the
required permissions before the server allows the artifact to be
scheduled. If a user with the Investigator role tries to launch this
artifact, they will be denied (since the usually lack the EXECVE
permission)

Typically we set the required_permissions field on client artifacts
that can do dangerous things if misused. In particular, if the
artifact parameter can specify running arbitrary code.
The required_permissions check is only done on the artifact being
launched. It does not apply to any dependent artifacts called from the
launched artifact. This is deliberate as it allows you to create
curated safe versions of the dangerous artifacts to be used by lower
privilege users. For example, while Windows.System.PowerShell
requires an EXECVE permission because its parameter allows arbitrary
commands to run, we can wrap it with a safe version:
name: Custom.SafePowershellDir
sources:
  - query: |
        SELECT * FROM Artifact.Windows.System.PowerShell(Command="dir C:/")
This artifact can not be misused because the command passed to
Windows.System.PowerShell is a fixed string and can not be changed
by the user that initiates the collection.
Managing org access
Velociraptor provides ACL separation to users based on an org (or tenant) model. This means the same user may have different ACLs in different orgs - they may only have read access in one org and full admin access in another org.
While this is convenient, it is not enough to provide complete separation to untrusted users.
If an untrusted user has access to one org but does not have access to another, there are multiple ways which allow the user to read/modify data in the other org:
Shelling out
By default, users have access to the execve() plugin providing they
have the EXECVE permission (normally given to administrators). This
allows an administrator in one org to run arbitrary code on the
server - which may allow them to just read the file store of another
org.
You may disable the execve() plugin using the configuration
file
security:
  denied_plugins:
      - execve
Accessing files from VQL
Velociraptor’s data ultimately lives within the datastore directory on disk. Although Velociraptor’s ACL system controls access to high level objects like flows, secrets and client, VQL queries may simply bypass these controls entirely by reading the data directly from disk.
Users may run queries in notebooks or server artifacts, that can reach these files via two different accessors:
| Accessor | Typical use | Controlled by |
|---|---|---|
file |
Native OS paths on the server host | security.denied_file_accessor_prefix, security.allowed_file_accessor_prefix |
fs |
Logical Velociraptor paths (notebooks, flows, hunts, uploads, secrets area, …) | security.denied_fs_accessor_prefix, security.allowed_fs_accessor_prefix |
Prefixes for one accessor never apply to the other: use the
_file_accessor_ keys to control access via the file accessor and
_fs_accessor_ keys to control access via the fs accessor.
To test your settings, an Administrator can probe the datastore from a notebook via these queries:
SELECT * FROM glob(globs="/**", accessor="file")
SELECT * FROM glob(globs="/*", accessor="fs")
The prefixes which are filtered out will be removed from the
output. Note that using the fs accessor additionally requires
SERVER_ADMIN - the above filtering occurs in addition to this
requirement.
By default, the fs accessor is denied access to some filestore
prefixes,
which are considered sensitive.
However, Velociraptor’s ACL policies are such that any user with the
READ_RESULTS permission, is able to real any client’s data
within the same org (See the discussion above ).
Because org directories sit on filesystem paths, whoever has
unrestricted access to file() can pivot around GUI ACL
boundaries. Example:
SELECT * FROM glob(globs="/opt/velociraptor/orgs/**", accessor="file")
In the default configuration, no restrictions are imposed on the
file accessor to allow users to access any file on the server’s
filesystem (for example for post processing, run external tools etc).
Tune
security.denied_file_accessor_prefix
for your mounting layout—for example blocking the datastore root plus
global pseudo filesystems (/proc/, /sys/).
security:
  denied_file_accessor_prefix:
      - /opt/velociraptor/
      - /etc/
      - /proc/
- If only the allowed set is specified, Velociraptor denies any prefix outside the allowed set
- If only the denied set is specified, Velociraptor denies any prefix within the denied set, but allow other prefixes.
- If both are specified, then Velociraptor will deny any files within the denied set, unless they also match the allowed set.
Other accessors (ext4, ntfs, raw disk plugins, archive mounts, …)
might still expose underlying blocks when the daemon runs with root
privileges. Continuing to run Velociraptor on Linux as a dedicated
low-privilege user is the recommended setting to avoid risks in
accessing the disk directly to bypass ACLs and denied paths.
The VQL http_client() plugin understands URLs like
/var/run/docker.sock:unix/v1/version, which relays HTTP traffic
over local Unix domain sockets. This is useful to communicate with some servers (e.g. Docker).
However, this may also pose a risk on shared
environments. Administrators who can run unrestricted notebook queries
(and hold the required NETWORK permission) therefore interact
directly with anything listening on a socket—for example orchestration
APIs commonly reachable through /run/docker.sock,
/run/podman/podman.sock, or
/run/containerd/containerd.sock.
To harden access to the http_client() plugin, consider the
approaches described above: artifact curated
permissions, removing
plugins,
security.denied_plugins,
security.vql_must_use_secrets,
and tight role hygiene so only trusted principals ever obtain those
capabilities.
In summary, although it is possible to restrict user access to different orgs this should be considered best effort. Much thought is required to truly isolate an untrusted user to some orgs, preventing access to other orgs. The recommendation is to avoid giving untrusted and potentially malicious users to the Velociraptor GUI at all.
If you require true data isolation between orgs, we recommend to spin up a separate Velociraptor instance (Virtual Machine or container) for each unique deployment.
Accessing process Environment from VQL
The VQL environ() plugin provides access to server’s environment
strings. In many environments these contains sensitive secrets. For
example, Velociraptor’s configuration file (which contains private
keys) may be injected via the VELOCIRAPTOR_CONFIG environment
variable into a container. In some deployments, environment variables
may also contain sensitive information like S3 access token and other
API tokens.
To access environment variables, the calling user needs the
MACHINE_STATE permission (normally only given to the administrator
role).
For secure deployments you should also add other sensitive environment
variables to the
security.shadowed_env_vars
configuration (Velociraptor’s own environment variables are
automatically added already).
The root org
The root org is more privileged than other orgs. Giving a user access to this org allows them to affect other orgs. For example, any custom artifact created in the root org will be visible to all other orgs.
You should only give trusted users access to the root org.