Working With Offline Collection Data
As described previously, the offline collector writes it’s results into a zip archive and optionally applies encryption to it. We technically refer to this as a collection container because the data contained in the zip is structured in a particular way that Velociraptor expects, and which includes metadata about the collection that Velociraptor understands. This standardized data structure allows Velociraptor to import the data from it, while making use of the associated metadata when importing.
Collection containers are also used when exporting collections or hunts from the server. So the same data format that the offline collector uses can also be used to transfer data from one server to another, for example to copy/replicate data in testing or training environment, or as a storage format for data backups.
As explained in Collection Security, when collections are secured they are double-zipped. This is done to prevent snooping on the collection filenames because the ZIP standard has the shortcoming of allowing file listing even for protected zips. So we add an outer zip on which we apply the encryption, which means that a file listing only allows potential attackers to see the file name of the inner zip - not the names of any files in the collection itself.
Verifying the integrity of collection containers
The offline collector creates a log file on the endpoint alongside the
collection container zip. In the final few lines of this log it records the
SHA-256 hash for the file with the message Container hash.
After transporting the container, you can verify this hash using sha256sum (on
Linux) or many other tools depending on your platform.
Collection container internal structure
Here is an example of the internal structure of a typical (unsecured) collection container:
$ unzip -l Collection-WIN-SJE0CKQO83P_lan-2024-11-05T17_45_36Z.zip
Archive:  Collection-WIN-SJE0CKQO83P_lan-2024-11-05T17_45_36Z.zip
Length      Date    Time    Name
---------  ---------- -----   ----
       32  2024-10-15 16:16   uploads/ntfs/%5C%5C.%5CC%3A/$Extend/$UsnJrnl%3A$Max
     8192  2024-10-15 17:12   uploads/ntfs/%5C%5C.%5CC%3A/$Boot
  1048576  2024-10-15 17:12   uploads/ntfs/%5C%5C.%5CC%3A/$Extend/$RmMetadata/$TxfLog/$Tops%3A$T
     1152  2021-05-08 18:15   uploads/auto/C%3A/ProgramData/Microsoft/Windows/Start Menu/Programs/Server Manager.lnk
     1190  2024-10-15 00:06   uploads/auto/C%3A/ProgramData/Microsoft/Windows/Start Menu/Programs/Azure Arc Setup.lnk
     2349  2021-05-08 18:15   uploads/auto/C%3A/ProgramData/Microsoft/Windows/Start Menu/Programs/Immersive Control Panel.lnk
...
     3256  1980-00-00 00:00   results/Windows.KapeFiles.Targets%2FAll File Metadata.json.index
   137590  1980-00-00 00:00   results/Windows.KapeFiles.Targets%2FAll File Metadata.json
     3256  1980-00-00 00:00   results/Windows.KapeFiles.Targets%2FUploads.json.index
   222960  1980-00-00 00:00   results/Windows.KapeFiles.Targets%2FUploads.json
     6192  1980-00-00 00:00   log.json.index
   175374  1980-00-00 00:00   log.json
      910  2024-11-06 03:46   collection_context.json
   280433  2024-11-06 03:46   requests.json
      813  2024-11-06 03:46   client_info.json
     3448  1980-00-00 00:00   uploads.json.index
   154136  1980-00-00 00:00   uploads.json
---------                     -------
776656838                     442 files
We can observe the following:
- The files collected using the
ntfsaccessor are stored in the prefixuploads/ntfs/. - Since those NTFS paths contain device names (with backslashes) that can not
appear in a Windows filename, Velociraptor will escape the backslashes (So
\\.C:becomes%5C%5C.%5CC%3A). If you also collect files fromVSSthey will be shown with the VSS device name escaped. - Files acquired using the
autoaccessor are stored with a prefix isuploads/auto/. Those filenames usually start with the drive name e.g.C:which has a:character. This is not usually allowed in a windows filename, so the character is escaped intoC%3A. - You can see that some of the files do retain the ZIP timestamp - this is done on a best effort basis as ZIP can only represent one timestamp with a second resolution.
- The preserved file metadata is stored in the
resultsfolder.
Let’s examine the metadata from the above example:
$ unzip -p Collection-WIN-SJE0CKQO83P_lan-2024-11-05T17_45_36Z.zip 'results/Windows.KapeFiles.Targets%2FUploads.json' | head -50 | tail -2
{
    "CopiedOnTimestamp": 1730828739,
    "SourceFile": "C:\\Users\\Default\\NTUSER.DAT",
    "DestinationFile": "C:\\Users\\Default\\NTUSER.DAT",
    "FileSize": 262144,
    "SourceFileSha256": "e05793b7ad9bb379514dcb59e778daeb76660cd19a009ee1d8d0dbcd4ed25de0",
    "Created": "2021-05-08T08:06:51.7462883Z",
    "Changed": "2024-10-14T15:32:30.3560316Z",
    "Modified": "2024-10-14T15:32:30.3560316Z",
    "LastAccessed": "2024-10-14T15:32:30.3560316Z",
    "_Source": "Generic.Collectors.File/Uploads"
}
{
    "CopiedOnTimestamp": 1730828739,
    "SourceFile": "C:\\Windows\\System32\\winevt\\Logs\\HardwareEvents.evtx",
    "DestinationFile": "C:\\Windows\\System32\\winevt\\Logs\\HardwareEvents.evtx",
    "FileSize": 69632,
    "SourceFileSha256": "f5f9e97a6b1ec8d46a9bd5b9d4ccae96521b85517b0337b248814d2e974a968b",
    "Created": "2024-10-15T06:16:46.6761566Z",
    "Changed": "2024-10-15T06:17:06.4886135Z",
    "Modified": "2024-10-15T06:17:06.4886135Z",
    "LastAccessed": "2024-10-15T06:17:06.4886135Z",
    "_Source": "Generic.Collectors.File/Uploads"
}
As you can see, the metadata contains the exact filenames as seen on the originating system, all the filesystem timestamps and the hashes of the files.
Because the container format is a ZIP file there are some caveats about the way files are stored within it:
-
To enhance compatibility certain characters are escaped from a filename. For example, Velociraptor supports any form of paths but windows paths such as
\\.\C:representing a device are not supported in a zip file (because they can not be extracted properly on windows).Therefore Velociraptor will escape these paths inside the ZIP file.
-
Some other programs try to preserve the timestamps of the acquired files inside the ZIP file. This is problematic because the ZIP format only supports storing one timestamp at a resolution of 1 second.
Velociraptor instead relies on timestamps being stored in JSON metadata files written to the collection container, and does not attempt to use timestamps in the ZIP file itself to replicate the timestamps on the originating filesystem.
To import or not to import?
Velociraptor collections typically consist primarily of JSON-formatted results from queries run on the endpoint. Copied files are a secondary option and most collections don’t copy files from the endpoint unless there is a compelling reason to do so. Offline collectors are no different to an online client, other than being preconfigured to run certain artifacts and return the results without a network connection to the server.

Importing a collection is the normal process to use when the collection contains the results from all the artifacts that you needed to collect on the endpoint.
What happens during import?
- Velociraptor creates a “virtual” client (i.e. a new client in the datastore).
- It copies the collection results from the container to this new client. This collection is identical to how it would appear if it was collected by a live client.
- File included in the collection are copied into the server’s datastore. These files are assumed to be included for preservation purposes – they are usually not used as the basis for further analysis.
File parsing is usually done on the endpoint, so that after importing you would have the parsed data imported to your server, which is what we normally work with in subsequent server-based VQL queries.
If the offline collection is planned well then the collection container will consist mainly of artifact results (in JSON format), and it may also include some files for preservation purposes. In that case importing the collection makes perfect sense, since you can then work with the imported data as if it had come from a network-connected client.
What if I collected files instead of parsing them on the endpoint?
Sometimes you might not have run all the artifacts that you needed to run on the endpoint. With offline collectors you often don’t get the chance to run any further collections - and even if you could, this would require building more offline collectors and going through a potentially arduous process to run them.
However, iteratively querying file-based data sources is often necessary during an investigation, while offline collectors usually represent a one-shot approach to collection. In those circumstances the files copied by the offline collector could be all you have to work with, so there are a few alternatives to consider for “post-processing” those files, which we’ll explain below.
Emulating the source filesystem using remapping
If you want to run additional artifacts on files included in an offline collection, you can try to make the best of the situation by emulating the filesystem of the endpoint using only the files stored in the collection container. This allows us to run additional artifacts against the copied files.
Using Velociraptor’s remapping feature, we can emulate the original filesystem after importing the collection data, or we could do it without even importing the data.
However this has inherent limitations. In particular it is not ideal because:
- you only have access to files, whereas on an endpoint you have access to the operating system plus the filesystem.
- many Velociraptor artifacts rely on data other than files, so you also need to take that into account when selecting which artifacts to run.
- the collection container very likely only contains a subset of the files from the original filesystem, so it’s possible that some artifacts may not find the files that they expect to be present.
- artifacts that use external tools cannot be used on files stored in the server’s datastore, since the remapping only applies to VQL queries. Tools will be unaware of the remapping and will be unable to find the files.
There are two ways to run artifacts on files copied by an offline collector:
-
Run artifacts on the collected files without importing the collection
You can use the method described in Dead disk analysis on a collection container. This gives you a full client against which you can interactively run further collections. There is a bit of setup required so it’s not quite as easy as importing and then running collections against the imported files, although it has the advantage of being more intuitive and familiar because you’ll be able to run collections interactively against a live client which is impersonating the original endpoint.
-
Run artifacts on the collected files after importing the collection
You can use the method described in Working with imported files. Unlike the previously described option, this doesn’t have any setup steps other than importing the collection. The remapping is generated and applied to a notebook cell’s scope using VQL, along with running the chosen artifacts. While this is still easy to do, it requires a solid understanding of VQL and uses a workflow that’s very different from using an interactive client in the GUI. So it’s generally less intuitive than the previous method, especially for novice users. For expert users this method may be preferred because it’s simpler to automate and doesn’t require spinning up any separate clients.
Why not both?
You could of course use a combination of these methods. Your choice will depend on:
- what’s contained in your offline collection container (mainly copied files or mainly parsed JSON results?),
- the type of analysis you need to run on the copied files (for example, an additional query against a single registry hive may not justify running a separate client),
- your level of VQL experience and preferred process (for example, if you need to post-process files in thousands of collection containers then running a separate client might not be as practical as repeating the same VQL in a notebook),
- and possibly other factors.
Working with External Tools
External tools cannot directly access files stored in the server’s datastore or the collection container when using remapping.
If you need to run external tools against the collected files then you can either:
-
Extract the container: Use the
velociraptor unzipcommand or external unzip tools to extract the files. -
Mount the container with FUSE: Use Velociraptor’s built-in FUSE utility (on Linux only) to mount the container and provide access to it’s file contents.
These options are also applicable if you want to work with the collection’s JSON results in external programs
Importing collections into the Velociraptor server
Offline collections are typically much larger than web browser uploads will allow, which is why we do not have a GUI facility to upload the collection zip file into the server. So you will need to use an appropriate transfer mechanism (such as SFTP or SCP) to upload the files to the server before importing them.
Most often we use the Server.Utils.ImportCollection artifact to import a
collection container, but this is essentially just a convenience wrapper around
the import_collection
VQL function. If you need to perform a bulk import of many collections then it’s
easy to
automate that process
using VQL in either a notebook or a server artifact.
Auto-decryption of containers
The Velociraptor server can automatically decrypt offline collection containers
when importing if they were encrypted with the server’s certificate. This
applies when importing via the GUI using the abovementioned artifact, or when
using your own VQL. The import_collection() function always tries to decrypt
the zip using the server’s key before importing. This auto-decryption is
possible because the function has access to the corresponding private key (if
the user running it has the necessary permissions) which it uses to decrypt the
randomly-generated encrypted password, which in turn is used to access the zip
contents.
Client matching during import
Offline collectors extract a unique HostID from the operating system and store
this in the offline collection data. This ID is expected to remain constant over
the lifetime of the operating system. When offline collections are imported into
the server, this ID is used to construct the unique Velociraptor client_id -
if you don’t specified one during the import. This means that separate
collections created on the same endpoint will be automatically associated with
the same “virtual client” in the server’s datastore (unless you manually specify
a different client_id for each import for some odd reason).
If the collection you’re importing comes from an existing client (real or
“virtual”), then the server tries to match the hostname contained in the
collection zip with an existing client record. This attempts to match imports to
existing client records. It’s not perfect under all scenarios - for example it’s
possible for separate endpoints to have the same hostname in the real world -
but most of the time it should work. If you need to be absolutely sure about
import matching the right client_id then you should specify it instead of
relying on the “auto” option.
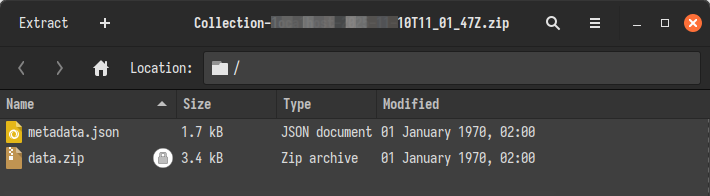
To summarize, the import process performs the following actions:
-
Inspects the zip file from a path specified on the server. Reads the
metadata.jsonfile, if present, to determine the encryption scheme and extract the encrypted password. -
Decrypts the password if possible and then uses the password to unlock the
data.zipinner container. -
Creates a “virtual client” (that is, a Velociraptor client record) if one matching the hostname in the collection data does not exist.
-
Imports the collection data into the server datastore and associates it with the client.
In the client’s Collected Artifacts view, the imported collections are indistinguishable from those that were collected from a regular “online” client. The collections and their data will then be available to any VQL queries run from notebooks, server_artifacts or API queries, the same as with any other clients.
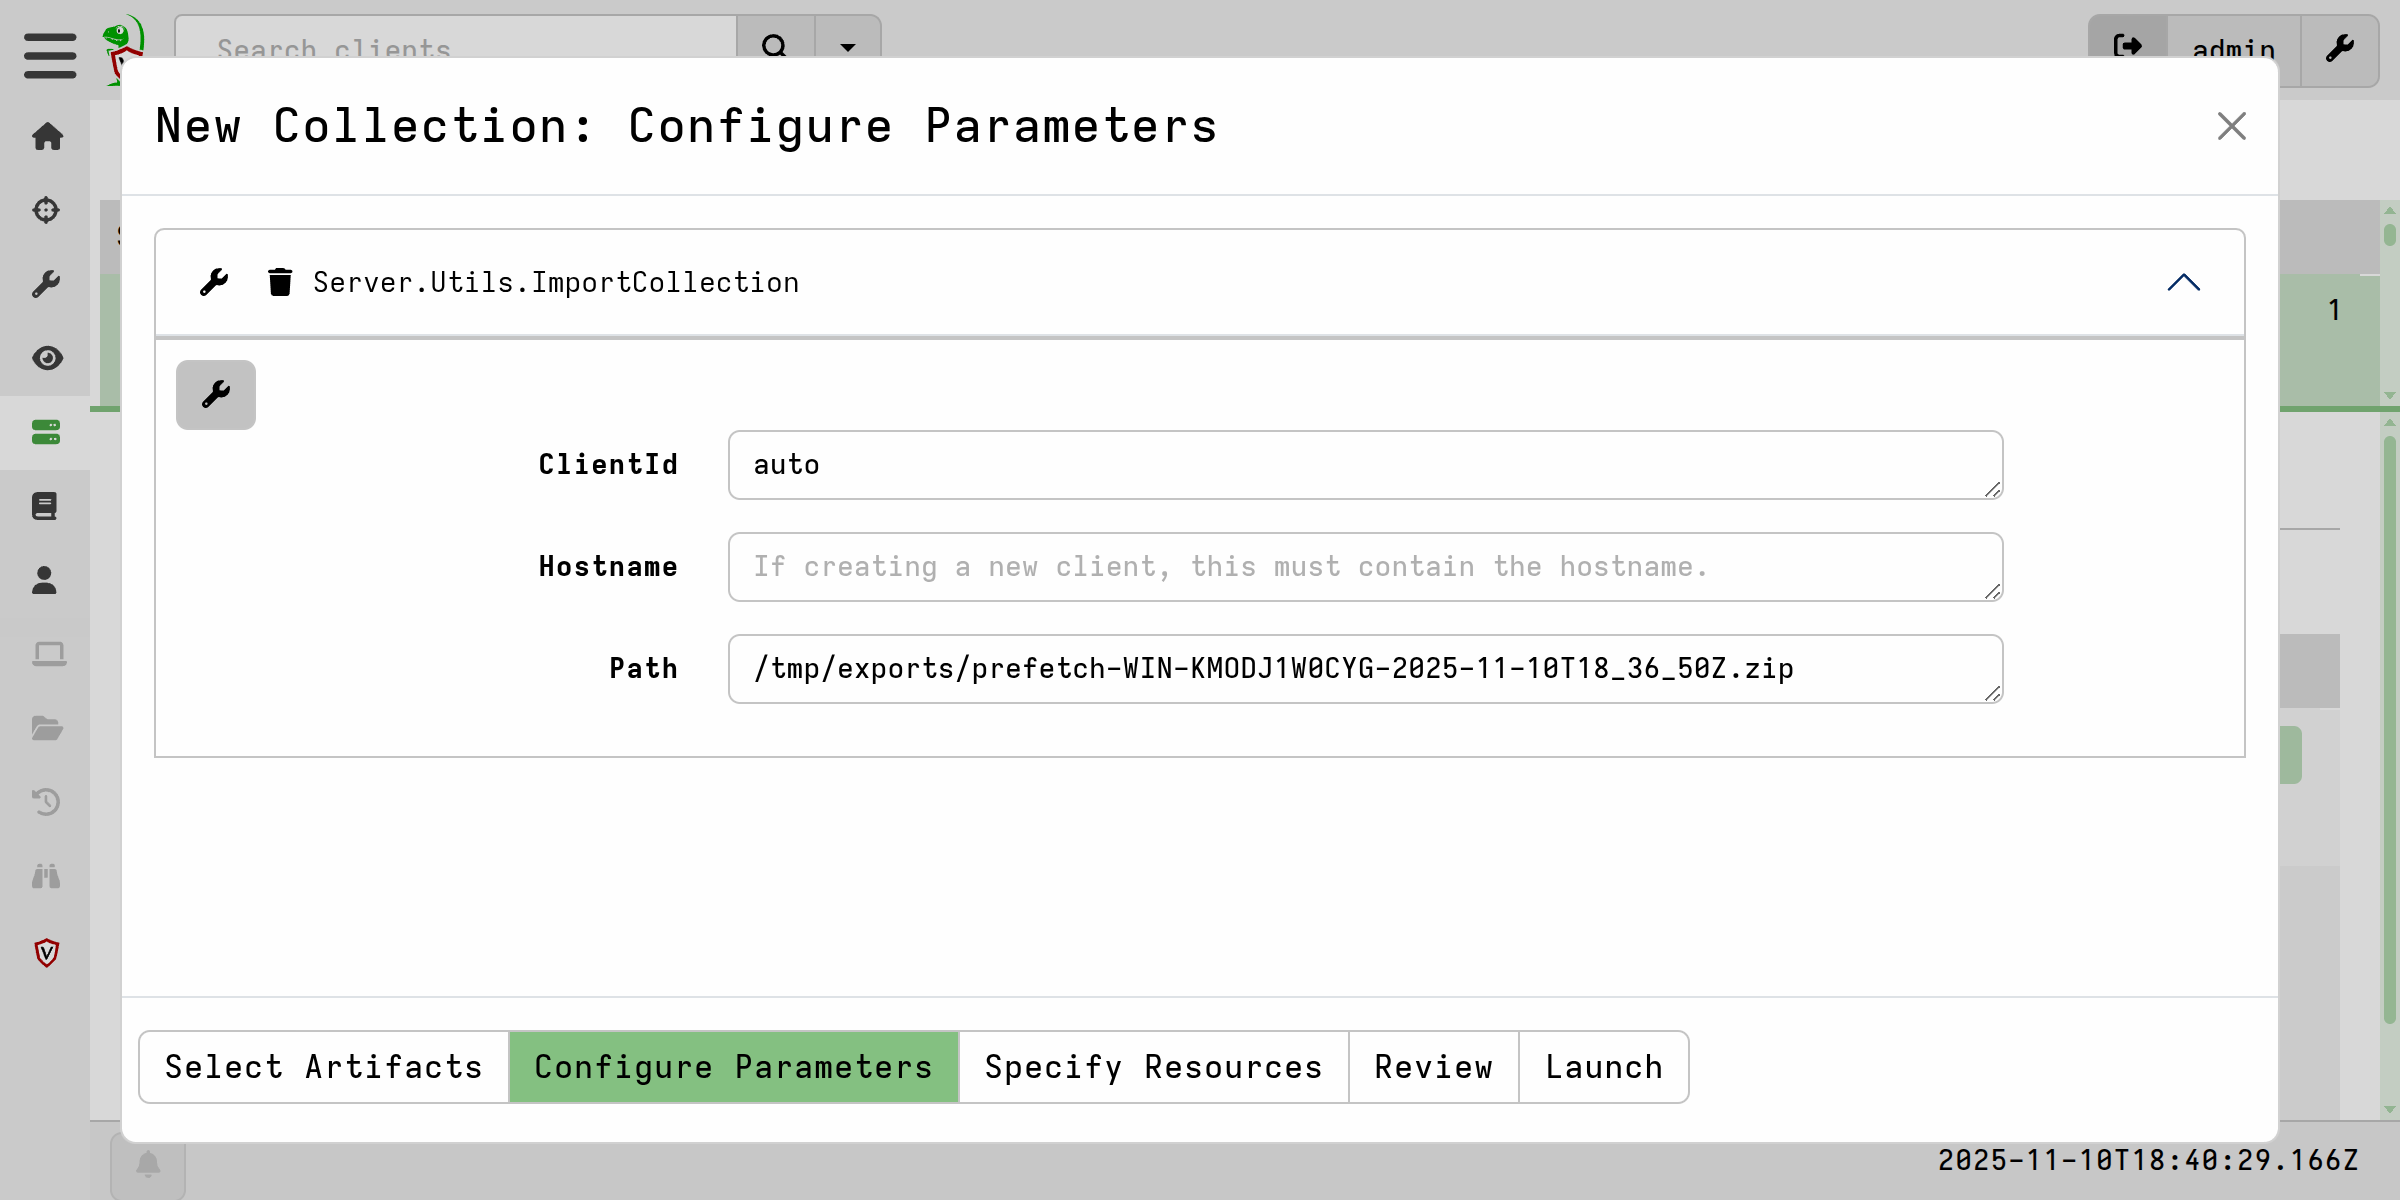
Importing using Server.Utils.ImportCollection
The Server.Utils.ImportCollection artifact is the most common way to import
collections. It caters for collection containers that are either protected using
the server’s X.509 certificate or that are unprotected. Currently this artifact
does not support importing collection containers that are secured by PGP, X.509
certs other than the server’s cert, or fixed passwords. However import of
collections secured by these other security schemes are supported using
alternative methods
described below.
Alternatively, if you want to use the Server.Utils.ImportCollection server
artifact to import a collection container that’s been secured using a fixed
password, a PGP certificate, or an X.509 other than your server’s certificate
then you’ll need to first
manually extract
the inner zip (data.zip) from the protected outer zip, and then import that.

You can then click on the Client ID to go to that client’s Collected Artifacts screen and there you will find the collections presented exactly as they would be for any “online” client.
Importing via a notebook
The import_collection VQL function can be used from a notebook or custom server artifact, if you want to implement additional logic relating to the import. For example, you may want to automate the import of many collection containers.
X.509 encryption using the server’s certificate
For collection containers that are secured with the server’s X.509 certificate
or that are unprotected, the import can be done in a notebook without any
additional steps. This is a straightforward use of the import_collection() VQL
function.
Example
SELECT import_collection(filename="/path/to/zips/Collection-WIN-KMODJ1W0CYG-2025-11-10T20_11_40Z.zip")
FROM scope()
PGP, non-server X.509 cert, or fixed password
For collection containers that use these protection schemes there is an
additional step required. We can only import these if we also provide the
import_collection function with the password. So the extra step is obtaining
that password.
Fixed password scheme
For the fixed password scheme that’s easy because you set the password when
you created the collector. If you can’t remember it, you can go find it in the
Server.Utils.CreateCollector collection that created the collector, or if you
have access to the collector binary you can use the config show command since
the embedded config contains the password in clear text.
When the import_collection function is run it checks for a variable in the
scope named ZIP_PASSWORDS which it expects to contain the password as a
string.
Example
In this example we set the password to “infected” when we created the collector. Before importing we set the variable in the local scope.
LET ZIP_PASSWORDS <= "infected"
SELECT import_collection(filename="/path/to/zips/Collection-WIN-KMODJ1W0CYG-2025-11-10T18_36_27Z.zip")
FROM scope()
PGP or X.509 (non-server cert) encryption schemes
If you chose to encrypt the collection container with a PGP certificate or an X.509 cert other than the server’s cert, then you need to first decrypt the encrypted zip password as an additional step. This can be done using external tools, or in a Velociraptor notebook, which is the process we describe here.
The collection container will contain a file at the top level named
metadata.json. This file contains the encrypted version of the zip password in
the field named EncryptedPass. To decrypt this string we also need the private
key that corresponds to the PublicKey which was used to encrypt it. The public
key is also provided in the metadata.json file, in case you need to be
reminded which one was used.
In a notebook we can use the pk_decrypt VQL function to decrypt the encrypted zip password. Note that Velociraptor does not support passphrase-protected private keys.
Example
LET PrivKey <= '''
-----BEGIN RSA PRIVATE KEY-----

...

-----END RSA PRIVATE KEY-----
'''

LET EncryptedPass <= base64decode(string="HmvxVDBNdjlC8dn ... pqBvigeqpG5o3Kew==")

SELECT str(str=pk_decrypt(data=EncryptedPass, private_key=PrivKey, scheme="rsa")) AS Password
FROM scope()
Note that in the above we used scheme="rsa" for the X509 scheme, but to
decrypt PGP you would use scheme="pgp" instead.
For this example the notebook provides the decrypted password like this:
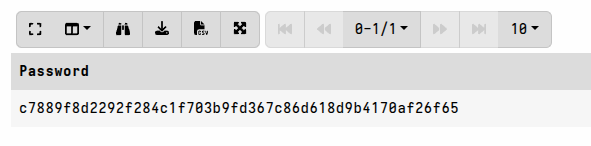
Now that we have the decrypted password we can provide it to the
import_collection function the same way we did for the non-encrypted
password case:
LET ZIP_PASSWORDS <= "c7889f8d2292f284c1f703b9fd367c86d618d9b4170af26f65"
SELECT import_collection(filename="/path/to/zips/Collection-WIN-KMODJ1W0CYG-2025-11-10T18_36_50Z.zip")
FROM scope()
Bulk collection imports
If you have many collection containers to import, you will probably want to automate the process by iterating over the zips and importing them one by one.
This can be done using VQL in a notebook, a server artifact, or via an API query.
Automating this process assumes that the collection containers can be
automatically decrypted (i.e. X509 using the server’s cert), or are unprotected.
If you used the fixed password scheme, such that all your collection zips are
secured by the same password, then you can add LET ZIP_PASSWORDS <= ... to
your VQL so that import_collection has access to it.
Example: Bulk import of collections
LET ZipsDir <= "/tmp/imports/"

SELECT OSPath, import_collection(filename=OSPath)
FROM glob(globs="*.zip", root=ZipsDir)
Adding imported collections to a hunt
Offline collectors obviously can’t participate directly in hunts, but you can add the collection to a hunt after importing it. This will make the virtual client and collection data part of the hunt, and you can then run queries across the hunt data which will include your offline collections.
Example: Importing a collection and adding it to a hunt
LET Container <= "/tmp/imports/scheduledtasks-WIN-KMODJ1W0CYG-2025-11-27T17_07_55Z.zip"
LET HuntId <= "H.D4K897V4QBNLU"
LET Imported = import_collection(filename=Container)

SELECT hunt_add(client_id=client_id, hunt_id=HuntId, flow_id=session_id)
FROM Imported
Example: Bulk import and add to a hunt
LET ZipsDir <= "/tmp/imports/"
LET HuntId <= "H.D4K897V4QBNLU"

SELECT *
FROM foreach(row={
    SELECT import_collection(filename=OSPath) AS Imported
    FROM glob(globs="Collection*.zip", root=ZipsDir)
  },
             query={
    SELECT
    hunt_add(client_id=Imported.client_id,
             hunt_id=HuntId,
             flow_id=Imported.session_id)
    FROM scope()
  })
Working with imported files
After importing a collection container the associated collection (flow) will be available on the client’s Collected screen - exactly as it would be if the collection was done using a network-connected client. The collection results can be queried and analyzed in the collection notebook, just as you can do with any other collection.
Any files included in the collection will be available in the Uploaded Files tab when viewing the collection.
If you want to perform further analysis on the files collected (for example if you forgot to run artifacts to extract the right data from those files), then it is possible to perform post-processing on the collection’s files. However this is not recommended under normal circumstances - it’s always far easier to work with data that was extracted on the endpoint rather than trying to extract the data from files on the server. Please see the section To import or not to import? for a more detailed discussion of the considerations and options when dealing with imported files.
If your offline collections used the Windows.Triage.Targets or
Windows.KapeFiles.Targets artifacts then these have a notebook cell suggestion
included for post-processing files.
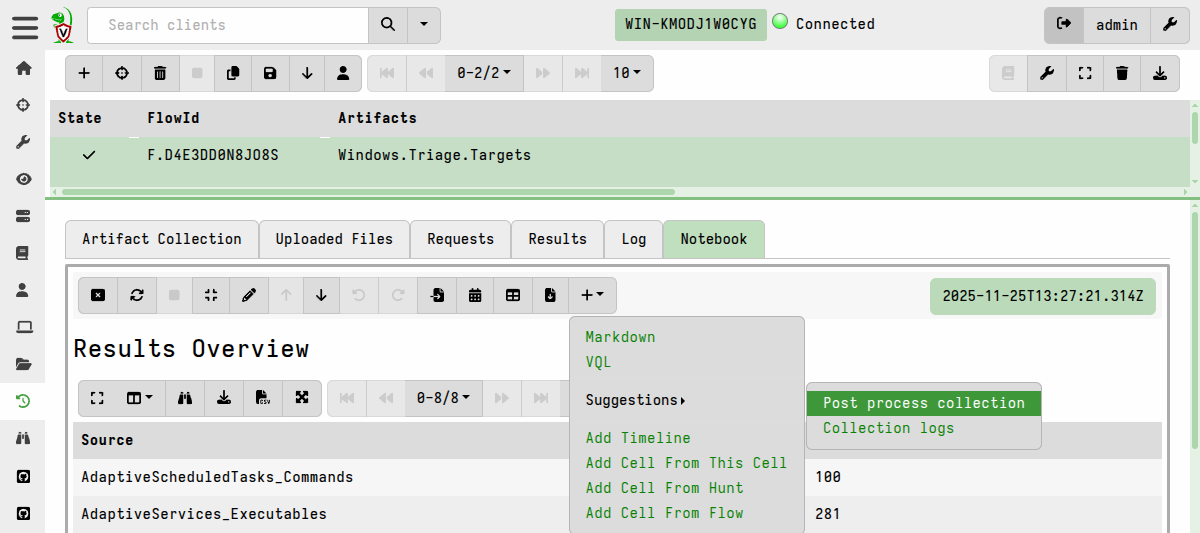
This uses the Windows.KapeFiles.Remapping artifact to generate and apply an
appropriate remapping configuration. The artifact as well as the cell itself
contain instructions for use.
For other artifacts which collected files you can use the same post-processing
approach in a notebook using the Windows.KapeFiles.Remapping artifact.
For example:
LET _ <=
   SELECT * FROM Artifact.Windows.KapeFiles.Remapping(ClientId=ClientId, FlowId=FlowId)

SELECT * FROM Artifact.Windows.System.TaskScheduler()
Accessing collection containers without importing
Sometimes you may want to work with the data external to Velociraptor. For example you may want to process the collected data with external tools.
Below we describe several methods, using either built-in capabilities of the Velociraptor binary or external tools.
Extraction with external tools
If you want to extract the collection containers without using Velociraptor at all, this is entirely possible. Note however that while you can extract the files using an external ZIP program, the program will not take into account the various transformations made by the offline collector.
Some external tools use the acquired file timestamps in the analysis and parsing of the file itself (e.g. prefetch parsing). This is based on the assumption that the files being parsed are on the originating system, not taking into account that they may have been copied. By copying or manipulating files in any way those timestamps will change, thus increasing the chances of incorrect analysis.
Some triage tools attempt to preserve these timestamps at the filesystem level - for example by creating a NTFS-based “virtual disk” container instead of a ZIP file. While this helps to preserve some timestamps by essentially timestomping the collected files into the correct timestamp, it is a workaround at best.
Velociraptor instead relies on timestamps being stored separately in JSON metadata files written to the collection container, and does not attempt to use timestamps in the ZIP file itself to replicate the timestamps on the originating filesystem, for various reasons as explained above.
If you use external tools to extract files from the container zip, then you cannot rely on the timestamps for the extracted files! Depending on your use case this may or may not matter, but you should always be aware of this fact.
If your analysis does need to take filesystem timestamps into account, then you can use the Windows.KapeFiles.Extract artifact to do the extraction. This artifact reads the stored timestamps and replicates them on the extracted files, however there are still some limitations as stated in the artifact’s description.
Example
velociraptor artifacts collect Windows.KapeFiles.Extract --args ContainerPath=Collection-DESKTOP-2OR51GL-2021-07-16_06_56_50_-0700_PDT.zip --args OutputDirectory=/tmp/MyOutput/
Note that this approach is really not ideal in most circumstances, and it will also be further affected by the filesystem type that you are extracting the files to: Windows allows 3 timestamps to be set (MAC times except for Btime), while Linux only allows 2 timestamps (Modified and Accessed).
Since timestamps are usually very important in most types of analysis, it is preferable to perform the analysis directly on the source system, or work directly with the file metadata that Velociraptor collected from the source system.
The fuse container command, which we describe below, also attempts to emulate
the original timestamps based on metadata stored in the collection container.
No encryption or password encryption
Unzipping using external tools is straightforward if you didn’t configure the collector to apply a certificate-based encryption scheme to the collection zip, but we remind you that the certificate-based schemes are strongly recommended in all cases.
If no encryption scheme was used then the container is just an ordinary unprotected zip.
If the fixed password scheme was used then the collection container is simply a standard password-protected zip.

Certificate-based schemes
For the X509 and PGP encryption schemes, the collection container is still just a password-protected zip, but the password is encrypted and must therefore be recovered first by decrypting it.
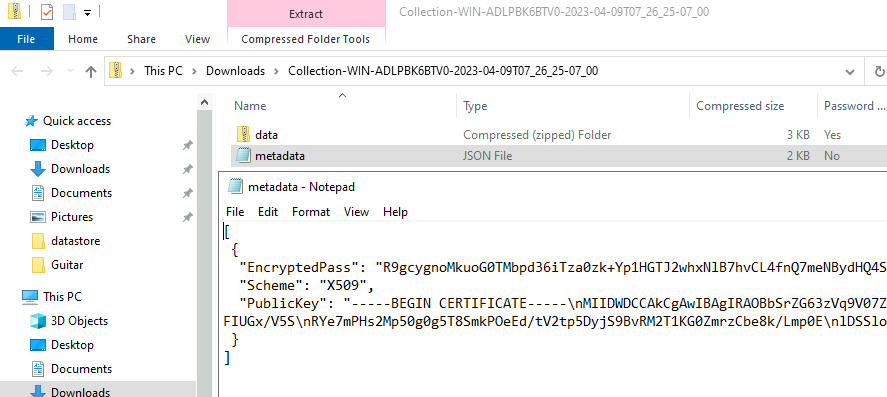
The collection container will contain a file at the top level named
metadata.json.
This file contains the encrypted version of the zip password in the field named
EncryptedPass. To decrypt this string we need the private key that corresponds
to the PublicKey which was used to encrypt it.
The public key is also provided in the metadata.json file, in case you need to
be reminded which one was used.
You can manually copy the encrypted password from that file and decrypt it using
external tools such a openssl or gpg with the relevant private keys.
If decrypting the password with external tools then you’ll likely also need to
first decode the encrypted password since the JSON format of metadata.json
requires that we store it in Base64-encoded form.
If you are working in a separate environment from your Velociraptor deployment, it is still possible to make use of a Velociraptor notebook, as described here, to do the password decryption. Since the notebook only needs the encrypted password and the relevant cert, it can be done on an Instant Velociraptor instance that is completely separate from your Velociraptor deployment.
Once you have decrypted the password you can use it with any unzip tool to extract the contents of the collection container.
Extracting or listing with the Velociraptor unzip command
To extract the collection container on the command line you can use
Velociraptor’s built-in
unzip command.
This command only supports collections secured with the server’s X.509
certificate and unprotected zips.
To decrypt an X509-secured container automatically, you will need to provide Velociraptor with access to the config file of the server that created the collector. Velociraptor will then use the server’s private key to decrypt the container transparently.
If you want to extract or list X509-secured collection containers on a machine
other than your Velociraptor server, you use a copy of the server.config.yaml.
Just remember that the config should be carefully guarded precisely because it
contains the server’s private key and possibly also the private key of the
internal CA!
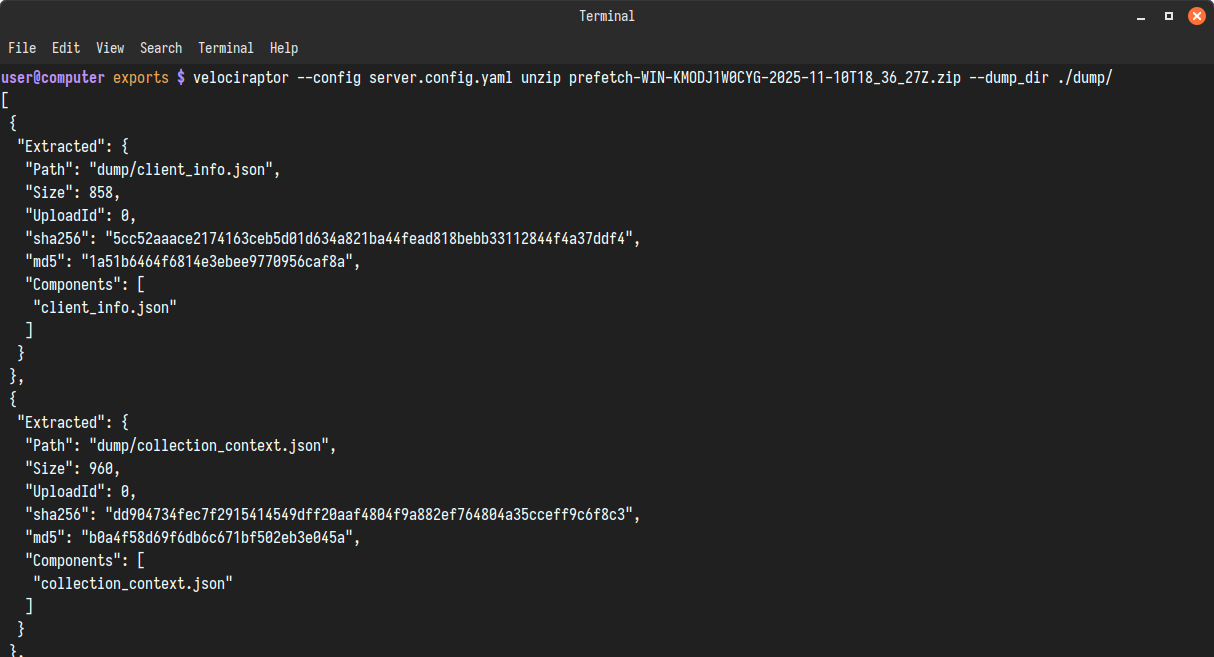
Example: Listing with unzip
velociraptor --config server.config.yaml unzip Collection-WIN-KMODJ1W0CYG-2025-11-10T18_36_27Z.zip --list

The unzip command used with the -v and --report_password flags will also
display the decrypted password. This is useful if you want to provide the
protected zip and the password to someone else so that they can extract it,
without needing to give them access to the server’s private key.
velociraptor --config server.config.yaml unzip Collection-WIN-KMODJ1W0CYG-2025-11-10T18_36_27Z.zip --list --report_password -v

If the --list (or -l) flag is not provided then the unzip command will
extract the contents of the container into the current directory. If you want to
specify a different directory then the --dump_dir flag should be used (it will
create the specified directory if it doesn’t exist).
Example: Extracting with unzip
velociraptor --config server.config.yaml unzip Collection-WIN-KMODJ1W0CYG-2025-11-10T18_36_27Z.zip --dump_dir ./output/
Mounting with the fuse container command
It’s possible to work with the contents of collection containers by mounting
them with FUSE instead of extracting them. The Velociraptor Linux binary
provides the fuse container command which
allows us to mount collection containers on a directory.
Using FUSE allows efficient and rapid access because the container does not need to be extracted. Non-sequential access is provided by the FUSE driver. This is a significant benefit if you’re working with a large number of huge collection containers. This also means that you don’t need to consume disk space by extracting the data.
The fuse container command has many advantages (some enabled by command line
flags) over simply extracting the contents of the zip container, especially when
the collection contains files collected from the endpoint that you want to
inspect with external tools. It can:
- merge file collections from multiple (non-encrypted) containers
- convert raw device names to drive letters, e.g.
\\.\C:->C: - strip the
:from drive letters in paths, e.g.C:->C - escape
/characters in Windows path components, e.g.abc/xyz->abc\/xyzbecause on Linux the/is a path separator and not valid within a path component. - emulate the original timestamps for bulk file collection artifacts such as
Windows.Triage.Targets
If you want to use a specific external tool to analyze the files, then the above options give you the flexibility to adjust the presentation of the file and folder structure so that it best suits the requirements of your external tool.
Auto-decryption
The fuse container command only works with collection containers that can be
automatically decrypted or accessed without encryption. This means either
containers that are secured with the server’s X.509 cert, or non-encrypted
containers (see Manual decryption below).
Example: Mounting an X509-protected container
velociraptor fuse container -c server.config.yaml \
--map_device_names_to_letters --strip_colons_on_drive_letters \
--unix_path_escaping --emulate_timestamps /tmp/exports/fuse_mount \
/tmp/exports/eventlogs-WIN-KMODJ1W0CYG-2025-11-12T10_24_44Z.zip -v
Manual decryption
If you have collection containers secured with other schemes then you can decrypt the password manually, extract the inner zip, and then FUSE mount it.
If you want to FUSE mount multiple zips, you’ll also need to decrypt them first because the auto-decryption currently only supports one zip (the first one if multiple are specified).
Method:
-
Obtain the decrypted password using the
decryptCLI command.velociraptor --config server.config.yaml decrypt --show_password -v /tmp/eventlogs-WIN-KMODJ1W0CYG-2025-11-12T10_24_44Z.zip data.zip -
Repeat the above step for any additional containers.
-
Mount the decrypted zip (
data.zip) - and any additional ones - using thefuse containercommand.
Example: Merge-mounting two manually extracted inner zips
velociraptor fuse container /tmp/exports/fuse_mount \
/tmp/exports/eventlogs-WIN-KMODJ1W0CYG-2025-11-12T10_24_44Z/data.zip \
/tmp/exports/prefetch-WIN-KMODJ1W0CYG-2025-11-12T10_25_06Z/data.zip -v


Note that when 2 or more containers are merged they are layered over each other in the order that they were specified on the command line. So if there are 2 different files (or 2 different versions of the same file) using the same path then in the mount directory you will see the last one in the stack. It’s important to keep this in mind since the container format uses several standard paths for certain common collection files. Merging is primarily intended for files in the collection’s “uploads”, i.e. files copied from the endpoint, so that you can work with them all together in one tree structure.
Once the containers are mounted you can then apply other tools to the collection data and/or files in the mount directory.
Reminder: Don’t forget to Ctrl+C and umount when you’re done!
Dead disk analysis on a collection container
Remapping is one of Velociraptor’s most versatile and powerful features. It was originally designed to allow Velociraptor to support dead disk analysis, but it turned out to be an incredibly useful capability that can be applied to a broad range of problems.
In some sense, a collection container is not that much different from a disk
image which is also a type of storage container. Velociraptor can remap
accessors to allow transparent file access to various disk image formats and
filesystem types. Likewise, the collection container has a well-defined format
and we have a special collector accessor which we can combine with remapping
rules to make the collection container emulate the filesystem of the original
endpoint. The remapping then allows a Velociraptor client to operate on the data
as if it was running on a live endpoint, but limited to having only file access.
Because the client is inspecting data that comes from a source other than the
operating system it is running on, we call it a “virtual client”. To prevent
VQL queries from inadvertently accessing the host operating system, the
remapping disables the VQL functions and plugins that would query the host
operating system, and redirects filesystem access.
The Windows.Collectors.Remapping artifact calculates remapping rules to support this disk-like access to a collection container, basically treating it the same as a dead disk. This allows running further artifacts on the output of the offline collector without needing to import the collection.

Because the virtual client is impersonating the original host and (partially) emulating the original filesystem, it does not have to run on the same platform as the original host. You can run it on your Velociraptor server, which is probably running on Linux, or you can run the virtual client on a separate host which could be running Windows or Linux.
Limitations
-
The virtual client is inherently more limited than a client running on a live endpoint, since the original OS is not present and only the copied files will be available to any VQL queries. Many standard artifacts will fail if they depend on data sources other than the filesystem, but at least they should fail gracefully and not produce incorrect data. Artifacts that rely purely on files in well-known locations should reliably produce meaningful results.
-
External tools cannot be used on files stored in the server’s datastore, since the remapping only applies to VQL queries. Tools will be unaware of the remapping and will be unable to find the files.
-
Connecting virtual clients to non-root orgs is currently not supported.
Because collection containers are a standardized format used for both exported
collections and offline collectors, the Windows.Collectors.Remapping artifact
can also be used with exported collection containers. For example, let’s say
you’ve exported a collection from your server and shared it with someone else
(perhaps a semi-trusted 3rd-party analyst) so that they can work independently
with it on their own server. They might just be using an
Instant Velociraptor
instance if they don’t have a permanently installed server.
Or they may choose to run artifacts or queries against the collection containers on the command line,
as documented in the artifact itself, which doesn’t require a Velociraptor
server at all.

Since exported containers cannot be secured with certificates - fixed passwords being the only security option available - there is no need for them to require anything other than the collection container and the associated password.
You should never share your server keys or config with anyone who isn’t already an admin on your server!
In it’s description the Windows.Collectors.Remapping artifact provides
instructions for it’s use on the command line in a standalone server-independent
manner, but here we will show how it can be used with a dedicated “virtual”
client that is connected to the server. From the server’s perspective it will
look and behave like a normal client.
-
We start with a collection container that contains files collected by the
Windows.Triage.Targetsartifact, created by an offline collector. This file needs to be located on the Velociraptor server because we are going to run theWindows.Collectors.Remappingserver artifact in the GUI to access it and generate a remapping config for it.Because the collection container is secured with the server’s certificate and we’re running the artifact via the GUI, it will be able to auto-decrypt the collection container, as explained in the previous sections. It will then be able to generate the remapping config by examining it’s file contents. However, if you are going to run a virtual client on a machine other than your server it won’t have access to the server’s private key to perform the decryption - unless you’re willing to use the client with a copy of your server config, which is generally not recommended for security reasons. In that case it’s probably best to first decrypt the collection archive and then work with the non-encrypted
data.zipcontainer. To do that you can use thedecryptCLI command.If you’ve used a zip protection scheme other than X.509 using the server’s certificate, then you need to first extract the inner
data.zipfrom the protected outer zip, as explained here, and then use that as the file target for theWindows.Collectors.Remappingartifact. -
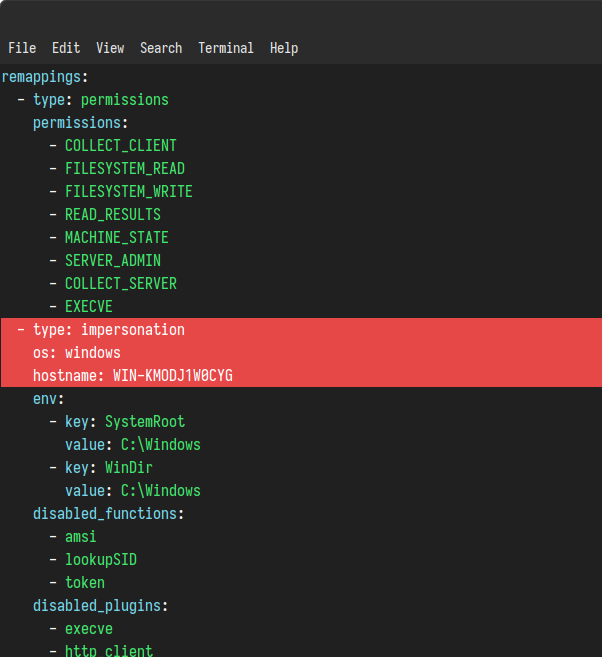
We generate the remapping file by running the
Windows.Collectors.Remappingartifact, providing it with the full path to thedata.zip, and optionally a hostname and a path to write the remapping file to.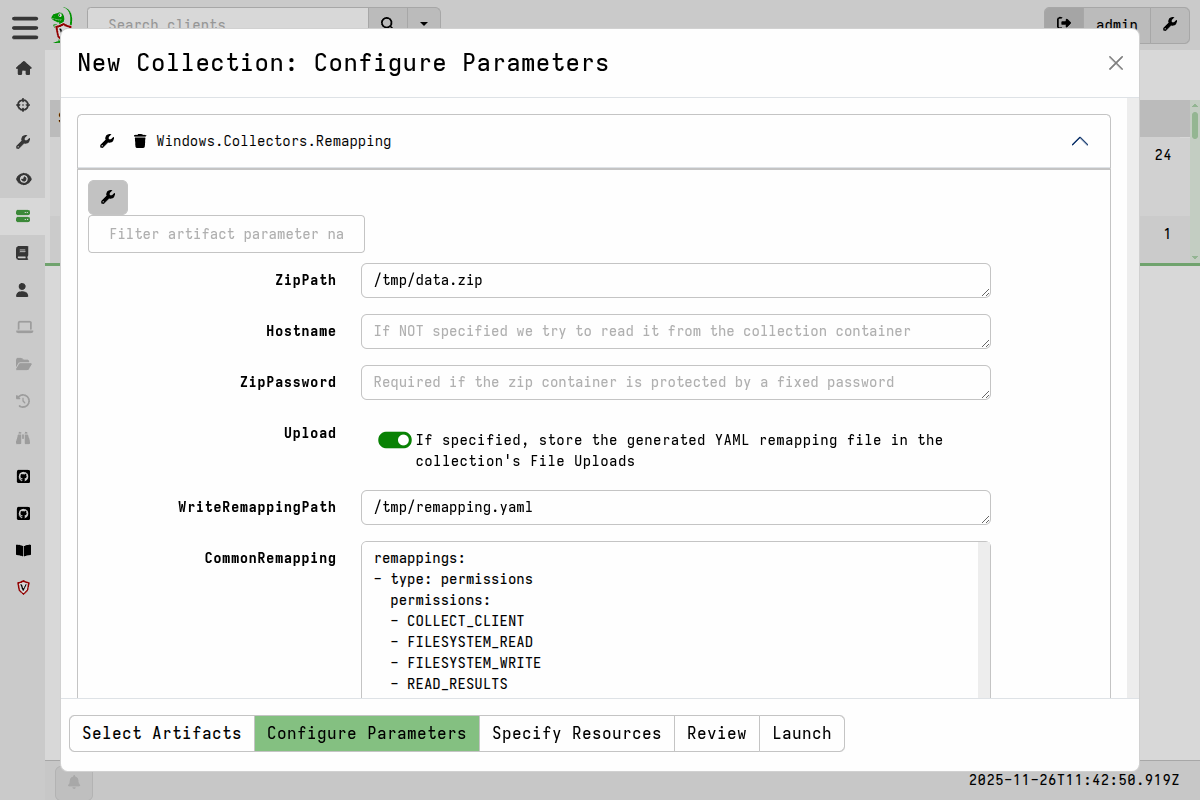
Windows.Collectors.Remapping parameters After running the artifact we can view it and confirm that it’s correct.
-
On the Server Dashboard screen in the GUI we download a client config file. Save it in the same folder where you saved the
remapping.yamlfile. -
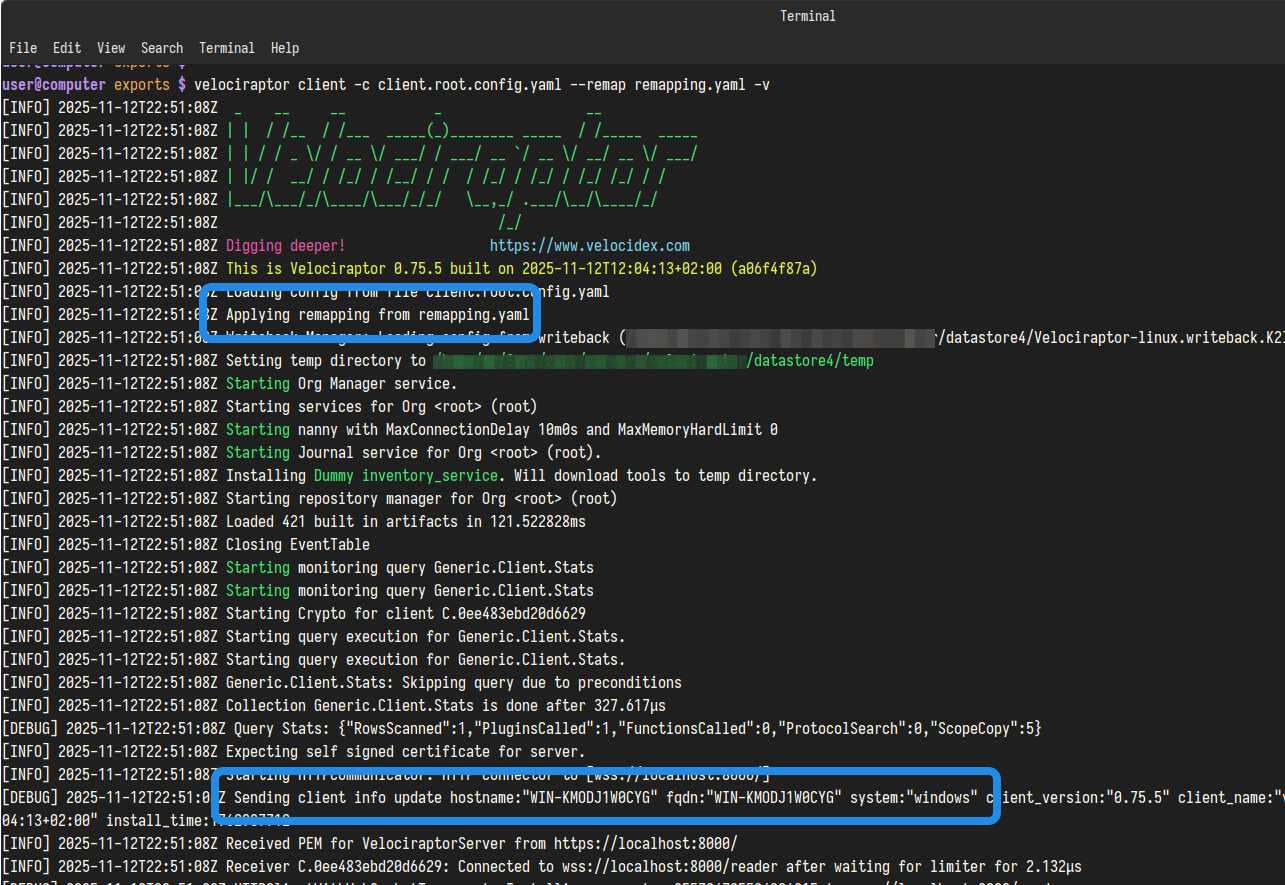
Using the
client.root.config.yamlandremapping.yaml, we now start a virtual client that will connect to the server.velociraptor client -c client.root.config.yaml --remap remapping.yamlSince the client will generate a writeback file on disk that contains it’s unique client ID. This writeback file will persist and cause the client to retain the same client ID between runs. If you intend to process further collection containers from other hosts then you will either need to delete the writeback file before starting a new client, or else add the path to a new writeback file for these subsequent clients. For the latter option, this can be done by adding the path to a new writeback file to the above command line using the appropriate
--config.client-writeback-<platform>flag - for example,--config.client-writeback-linux=/path/to/writeback.yamlfor Linux or--config.client-writeback-windows="C:/path/to/writeback.yaml"for Windows. -
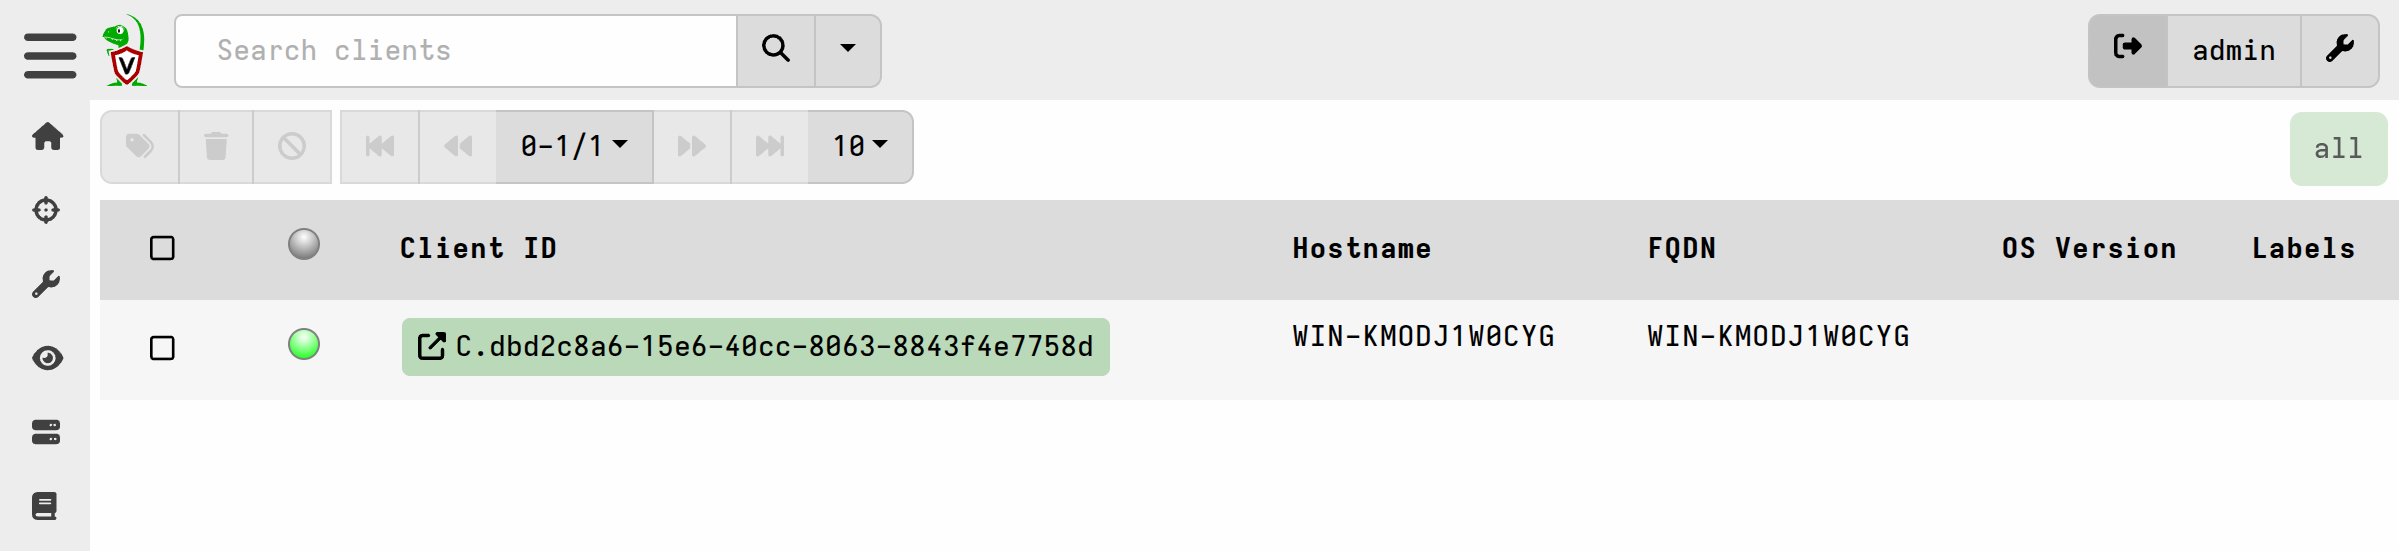
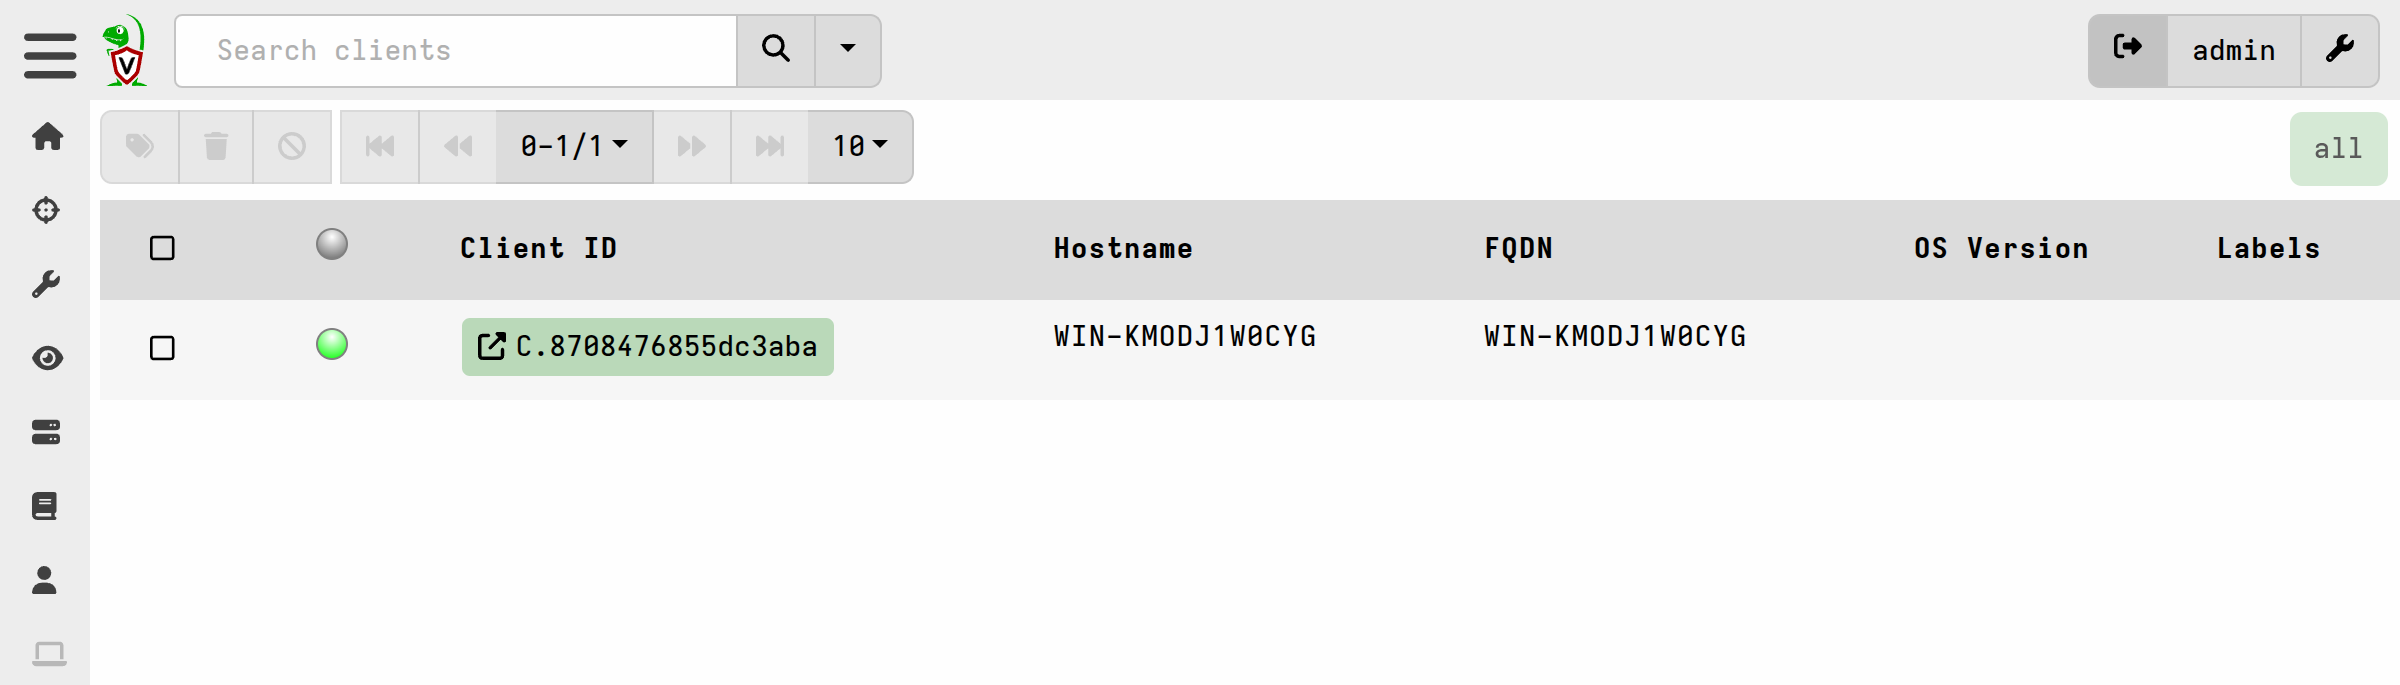
In the GUI we can search clients and see our new virtual client.
-
The virtual client is functionally the same as a normal client except that it runs collections against the offline collection container rather than the host it’s running on.

If you are running the virtual client on your server, you may choose to not decrypt the collection container because you can instead pass it the server config. This contains the server’s private key (and the client config) which will allow it to transparently access to the protected container.
velociraptor client -c server.config.yaml --remap remapping.yaml
You should ensure that both the Windows.Collectors.Remapping artifact and the
client have access to the same collection zip file using exactly the same path.
The remapping config contains the full path to the zip container, so if you move
it after generating the remapping then it will not work. If you run
Windows.Collectors.Remapping to generate the remapping and then choose to run
the client on a separate system, then you should replicate the path to the
container on the latter system.