Deploying Clients
We refer to Velociraptor endpoint agents as clients.
Clients connect to the server and wait for instructions, which mostly consist of VQL queries. They then run the VQL queries assigned to them by the server and return the results to the server.
On this page we explain how to run, and optionally install, clients on the most common platforms. There is no single “correct” way to deploy and use Velociraptor so here we also try to highlight the pros and cons of the most common approaches.
Velociraptor only has one binary per operating system and architecture.
We don’t have separate client binaries and server binaries. The command line options tell the binary whether to behave as a server or as a client. Therefore you can run the client on any platform and architecture that we have a binary for.
For platforms and architectures where we don’t have a binary you may still be able to compile one yourself from source, provided that Golang supports the target platform+architecture combination.
Generating the client configuration file
This section describes client packaging from a relatively low-level perspective.
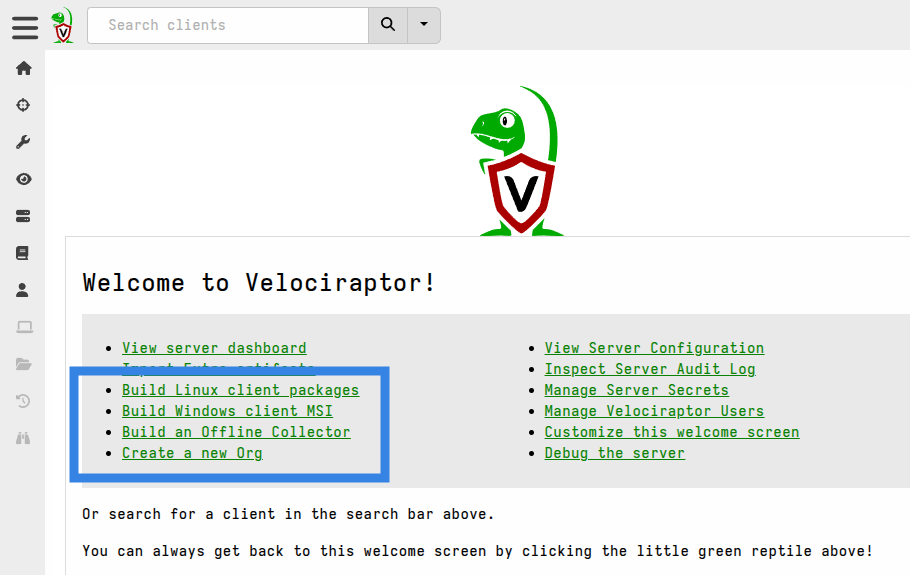
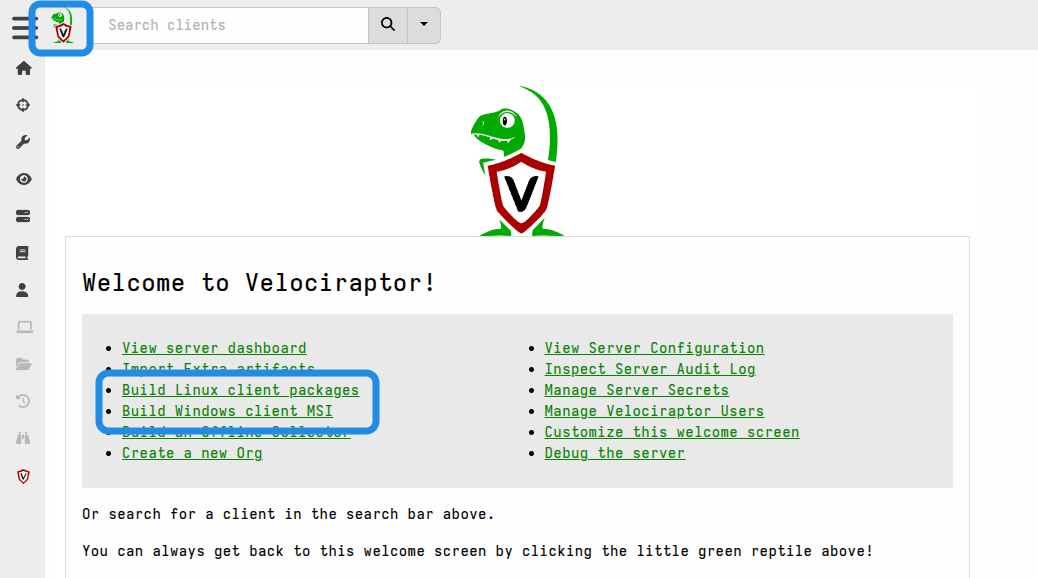
While it’s important to understand client installer packaging, in recent versions of Velociraptor we have simplified this process by automating it via built-in server artifacts. You will find links to run these artifacts on the Welcome page.
Also when you create a new
org
using the Server.Orgs.NewOrg artifact it will, by default, also create Windows
and Linux client installers for that org.
We do recommend that you read this section so that you understand what the client config is, as this is a key aspect of all client installer packages. However you probably won’t want to create client packages this way unless you need advanced customization or want to build the installer packages separately from your server environment.
If you’ve created client installer packages by running the artifacts linked on the Welcome page then you can skip ahead to Installing the client as a service.
There are several ways to run clients, depending on your needs. Ultimately however this amounts to running the Velociraptor binary and providing it with a client configuration file, which provides the client with cryptographic material, connection information and other client-related settings.
We saw how to generate the server configuration file in the server deployment guide. The client configuration is contained within the server configuration.

When we “generate” a client config file we are effectively extracting the Client
section from the full config. If you are using the
orgs
feature then you will need a separate client config file for each org, since the
config also contains a nonce value that associates the client with a specific
org.
There are two ways to accomplish this task which we explain below:
- Using the Admin GUI (recommended)
- Using the command line
If you are only interested in Windows clients and will only be creating MSI installer packages, then the MSI repacking method described here will use the client config for the current org. In that case you don’t actually need to download the client config file, although you may still want to read this section to understand more about the topic of client config files.
Option 1: Obtaining the client config from the GUI
The simplest way of obtaining the client config file is to download it from the GUI.
Navigate to the Current Orgs section on the Home screen and then click on the file name to download the YAML file.

The config files for each org contain the correct client nonce for connecting
to that org.
Option 2: Obtaining the client config on the command line
The client config can also be obtained using the CLI. Although this is not the preferred way, it is useful in some situations such as automated build environments.
./velociraptor config client --org "root" --config server.config.yaml > client.root.config.yaml
velociraptor.exe config client --org "root" --config server.config.yaml > client.root.config.yaml
NOTE: it is recommended that this be done using cmd.exe since PowerShell redirection operators by default create files encoded in UTF-16LE (Unicode).
./velociraptor config client --org "root" --config server.config.yaml > client.root.config.yaml
This command reads the datastore location from the config specified in the
--config flag, and for non-root orgs these orgs must already exist in the
datastore.
Note that the --org flag expects the Org ID, not the org name. If the --org
flag is not specified then the command will default to the root org, which
always exists.
Running clients interactively
This method is most suitable for testing prior to deployment, for learning, or for troubleshooting.
The most simple way to run the client is by executing it in a terminal and providing it with the client configuration.
./velociraptor --config client.config.yaml client -v
velociraptor.exe --config client.config.yaml client -v
./velociraptor --config client.config.yaml client -v
The command line flag -v (verbose) is added so that the client prints it’s log
to the terminal. It’s not needed but it’s very useful if you want to see what
the client is doing, especially if you are troubleshooting issues such as
network connectivity.

The first time the client connects to the server it will enroll. The enrollment process requires the client to reveal basic information about itself to the server.
Note that this type of interactive execution will work effectively the same way for all versions of the client (Windows, Linux, or Mac). In the sections that follow, we show options for more scalable and/or permanent use.
When installed as a service, the Velociraptor client runs with elevated privileges. But when running it manually you may choose to run it as a normal user. The choice depends on what data sources you intend to access. For example, to access operating system protected files usually requires elevated privileges.
In some circumstances you may want to automate this deployment method. That is, you may want to run hunts across many endpoints without permanently installing clients. Any remote management tool that can run executables on the endpoints can be used, but in Active Directory environments it is common to use Group Policy to accomplish this goal. We explain how to set up such a deployment in the section Agentless deployment.
Installing the client as a service
Windows
The recommended way to install the Velociraptor client as a service on Windows is via a Microsoft Installer (MSI) package. The benefit of using this installer format is that most enterprise system administration tools are capable of deploying MSI packages. For example, you can use SCCM or Group Policy to deploy the MSI to a target organizational unit.
An MSI is a standard Windows installer package. The benefit of using this installer format is that most enterprise system administration tools are capable of deploying MSI packages. For example, you can use SCCM or Group Policy to deploy the MSI to a target organizational unit.
For more information, see Use Group Policy to remotely install software.
There are two approaches to generating the MSI package:
- Repacking the official release MSI to include your client configuration.
- using the GUI
- using the command line
- Building your own MSI from scratch using 3rd-party tools.
The first approach makes use of our official release MSI and inserts your client configuration into the file without changing anything else. None of the MSI settings are changed when using this method. It is most suitable for users who just want to get up and running quickly. Since it is so commonly done we have provided a built-in server artifact which allows this to be done via the Velociraptor web GUI. However it can also be done on the command line using our CLI, similar to how we create installer packages for Linux and macOS. The CLI option makes it possible to automate the process using external tools or CI pipelines.
The second option is suitable for users who require advanced customization of the MSI package. This is done to change how the MSI install works. Things like installation path, file name, service name, service startup options, icons, etc. can be changed if needed. Most deployments don’t need this kind of customization but some do.
Repacking the official release MSI
Since the Velociraptor client requires your unique configuration file to identify the location of your server, we can’t package the configuration file in the official release. Therefore, the official MSI does not include a valid configuration file. You will need to modify the release MSI to include your client configuration file. This is done through a process we call “repacking”.
The official release installs the Velociraptor executable into
C:\Program Files\Velociraptor\. It then creates a new Windows service that
points to this executable. The service starts automatically at boot time (with
a random delay). If an existing Velociraptor service is already installed, it
will be upgraded and the client configuration file will be overwritten.
Option 1: Using the Velociraptor GUI
The easiest way to repack the MSI package so that it includes your client config
file is by using the
Server.Utils.CreateMSI
server artifact.
- In the Velociraptor web GUI, simply switch to the relevant Organization, then select Server Artifacts from the sidebar on the left side of the page.

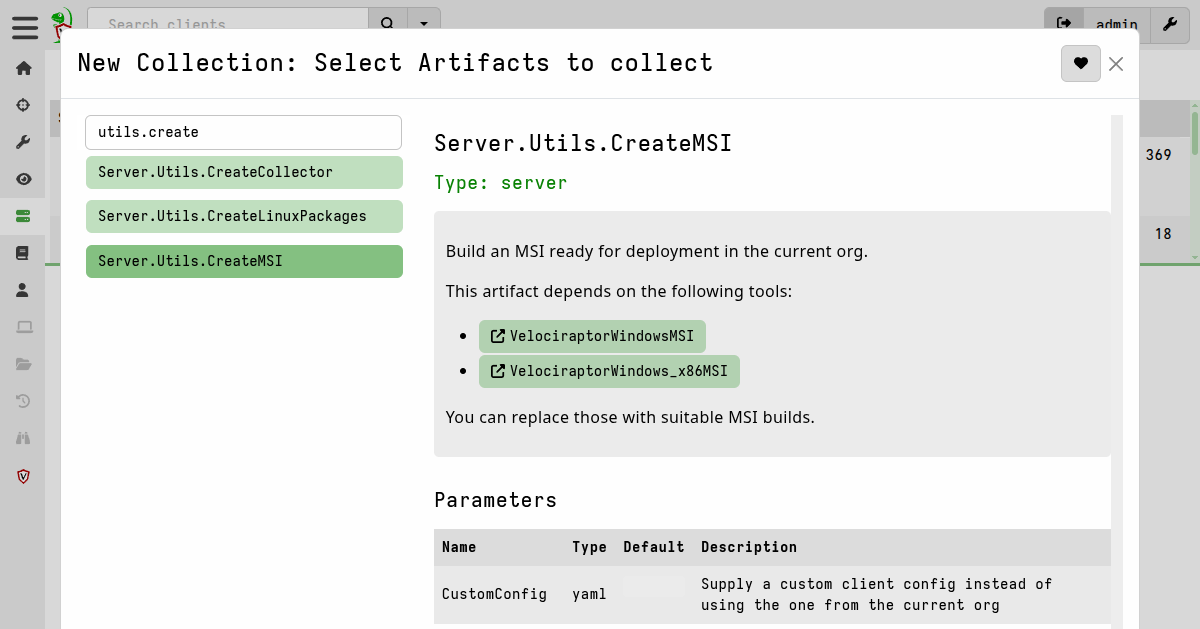
- Add a new collection: search for
Server.Utils.CreateMSI, select it, and then click “Launch”.

-
It will take a moment to download the latest release MSI files (both 64-bit and 32-bit) from GitHub and then repack them with your client config file.
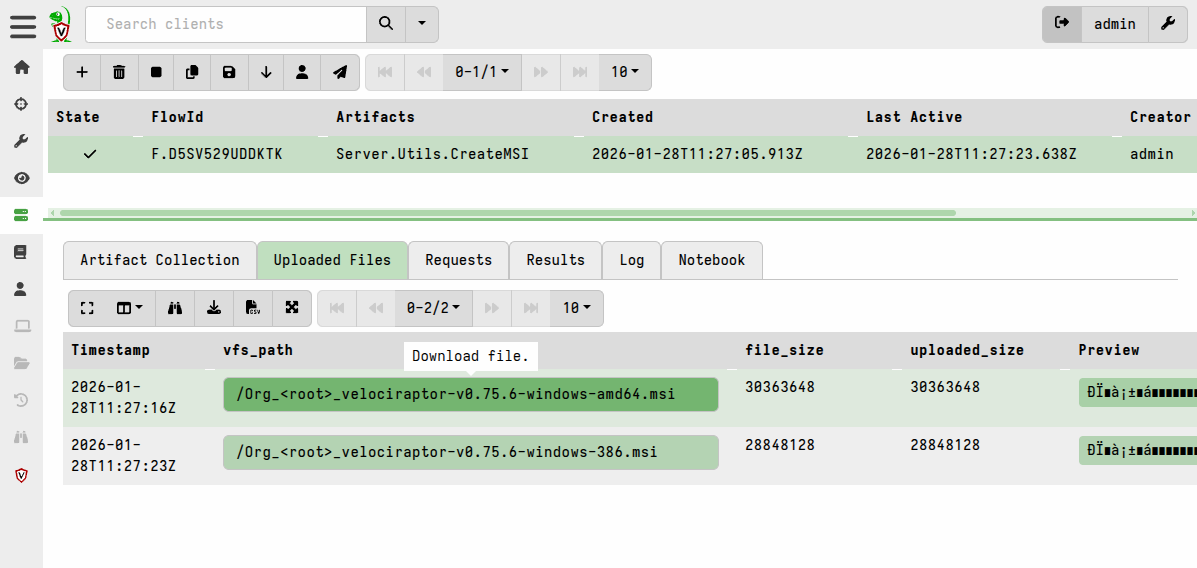
-
The repacked MSI files will then be available in the Uploaded Files tab of the artifact collection.

Option 2: Using the command line
In this section we’d like to draw your attention to the fact that repacking the Windows MSI package can be done on any platform. It does not have to be done on Windows.
Also note that in the commands below we have omitted version numbers and architecture tags from the file names to make the commands more concise, however it is useful to include the version number and architecture tags in your output file names so that you know exactly what they are.
To repack the MSI with a custom config on the command line we use the config
command with the repack subcommand, along with the --msi flag.
In all cases we need to tell Velociraptor:
- which MSI we want to repack (usually it’s the official release MSI - either 64-bit or 32-bit - but previous releases can also be found on the Releases page at GitHub if you need them), and
- what the output file should be named.
./velociraptor config repack --msi velociraptor-windows.msi client.config.yaml velociraptor-windows-repacked.msi
velociraptor.exe config repack --msi velociraptor-windows.msi client.config.yaml velociraptor-windows-repacked.msi
./velociraptor config repack --msi velociraptor-windows.msi client.config.yaml velociraptor-windows-repacked.msi
If you are using Velociraptor organizations (“orgs”)
then you can obtain the client configuration file for each org from the Home
page in the GUI. Ensure that you are in the root org so that the configs for
all orgs are accessible.

While the Velociraptor binary inside the MSI is officially signed by Rapid7 LLC and is unaffected by the MSI repacking process, we recommend that the MSI also be signed by a valid code signing certificate after repacking.
If your Windows environment use winget command line tool (or “Romanitho/Winget-AutoUpdate” for user toasts) for unattended 3rd party app auto updates on Windows, this can lead to failed downgrade messages and issues (as at 5 Feb 2024). When the winget version numbers are fixed this can result in unexpected upgrade toasts and server-client version mismatches.
We strongly recommend getting your admins to pin the Velociraptor version in winget and also deny-list any upgrades of Velociraptor via Winget-autoupdate if your environment uses it. Please see https://learn.microsoft.com/en-us/windows/package-manager/winget/pinning / https://github.com/Romanitho/Winget-AutoUpdate (search for “blacklist”) for more information.
Building a custom MSI package from scratch
If you wish to make advanced customizations to the MSI (for example, change the name of the service, change install locations, etc.) then you will need to use the WiX Toolset or similar packaging tool which can build a new MSI from scratch. We recommend WiX and describe it’s use here because it is free and widely used. However there are other tools, mostly commercially licensed, which you may decide to use instead, especially if your organization already has such tools.
The Velociraptor repository on GitHub already includes a WiX Toolset configuration file that creates a functioning MSI with an included client configuration. You can further customize this WiX configuration to specify a different service name, destination location, etc.
More detailed instructions are provided here.
To summarize the process, you will need to perform the following steps:
- Download or clone the Velociraptor repository to a Windows host. Specifically, you may want to copy the docs/wix directory into a new working directory on your host. This folder contains the necessary WiX configuration (XML) files and other support files that make it possible to build your custom MSI directly in this folder. After creating your MSI build you may want to keep this build folder and use it for creating future builds when new Velociraptor versions are released.
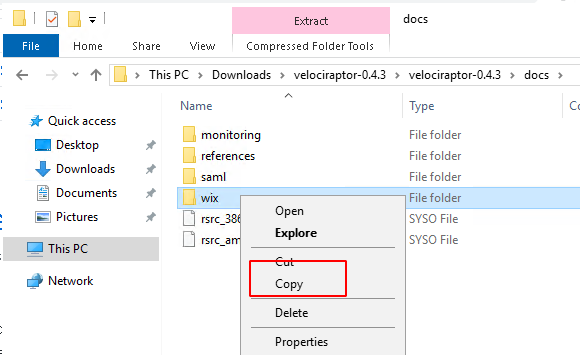
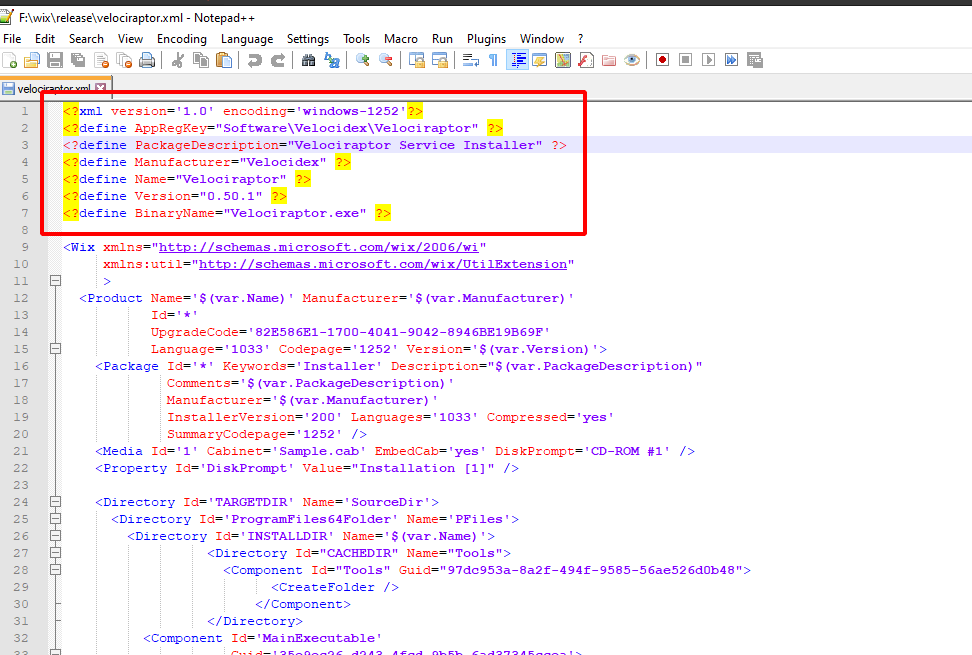
- Update the custom XML for your installation. The README file at docs/wix walks you through the settings that are most commonly customized.
-
Install the WiX Toolset on your Windows host.
-
Add your custom
client.config.xmlfile and the appropriate Velociraptor executable to a subdirectory of your build directory calledoutput. If you have downloaded the executable from our website or GitHub then the file name will contain the version and platform information. Ensure that the executable in theoutputfolder is namedvelociraptor.exe.

- Execute the build batch file to create the new MSI file.

MSI install
To install the MSI from the command line (which requires elevated privileges) simply run:
msiexec /i velociraptor_custom.msi
This will install the binary and client configuration file in the
C:\Program Files\Velociraptor\
folder, create the service, and start it.
The Velociraptor service runs using the Local System account. Startup of the service is Automatic with a delayed start.
One way to automate such a deployment by using Active Directory Group Policy.
The procedure outlined below can easily be adapted to
run the command msiexec /i \\DC\Deployment\velociraptor_custom.msi instead of
running the exe, or you can use Package distribution procedure described here:
Use Group Policy to remotely install software.
Exe install
The Velociraptor executable is also capable of installing itself as a Windows service without needing an MSI.
Although Velociraptor supports installing the service directly this is not the recommended method. We recommend using the MSI as described above.
This installation method is not recommended because it does not use a proper package manager, and that may complicate uninstalls or upgrades that you will probably want to do in future.
A known problem with installing the service in this way is that it cannot uninstall completely cleanly since MSI infrastructure would usually be relied on to perform post-removal tasks such as cleaning up old files.
Nevertheless this approach is possible if the situation requires it. You may choose to automate such a deployment by using the Group Policy scheduled tasks procedure outlined below.
The following command, which requires elevated privileges, will install the client as a service:
velociraptor.exe service install --config client.config.yaml -v
This will install the binary and client configuration file in the
C:\Program Files\Velociraptor\
folder, create the service, and start it.
The binary location is specified in the configuration file under the setting
Client.windows_installer. You can also change the name of the binary and the
service name if you wish.
The Velociraptor service runs using the Local System account. Startup of the
service is Automatic with a delayed start.
After installation you can check the service status with the command
sc query velociraptor
macOS
Apple’s requirements and processes for software packaging are complex. Therefore we don’t provide installer packages (.pkg or .dmg) or packaging capabilities for macOS. Our binary does have the capability to install itself under macOS though, and this is described below. We do provide Apple Developer code-signed binaries for all official releases.
If your organization has the necessary toolsets, skills and other resources for creating macOS installation packages then you may choose to do so. The Velociraptor client is a single binary, with no package or library dependencies, plus a configuration file, which is probably the simplest kind of package that any packaging expert will ever have to deal with.
Manual Deployment
For small deployments we provide a self-installing capability in the
Velociraptor binary. The service install directive can be used to install
Velociraptor so that it persists through reboots and starts automatically. The
following command installs the binary and the config to /usr/local/sbin.
Persistence and service control is accomplished via launchd.
First you need to mark the binary as executable.
chmod +x velociraptor
The following command, run with root privileges, will install the Velociraptor client as a service.
sudo ./velociraptor service install --config client.config.yaml -v
Depending on your version of macOS you may be prevented from running the executable and you will instead see a warning similar to this.
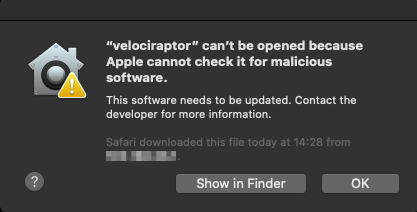
Click “OK” or “Cancel” and then from System Preferences, open “Security & Privacy” and from the General tab, click “Allow Anyway”.

If you downloaded the file from the internet or another network location then you may also need to remove the quarantine attribute from the file to suppress further warning prompts.
xattr -d com.apple.quarantine velociraptor
The client binary will be installed into the path specified in the
Client.DarwinInstaller.InstallPath key of the client config, and defaults to
/usr/local/sbin/velociraptor.
The client config will be written to /usr/local/sbin/velociraptor.config.yaml.
The client service will be named according to the name set in the
Client.DarwinInstaller.ServiceName key of the client config, and defaults to
com.velocidex.velociraptor.
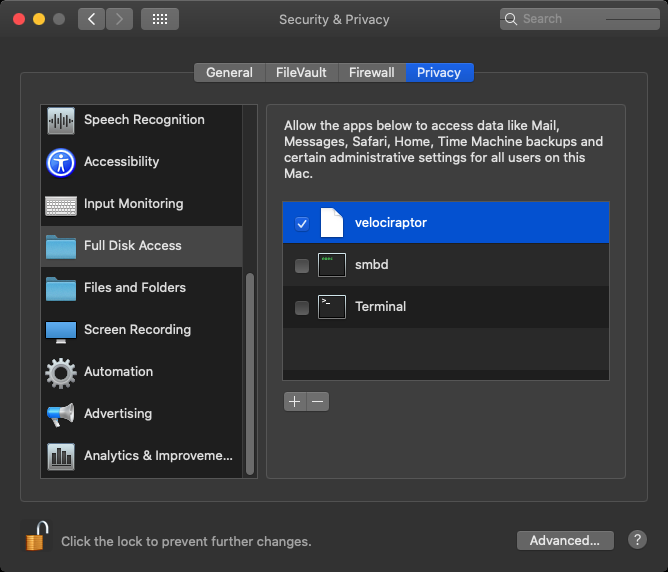
In addition, for macOS versions >10.14 the client also requires “Full Disk Access” in order to work correctly. Full Disk Access is part of Apple’s security framework for macOS, and this feature enables an application to access all files on the system.
After installation you can check the service’s status with:
ps -eaf | grep veloorsudo launchctl print system/com/velocidex.velociraptoror- Navigate to Applications > Utilities > Activity Monitor and search for
Process Name
velociraptor.
Automated deployment using MDM
Organizations that use macOS at scale usually have their own packaging and deployment processes worked out using their preferred toolset and MDM solution. For example Jamf or Microsoft Intune are commonly used mobile device management (MDM) solutions.
Below is a community-provided example of the steps required for Jamf Pro. Unfortunately we cannot provide detailed instructions for other MDM solutions, and we recommend that you consult the documentation for your chosen MDM solution.
Some of the considerations and complexities regarding deployments in macOS environments are described in this presentation. and may be helpful.
Jamf Pro deployment example
- Navigate to Configuration Profiles > New
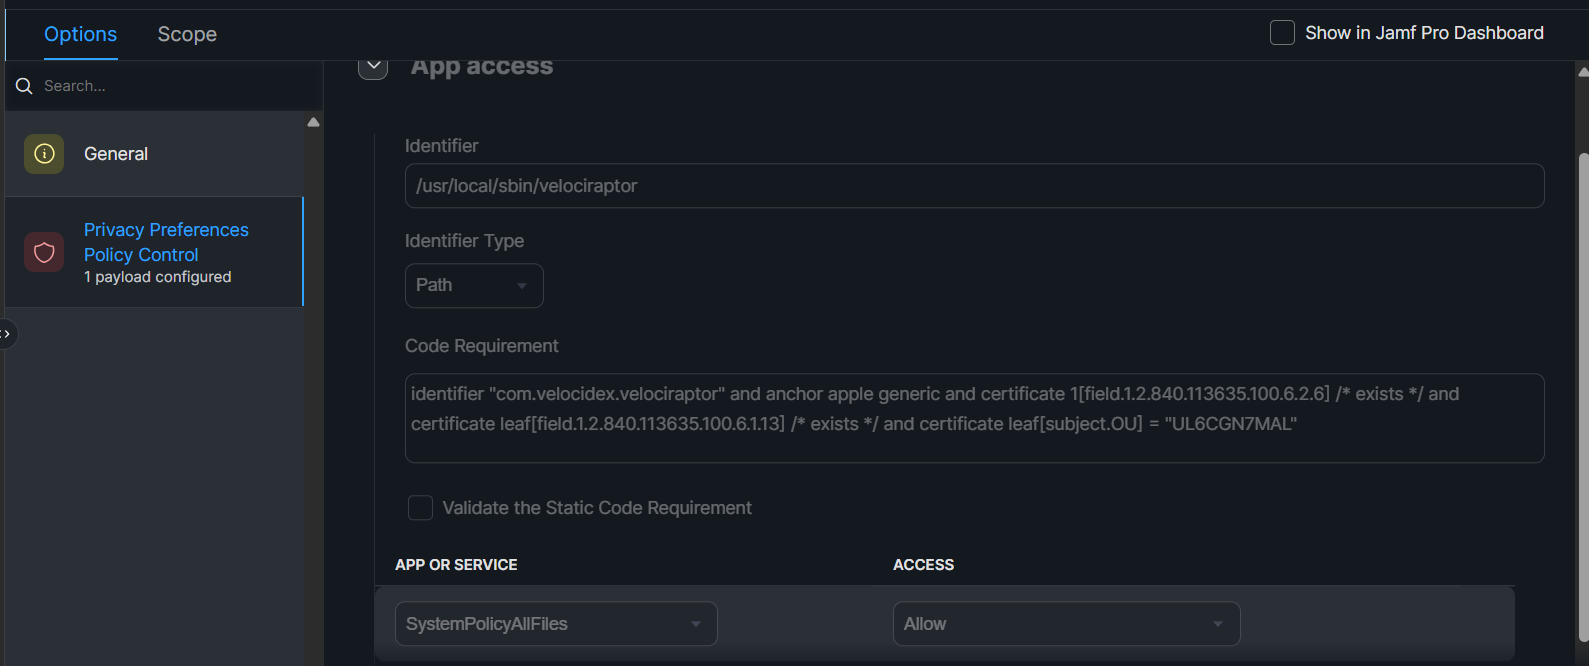
- Configure Privacy Preferences Policy Control
- Identifier:
/usr/local/sbin/velociraptor - Identifier Type:
Path - Code Requirement:
identifier "com.velocidex.velociraptor" and anchor apple generic and certificate 1[field.1.2.840.113635.100.6.2.6] /* exists */ and certificate leaf[field.1.2.840.113635.100.6.1.13] /* exists */ and certificate leaf[subject.OU] = "UL6CGN7MAL"
- Under “App or Service” Configure SystemPolicyAllFiles set to Allow, effectively granting “Full Disk Access”
- Scope: You can select All Computers but this is up to you
This configuration would be the same for all MDM solutions for MacOS, just different UI
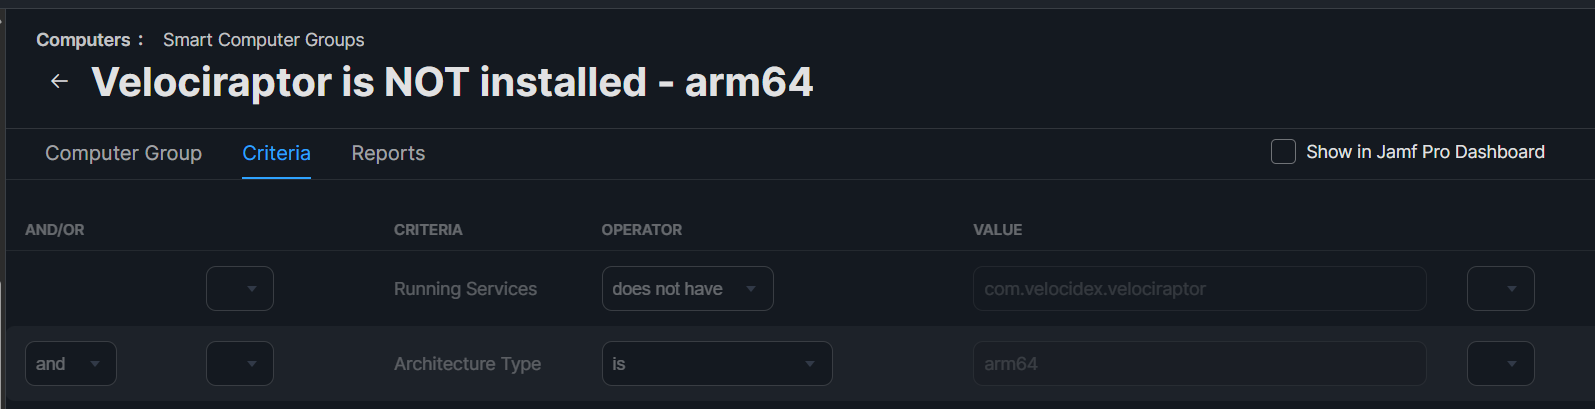
- Navigate to Smart Computer Groups > New
- Configure the group
- Running Services
does not havecom.velocidex.velociraptor - and Architecture Type
isarm64
You can also use x86_64 instead of arm64 for Intel-based devices
- Navigate to Settings > Scripts > New
- Create your installer script.
This is an example based on v0.74.1, you may want to install the client differently
echo "Start script";
velociraptor_DIR="/Users/Shared/velociraptor_install";
filename="velociraptor-v0.74.1-darwin-arm64";
mkdir $velociraptor_DIR;
cd $velociraptor_DIR;

checksum="e6496519402e139de376c1c964302cc5f9b338c1d88a52b0579c9121d1992fba";

#Downloading velociraptor
curl -L -O "https://github.com/Velocidex/velociraptor/releases/download/v0.74/$filename"
temp_checksum=$(shasum -a 256 $filename | cut -d ' ' -f1);
if [[ $temp_checksum != $checksum ]]; then
    echo "Downloaded hash ($temp_checksum) is not matching the check $checksum";
    rm -f $filepath;
    exit;
fi

chmod a+x $filename;

cat >client.config.yaml << EOL
version:
  name: velociraptor
  version: 0.74.1
  commit: 7e3ae67d3
  build_time: "2025-03-26T02:36:53Z"
  compiler: go1.23.2
  system: linux
  architecture: arm64
Client:
.....................
.....................
EOL

sudo ./$filename --config client.config.yaml service install;
- Navigate to Policies > New
- Configure installation policy:
- Scope:
Smart Group we created in 3.(Make sure that the Profile we created in 1. is deployed to the same scope OR “All Computers” - Scripts:
Script we created in 5. - Triggers: Up to you.
In Settings > Privacy & Security > Full Disk Access velociraptor can still appear as disabled, even when it is correctly configured in the MDM Profile. To ensure the FDA has been enabled, follow the verification steps:
- Run MacOS.System.TCC artifact in Velociraptor
- If return output is empty > no Full Disk Access (FDA)
- If you see actual data > Full Disk Access (FDA) is enabled for
velociraptor!
Linux
There are many variations of Linux in the wild. Many distributions and releases, both new and very old. As DFIR practitioners we have to deal with whatever systems are put in front of us. Upgrading operating systems is usually not an option.
Most binaries compiled for Linux, including our standard Linux binary, link to a specific minimum version of the Glibc library. This version is dictated by the compiler, which links the binary to the version present on the system on which it is compiled. We obviously prefer to compile our binaries on modern systems, so this means that the standard binary will only work on modern systems (generally ones from the past few years) and will fail to run on older Linux systems that have older Glibc versions. You will see an error similar to “Version GLIBC_2.xx Not Found” when trying to run the standard binary on such systems. Typically the version of Glibc cannot be upgraded without upgrading the entire operating system.
If your environment has only relatively modern Linux systems then this shouldn’t
be a problem for you. However to address this problem for environments where old
Linux systems are an unavoidable fact, we also release a Linux
MUSL binary. This binary is linked against a
static version of the MUSL library which allows Velociraptor to run with zero
dependencies on the running OS. We find this binary to be completely reliable
and no issues have been reported with it, so we recommend the MUSL build in all
cases. The MUSL releases have _musl at the end of the file name.
The dpkg (Ubuntu/Debian/Mint) or rpm (Red Hat/CentOS/Fedora/SUSE) package
management tools are used to install Velociraptor on Linux clients after
creating an appropriate package.
Both types of installer packages use the same service settings and file
locations. That is, the binary and client configuration files for Linux will be
in the same locations regardless of whether you installed using an rpm or a
deb package.
Our rpm installer supports both systemd and SysVinit, since very old
RPM-based systems are still relatively common, so our installer will
detect and use the appropriate one. We do not provide installer support for
other init systems such as Upstart, init.d or OpenRC. If you need to create
installer packages for platforms that use other init systems then you will have
to do it manually. However you can probably re-use most of the service
configuration information that we use for systemd and SysVinit, which is
available in our GitHub repo.
After installation the binary will be located at
/usr/local/bin/velociraptor_client
and the client configuration file will be at
/etc/velociraptor/client.config.yaml.
The Velociraptor service is named velociraptor_client.service and runs using
the root account. Startup of the service is automatic.
Debian Package
In this section we’d like to draw your attention to the fact that creation of Linux installation packages can be done on any platform. It does not have to be done on Linux.
Also note that in the commands below we have omitted version numbers from the file names to make the commands more concise, however it is useful to include the version number and architecture tags in your output file names so that you know exactly what they are.
- Create a deb installation package with an embedded client configuration file.
./velociraptor debian client --config client.config.yaml
velociraptor.exe debian client --config client.config.yaml --binary velociraptor-linux-musl
Since the Windows binary is being used here to do the packaging work, we also need to tell it where to find the Linux binary.
./velociraptor debian client --config client.config.yaml --binary velociraptor-linux-musl
Since the macOS binary is being used here to do the packaging work, we also need to tell it where to find the Linux binary.
By default, if the --binary flag is not specified, then the installer package
will be created using the binary that invoked the debian client command. To
package a binary for a different architecture, for example arm64, you must
specify the binary in the command.
- Install the package.
sudo dpkg -i velociraptor_client_amd64.deb
After installation you can check the service status with the command:
systemctl status velociraptor_client- on systems using systemdservice velociraptor_client status- on systems using SysVinit
Red Hat Package
- Create a RPM installation package with an embedded client configuration file.
./velociraptor rpm client --config client.config.yaml
velociraptor.exe rpm client --config client.config.yaml --binary velociraptor-linux-musl
Since the Windows binary is being used here to do the packaging work, we also need to tell it where to find the Linux binary.
./velociraptor rpm client --config client.config.yaml --binary velociraptor-linux-musl
Since the macOS binary is being used here to do the packaging work, we also need to tell it where to find the Linux binary.
By default, if the --binary flag is not specified, then the installer package
will be created using the binary that invoked the rpm client command. To
package a binary for a different architecture, for example arm64, you must
specify the binary in the command.
- Install the package.
sudo rpm -Uvh velociraptor_client_amd64.rpm
After installation you can check the service status with the command:
systemctl status velociraptor_client- on systems using systemdservice velociraptor_client status- on systems using SysVinit
Other platforms and architectures
In our official releases we also provide binaries for FreeBSD.
Velociraptor is written in Golang, so it is technically possible for you to build it on any platform supported by Go. However Go has officially ended support for Windows 7 with the Go 1.20 release. This means that Windows XP, Windows server 2003, and Windows 7/Vista can no longer be built using a supported version of Go. We may make occasional (depending on demand for it) builds for Windows 7 using an old unsupported version of Go, but these will not be supported and may not be the latest version. Please see our Support Policy.
We also distribute 32-bit binaries for Windows but not for Linux. If you need 32-bit Linux builds you will need to build from source. You can do this easily by forking the project on GitHub, enabling GitHub Actions in your fork and editing the “Linux Build All Arches” pipeline.
Agentless deployment
There has been a lot of interest in “agentless hunting” using Velociraptor, especially since many people come from backgrounds where PowerShell is used for this purpose.
There are many reasons why agentless hunting is appealing. These are the ones we hear most often:
- There are already a ton of endpoint agents and yet another one may not be welcome.
- Sometimes we need to deploy endpoint agents as part of a DFIR engagement and we may not want to permanently install yet another agent on endpoints.
In the agentless deployment scenario, we simply run the binary from a network share using Group Policy settings. The downside to this approach is that the endpoint needs to be on the domain network to receive the Group Policy update (and have the network share accessible) before it can run Velociraptor.
When we run in agentless mode, we are typically interested in collecting a bunch of artifacts via hunts and then exiting - the agent will not restart after a reboot. So this method is suitable for quick hunts on corporate (non roaming) assets.
Create a network share
The first step is to create a network share with the Velociraptor binary and its configuration file. We will run the binary from the share in this example, but for more reliability you may want to copy the binary into e.g. a temp folder on the end point in case the system becomes disconnected from the domain. For quick hunts though, it should be fine.
We create a directory on the server. Note that in the below example, we’re creating on a Domain Controller, but we strongly recommend using another location on real deployments.
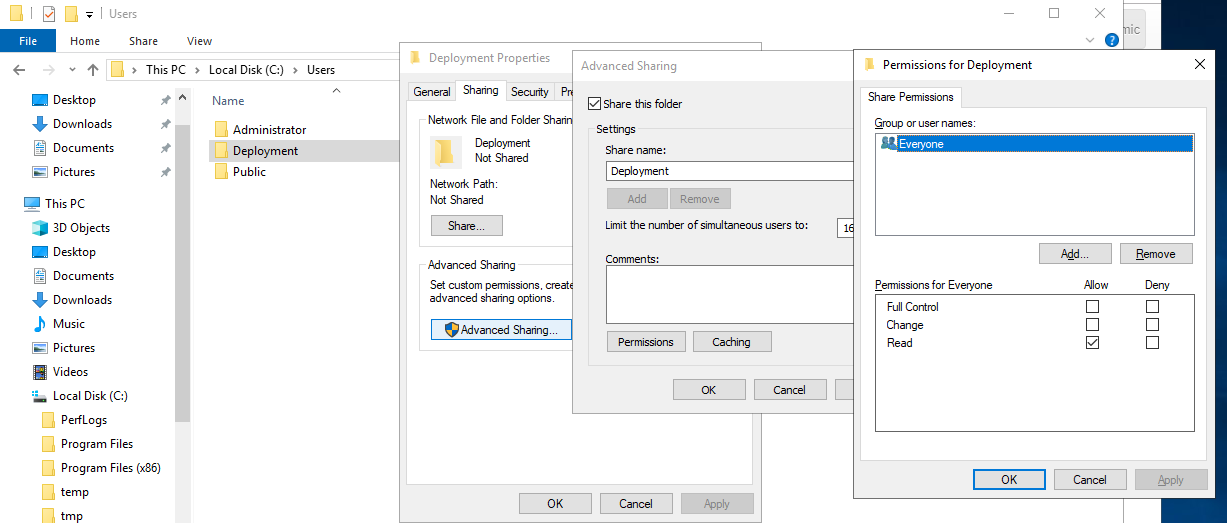
In this example we created a directory called C:\Users\Deployment and ensured
that it’s read-only. We shared the directory as the name Deployment.
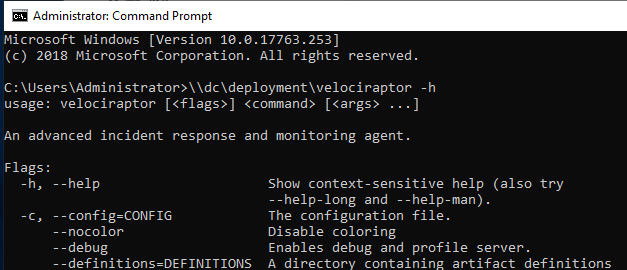
We now place the Velociraptor executable and client config file in that
directory and verify that it can run the binary from the network share. The
binary should be accessible via \\DC\Deployment\velociraptor.exe:
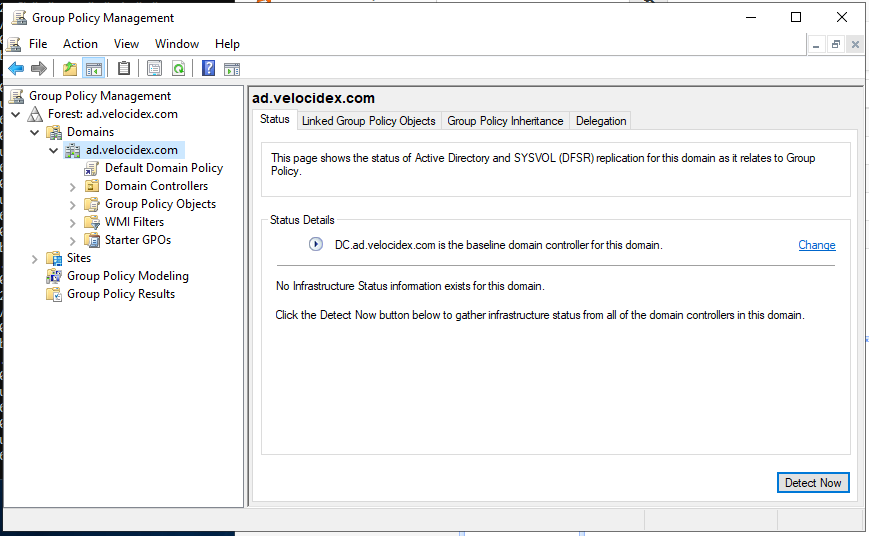
Create the Group Policy object
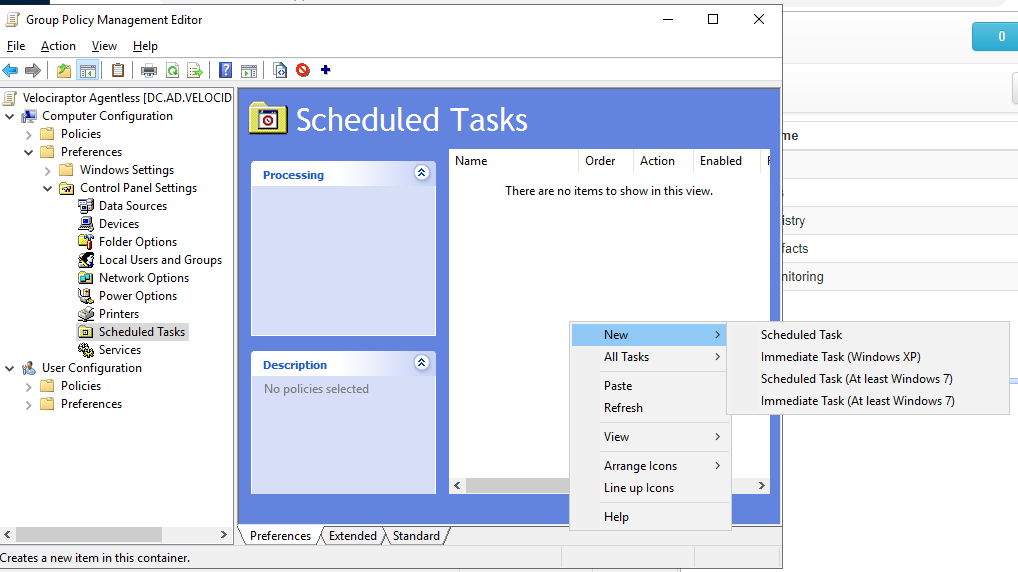
Next we create the Group Policy object, which forces all domain connected machines to run the Velociraptor client. We use the Group Policy Management Console:
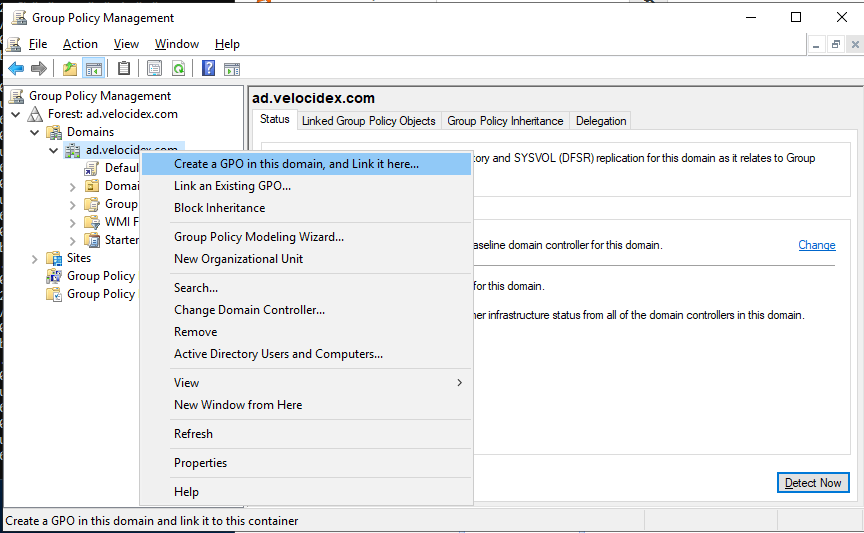
Select the OU or the entire domain and click “Create New GPO”:
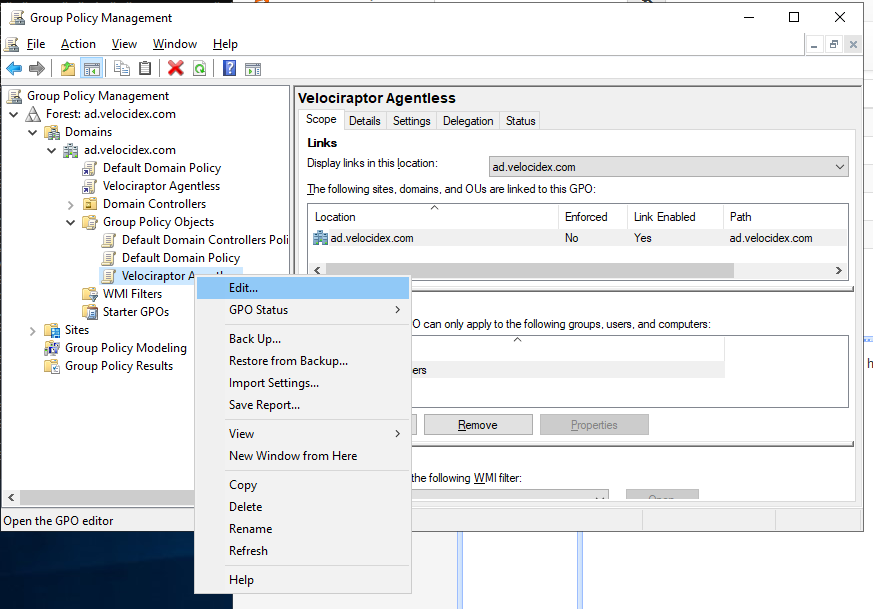
Now right click the GPO object and select “Edit”:
We will create a new scheduled task. Rather than schedule it at a particular time, we will select to run it immediately. This will force the command to run as soon as the endpoint updates its Group Policy settings, because we don’t want to wait for the next reboot of the endpoint.
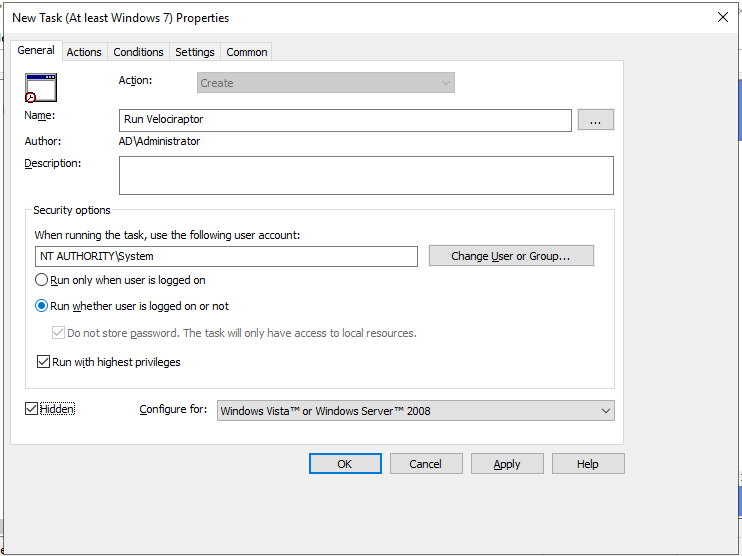
Next we give the task a name and a description. In order to allow Velociraptor
to access raw devices (e.g. to collect memory or NTFS artifacts) we can specify
that the client will run at NT_AUTHORITY\SYSTEM privileges and run without any
user being logged on.
It’s also worth ticking the “hidden” checkbox here to prevent a console box from appearing.
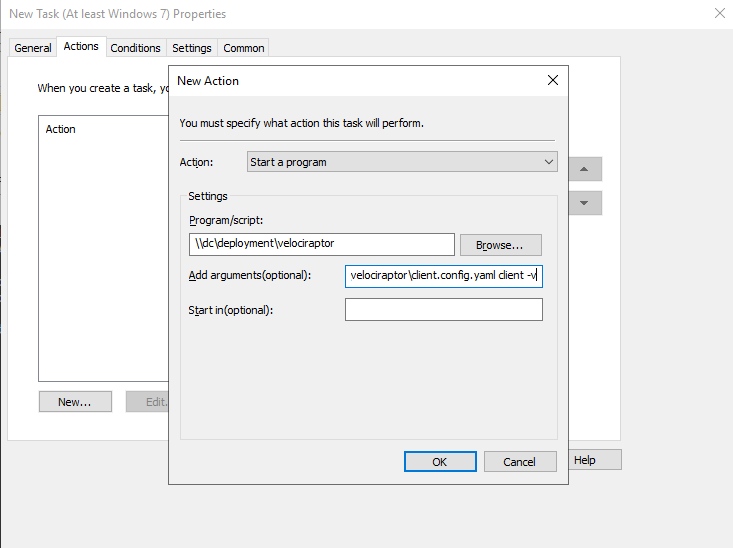
Next click the Actions tab and add a new action. This is where we launch the
Velociraptor client. The program will simply be launched from the share (i.e.
\\DC\Deployment\velociraptor.exe) and we give it the arguments allowing it to
read the provided configuration file
(i.e. --config \\DC\Deployment\client.config.yaml client -v).
In the “Setting” tab we can control how long we want the client to run. For a quick hunt, this may be an hour or two depending on the network size and hunt scope. For a more comprehensive DFIR collection, be prepared to wait several hours or even days while user machines are naturally disconnected and reconnected from the network. The GPO will ensure the client is killed after the allotted time.

Once the GPO is installed it becomes active for all domain machines. You can now schedule any hunts you wish using the Velociraptor GUI. When a domain machine refreshes its Group Policy, it will run the client, which will enroll and immediately participate in any outstanding hunts - thus collecting and delivering its artifacts to the server.
After the allotted time has passed, the client will shut down without having installed anything on the endpoint.
You can force a Group Policy update by running the gpupdate program. Now you
can verify that Velociraptor is running:
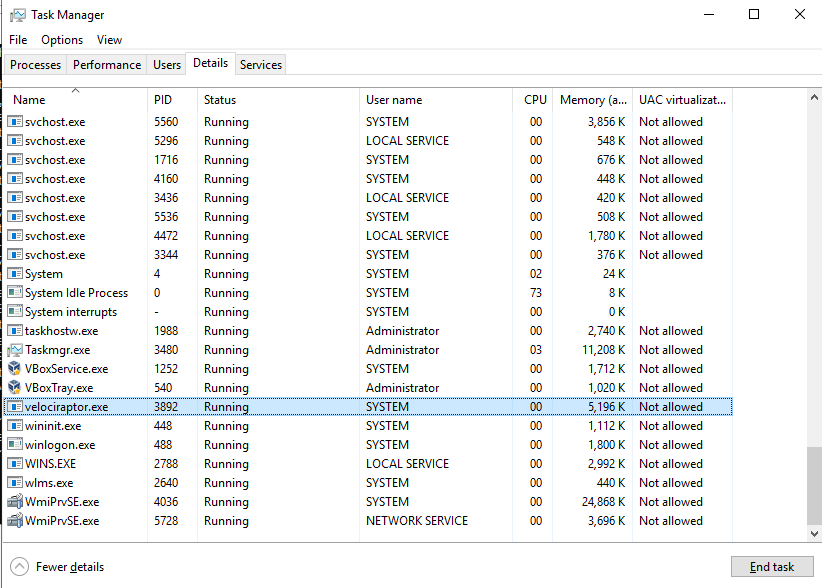
In our experience GPO deployments are not very reliable - we often find the
Velociraptor client will be launched multiple times on the endpoint. It is
highly recommended that you use the --mutant flag to specify a mutant
preventing the client from starting multiple times.
velociraptor.exe --config ... client -v --mutant ArandomString
Client upgrades
The client’s identity is derived from the client’s cryptographic certificate
which is stored in the writeback file, as defined by the key
Client.writeback_<platform> in the client config.
For example, by default on Windows this will be
C:\Program Files\Velociraptor\velociraptor.writeback.yaml and
/etc/velociraptor.writeback.yaml on Linux or macOS.
We generally try to allow this file to persist on disk, even after uninstalls, in order to ensure that clients do not change their client ID. The default provided WiX script ensures the file remains in order to maintain a consistent client id for the host.
The Velociraptor server is intended to be backwardly-compatible with older clients across the previous few releases, which allows you to upgrade the server and then upgrade the clients. This backward-compatibility is mainly in terms of client-server communication - that is, older clients should be able to continue communicating with a newer server version. However, older clients will not be able to run artifacts that use newer features and functionality, so ideally you should try to upgrade your clients to the same version as the server as soon as possible after upgrading the server.
Note that you should always upgrade the server first. When creating new
installer packages, as described below, the server will attempt to download any
additional Velociraptor binaries from GitHub. The server uses a built-in
artifact named Server.Internal.ToolDependencies that contains links to the
binaries that match the server version. So, by default, the server artifacts
that automate the creation of new client installers will always create ones that
match the server version.
Creating new installation packages
If you’ve previously installed your clients using the client operating system’s package manager then the first step in upgrading is to create a new installer package, just as you did for your initial deployment.
For Windows and Linux the appropriate installer packages can be easily created
using the Server.Utils.CreateMSI and Server.Utils.CreateLinuxPackages server
artifacts.
These artifacts will attempt to download any additional Velociraptor binaries from GitHub, as needed. These binaries will correspond to the server’s version. You can manually override the binary by clicking on the tool name and uploading the binary that you want to use, but usually this is not necessary.
When your launch the collection you will see it pause briefly while downloading any binaries that are needed. These binaries are stored in the server’s tools inventory and will not be downloaded again if these artifact are run subsequently.
The installer packages can then be downloaded from the collections Uploaded Files tab.
Remotely upgrading clients
The newly created client installer packages can be deployed using your favourite
enterprise software management tool, or by using the built-in
Admin.Client.Upgrade.<Platform> artifacts which use the existing client to
run the installer.
While it is possible to use the Velociraptor client to upgrade itself, many organizations have strict processes and procedures around software management and using a standard software management tool might be mandated by the organization. You should take this into consideration, especially if you’re managing Velociraptor in someone else’s network environment.
Regardless of the process you choose, you should always perform a limited initial rollout to verify that everything works smoothly and as expected.
To use the Admin.Client.Upgrade.<Platform> artifacts, you can create a hunt
which runs the artifact on the targeted endpoints.
and click the tool setup screen.

In the tools setup screen select the MSI from your local machine and upload it to the server.

Note that when installing the MSI using Velociraptor, the Velociraptor process will be killed part way through collecting the artifact, so it would appear to never complete it (in the GUI the flow looks hung). This is OK and part of the upgrade process.
To verify that clients are upgraded we recommend running the
Generic.Client.Info hunt periodically. This hunt will refresh the server’s
datastore of client details (including reporting the client’s version).