Velociraptor 0.72 Release
I am very excited to announce that the latest Velociraptor release 0.72 is now available. You can also watch a video walkthrough of this post here https://www.youtube.com/watch?v=FwmFYmTQxeA
In this post I will discuss some of the interesting new features.
Version scheme update
Traditionally Velociraptor followed the GRR version format and that has 4 numbers - so we had 0.6.5 and then if we needed to do a patch release we would do 0.6.5-1 etc.
It turns out this is not compatible with Semantic Versioning exactly
which needs to have exactly 3 versions: a MAJOR version, a MINOR
version and a PATCH version. This causes problems with packaging
systems which expect semantic versioning like that for example RPM,
DEB or MSI. We also use Semantic Versioning internally to compare
versions (for example to determine if we should upgrade a Tool
definition )
So in this release we are taking the brave step of conforming with
Semantic Versioning more correctly and officially dropping the second
dot to have a MAJOR version of 0, a MINOR version of 72 and then
PATCH releases after that (starting with 0).
That means our next version will be 0.72.0 and if we need to release
patches after the release it will be 0.72.1 , 0.72.2 etc.
EWF Support
Velociraptor has introduced the ability to analyze dead disk images in the past. Although we don’t need to analyze disk images very often, the need comes up occasionally.
While previously Velociraptor only supported analysis of DD images (AKA “Raw images”). Most people use a standard acquisition software to acquire the image which uses the common EWF format to compress the image.
In this release, Velociraptor supports EWF (AKA E01) format using the
ewf accessor. This allows Velociraptor to analyze E01 image sets.
To analyse dead disk images use the following steps:
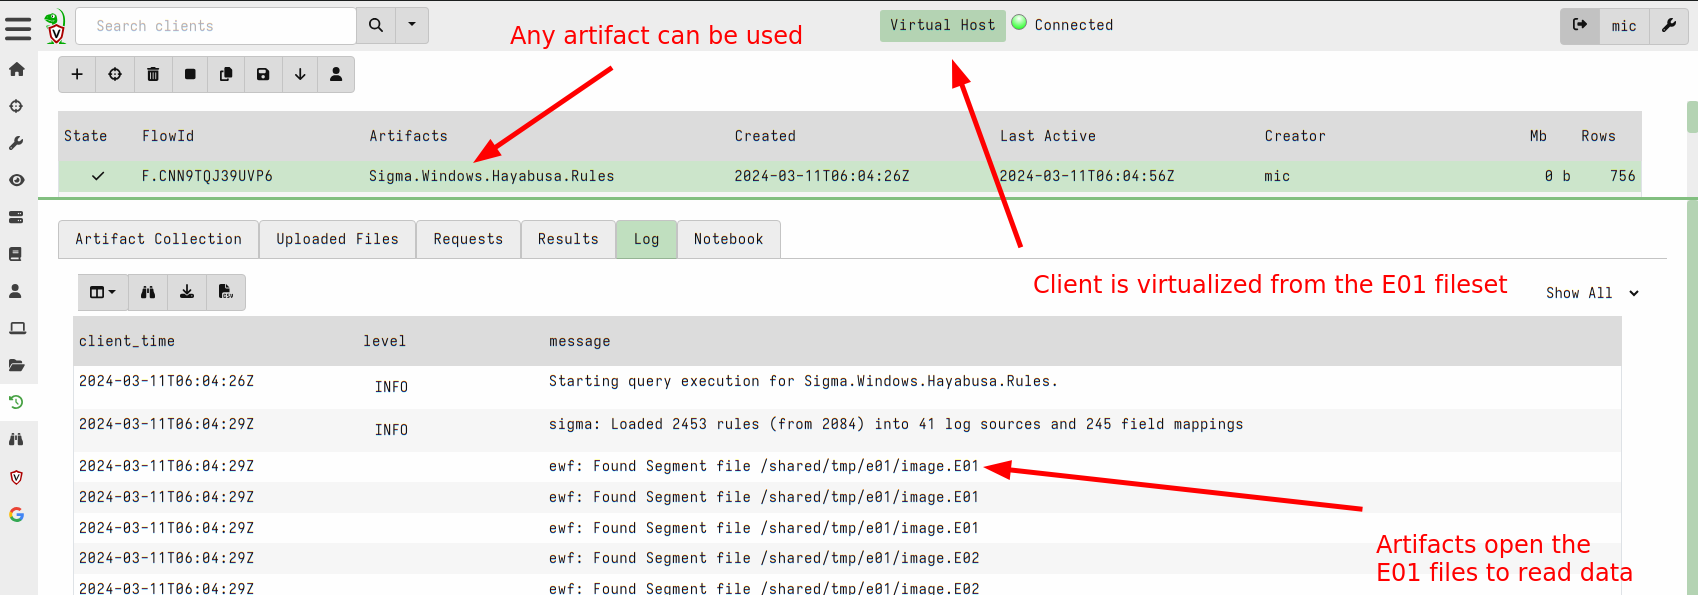
Create a remapping configuration that maps the disk accessors into the E01 image. This automatically diverts VQL functions that look at the filesystem into the image instead of using the host’s filesystem. In this release you can just point the
--add_windows_diskoption to the first disk of the EWF disk set (the other parts are expected to be in the same directory and will be automatically loaded).The following creates a remapping file by recognizing the windows partition in the disk image.
$ velociraptor-v0.72-rc1-linux-amd64  deaddisk \
   --add_windows_disk=/tmp/e01/image.E01 /tmp/remapping.yaml -v
Next we launch a client with the remapping file. This causes any VQL queries that access the filesystem to come from the image instead of the host. Other than that the client looks like a regular client and will connect to the Velociraptor server just like any other client. To ensure that this client is unique you can override the writeback location (where the client id is stored) to a new file.
$ velociraptor-v0.72-rc1-linux-amd64  --remap /tmp/remapping.yaml \
   --config ~/client.config.yaml client -v \
   --config.client-writeback-linux=/tmp/remapping.writeback.yaml
Allow remapping clients to use SSH accessor
Sometimes we can not deploy the Velociraptor client on a remote system. For example, it might be an edge device like an embedded Linux system or it may not be directly supported by Velociraptor.
In 0.7.1, Velociraptor introduced the ssh accessor which allows VQL
queries to use a remote ssh connection to access remote files.
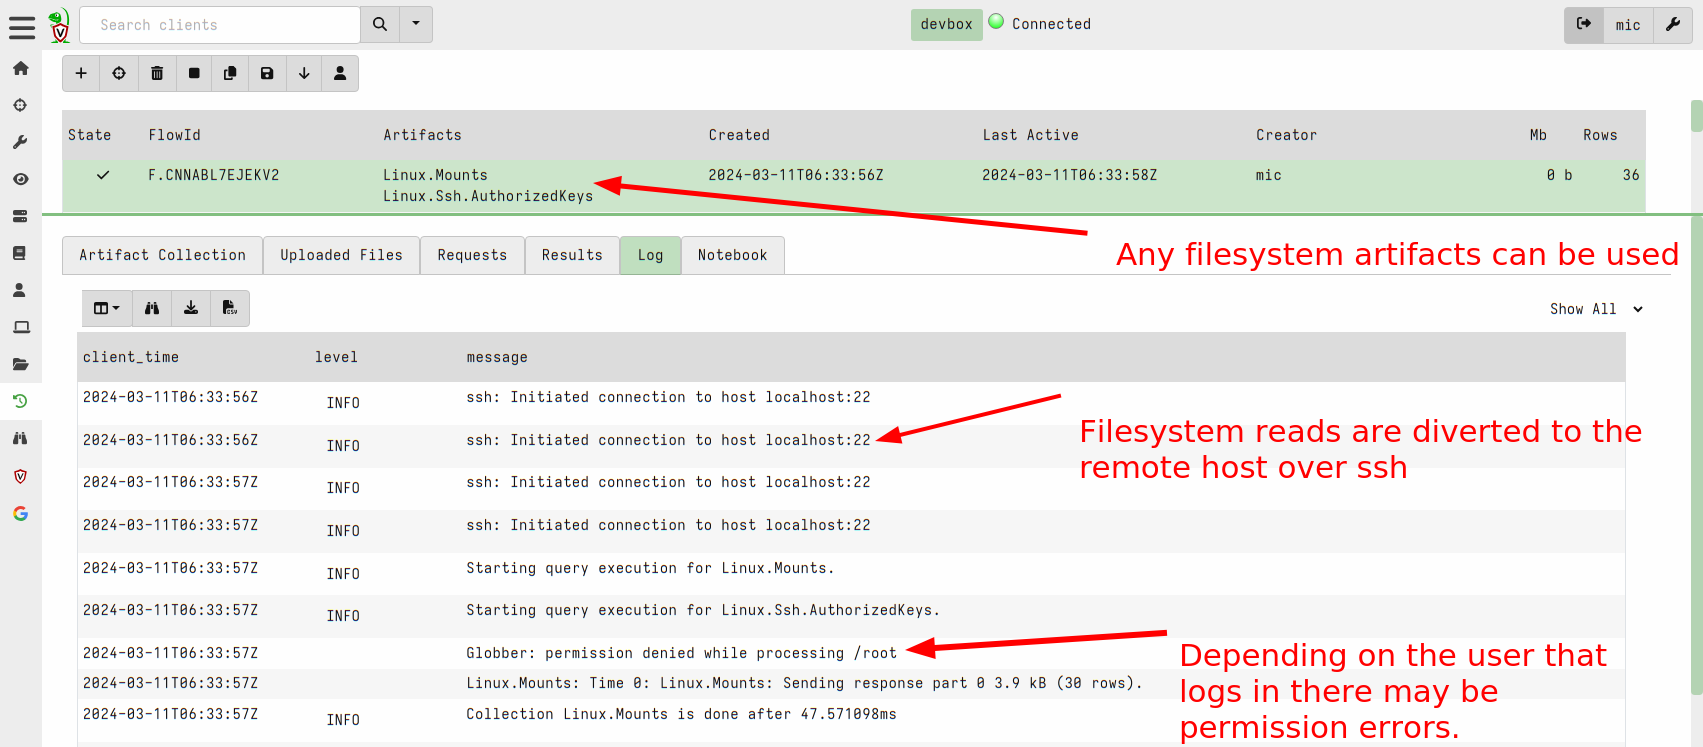
This release added the ability to apply remapping in a similar way to
the dead disk image method above to run a Virtual Client which
connects to the remote system via SSH and emulates filesystem access
over the sftp protocol.
To use this feature you can write a remapping file that maps the ssh
accessor instead of the file and auto accessors:
remappings:
- type: permissions
  permissions:
  - COLLECT_CLIENT
  - FILESYSTEM_READ
  - READ_RESULTS
  - MACHINE_STATE
- type: impersonation
  os: linux
  hostname: RemoteSSH
- type: mount
  scope: |
    LET SSH_CONFIG <= dict(hostname='localhost:22',
      username='test',
      private_key=read_file(filename='/home/test/.ssh/id_rsa'))

  from:
    accessor: ssh

  "on":
    accessor: auto
    path_type: linux

- type: mount
  scope: |
    LET SSH_CONFIG <= dict(hostname='localhost:22',
      username='test',
      private_key=read_file(filename='/home/test/.ssh/id_rsa'))

  from:
    accessor: ssh

  "on":
    accessor: file
    path_type: linux
Now you can start a client with this remapping file to virtualize access to the remote system via SSH.
$ velociraptor-v0.72-rc1-linux-amd64  --remap /tmp/remap_ssh.yaml \
   --config client.config.yaml client -v \
   --config.client-writeback-linux=/tmp/remapping.writeback_ssh.yaml \
   --config.client-local-buffer-disk-size=0
GUI Changes
The GUI has been improved in this release.
Inbuilt Stacking support
One very common task in DFIR is stacking . This is a powerful technique to quickly understand what had happened on the endpoint and what is normal (and by extension unusual) on an endpoint.
While Velociraptor has always been able to do stacking within a post
processing notebook by using the GROUP BY VQL operator to count the
number of occurrences broken by category. When the user wanted to
actually see all those items, they needed to run a second VQL query to
filter only those items. This made it cumbersome and inefficient to
review large numbers of groups.
In the latest release, stacking is built right into the GUI for fast and efficient operation. I will demonstrate how to use it with the example of the Velociraptor Sigma artifacts.
For this example, assume I approach a new endpoint and I really don’t know where to start - is this a suspicious endpoint? Is it normal?
First I will import the Sigma artifacts into my server. The Velociraptor Sigma project maintains this artifact at https://sigma.velocidex.com
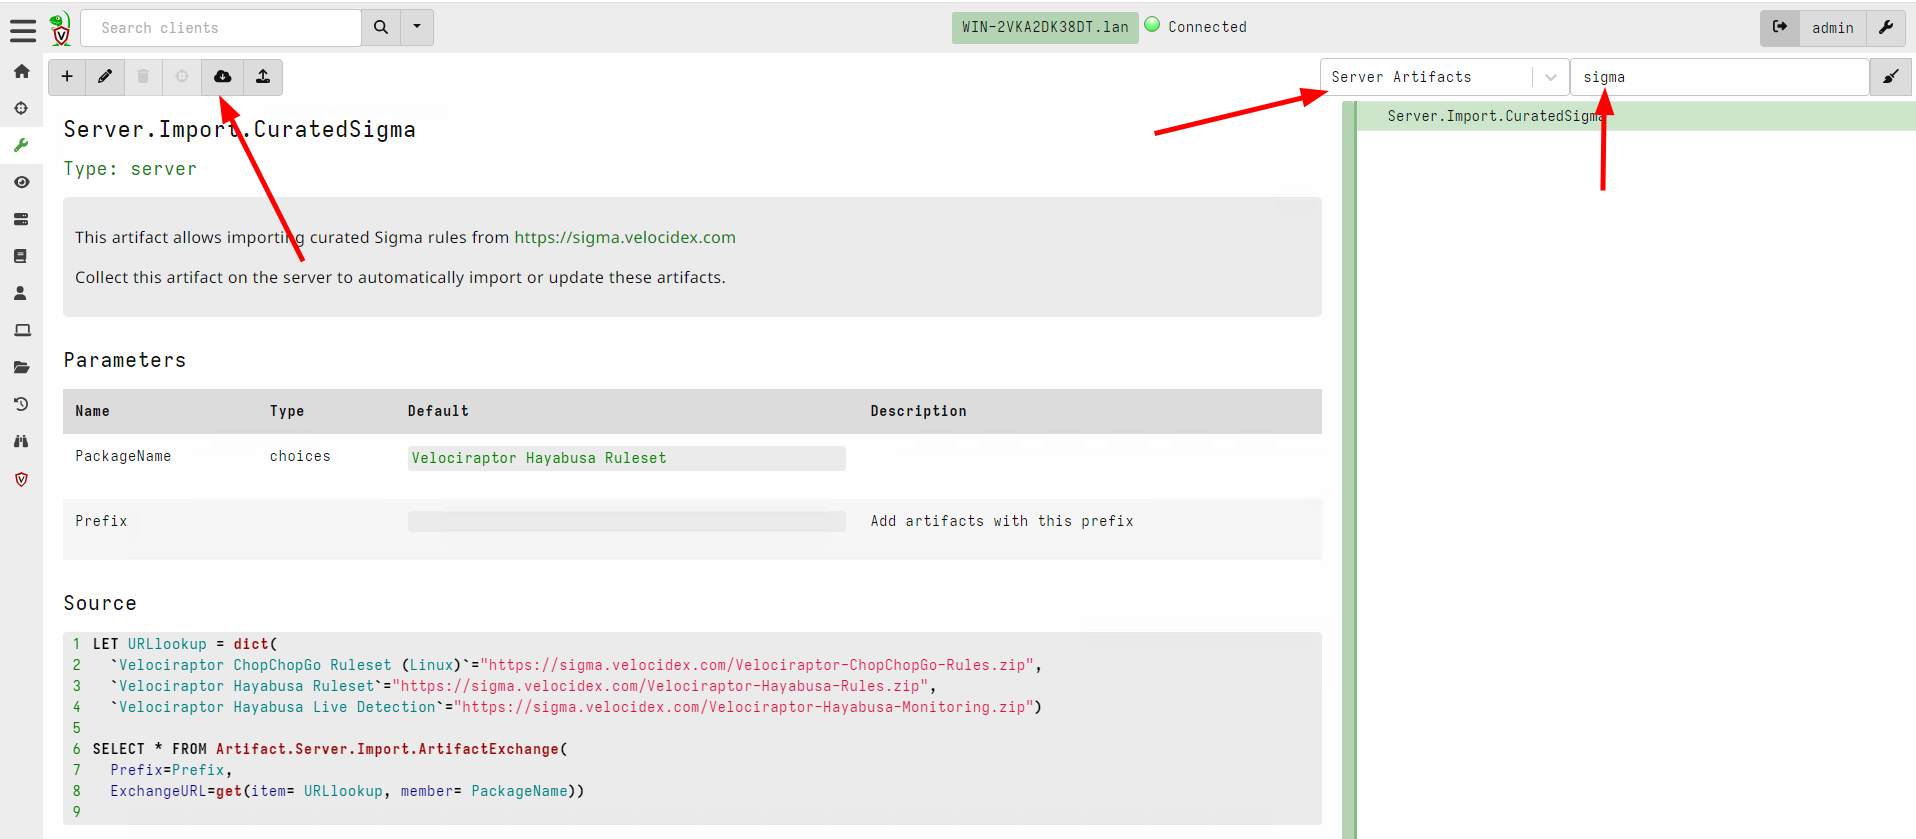
I will import the Velociraptor Hayabusa Ruleset which allows me to
apply the rules maintained by the Hayabusa
project
to static event
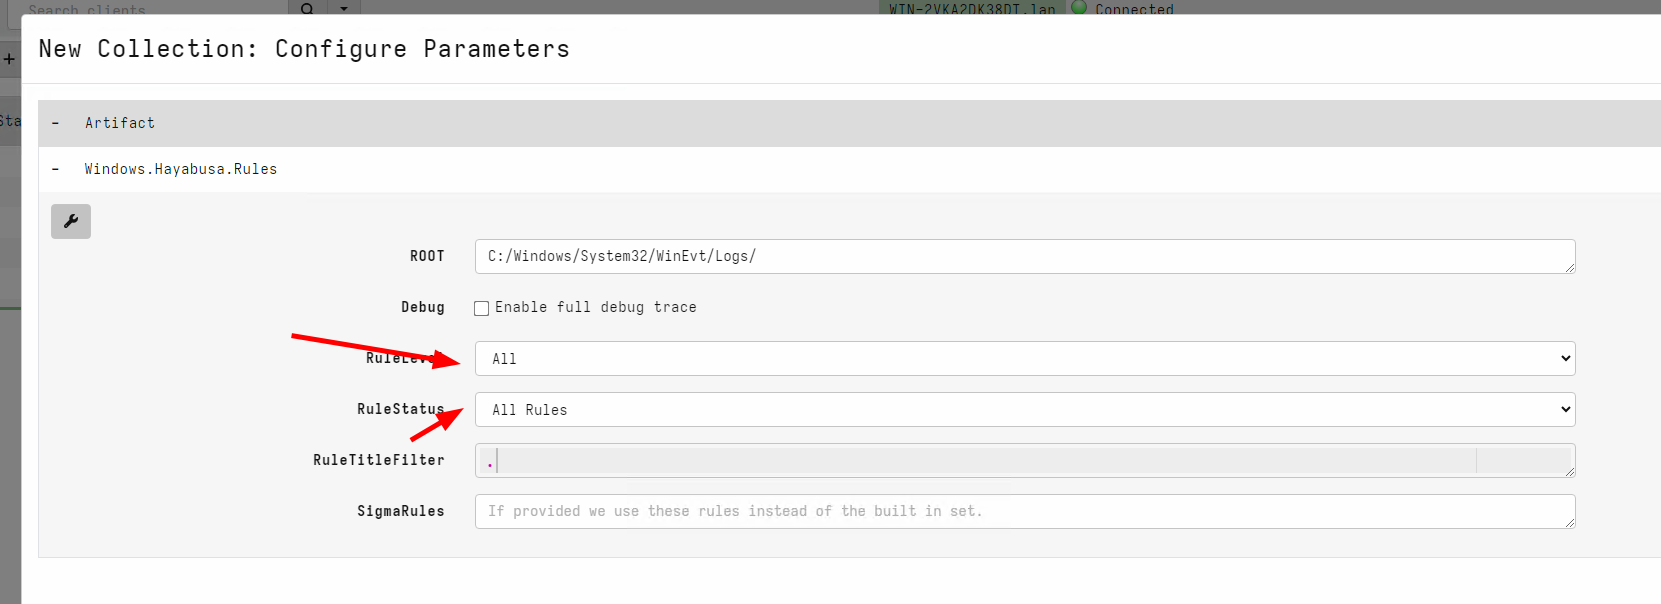
log files on the endpoint. The ruleset is extensive and rules are
broken down by rule level and rule status. However in this case I want
to try out all the rules - including very noisy ones because I want to
get an overview of what might have happened on this endpoint.
The Hayabusa ruleset is extensive and might collect many false positives. In this case it took around 6 minutes to apply the rules on all the event log files and returned over 60k hits from about 4200 rules.
Generally it is impractical to review every single hit, so we typically rely on Stacking the results using a query like
SELECT *, count() AS Count
FROM source(artifact="Windows.Hayabusa.Rules")
GROUP BY Title ORDER BY Count DESC
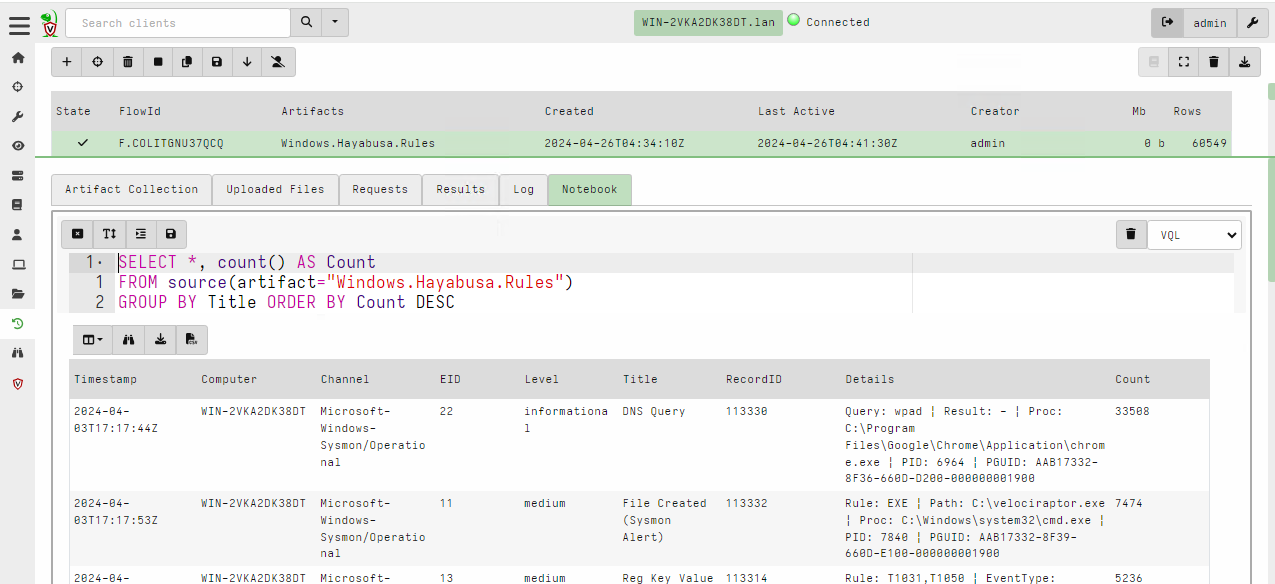
We immediately see that almost half the rules are triggered by informational DNS queries, but if we wanted to look at those we would have to issue another query
SELECT *
FROM source(artifact="Windows.Hayabusa.Rules")
WHERE Title =~ "DNS Query"
In this release, stacking is built directly into the GUI making it a lot easier to work with. The way this works is by performing the stacking operation at the same time as sorting a column.
I will stack by Title by clicking the sort icon at the top of the column
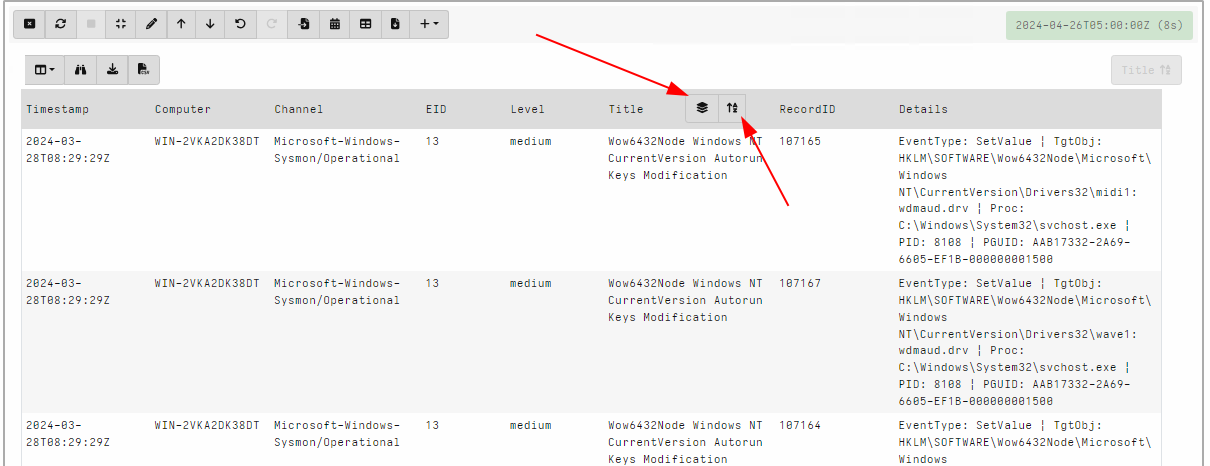
Once the column is sorted, a stacking icon will appear next to it. Clicking on that icon will display the stacking dialog view. This view shows the different unique values of the selected column and the total number of items of that value. In our case it shows the total number of times the specific rule has fired.
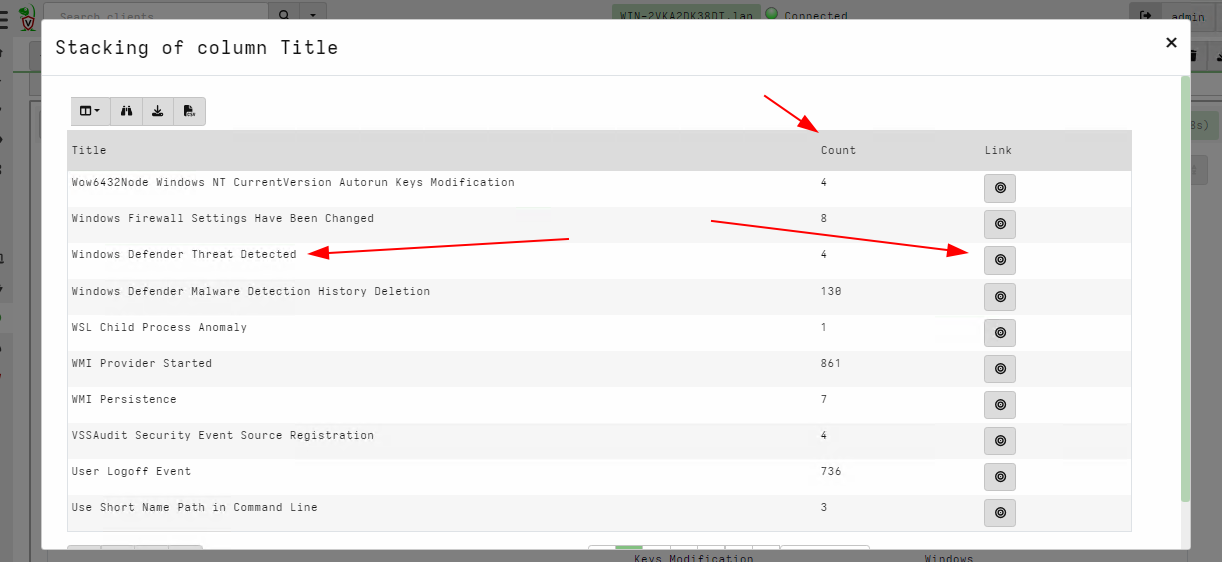
Clicking the icon in each row seeks the table immediately to view all
the rows with the same Title value. In this case I want to quickly
view the hits from the Windows Defender Threat Detected rule.
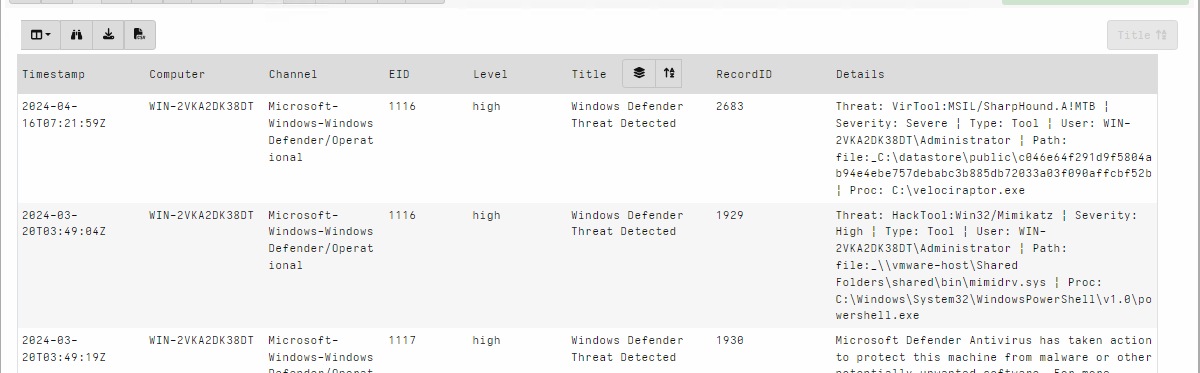
Using this technique I can quickly review the most interesting rules and their corresponding hits directly in the GUI without needing to recalculate anything.
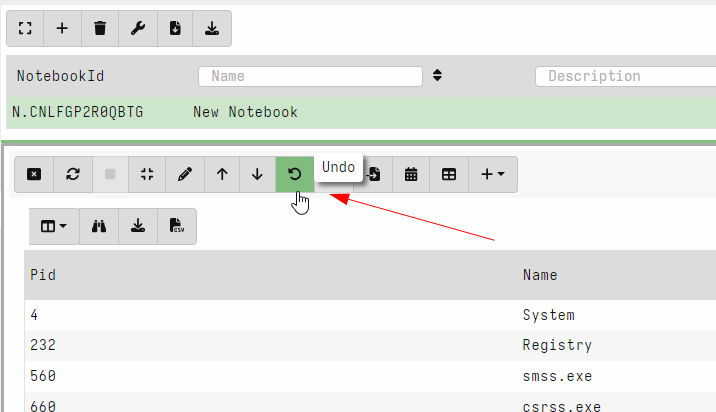
Undo/Redo for notebook cells
Velociraptor offers an easy way to experiment and explore data with VQL queries in the notebook interface. Naturally exploring the data requires going back and forth between different VQL queries.
In this release, Velociraptor keeps several versions of each VQL cell (by default 5) so as users explore different queries they can easily undo and redo queries. This makes exploring data much quicker as you can go back to a previous version instantly.
Hunt view GUI is now paged
Previously hunts were presented in a table with limited size. In this release, the hunt table is paged and searchable/sortable. This brings the hunts table into line with the other tables in the interface and allows an unlimited number of hunts to be viewable in the system.

Secret Management
Many Velociraptor plugins require secrets to operate. For example, the
ssh accessor requires a private key or password to log into the
remote system. Similarly the s3 or smb accessors requires
credentials to upload to the remote file servers. Many connections
made over the http_client() plugin require authorization - for
example an API key to send Slack messages or query remote services
like Virus Total.
Previously plugins that required credentials needed those credentials to be passed as arguments to the plugin. For example, the upload_s3() plugin requires AWS S3 credentials to be passed in as parameters.
This poses a problem for the Velociraptor artifact writer - how to safely provide the credentials to the VQL query in a way that does not expose them to every user of the Velociraptor GUI? If the credentials are passed as parameters to the artifact then they are visible in the query logs and request etc.
This release introduces Secrets as a first class concept within
VQL. A Secret is a specific data object (key/value pairs) given a
name which is used to configure credentials for certain plugins:
- A Secret has a
namewhich we use to refer to it in plugins. - Secrets have a
typeto ensure their data makes sense to the intended plugin. For example a secret needs certain fields for consumption by thes3accessor or thehttp_client()plugin. - Secrets are shared with certain users (or are public). This controls who can use the secret within the GUI.
- The GUI is careful to not allow VQL to read the secrets directly. The secrets are used by the VQL plugins internally and are not exposed to VQL users (like notebooks or artifacts).
Let’s work through an example of how Secrets can be managed within
Velociraptor. In this example we store credentials for the ssh
accessor to allow users to glob() a remote filesystem within the
notebook.
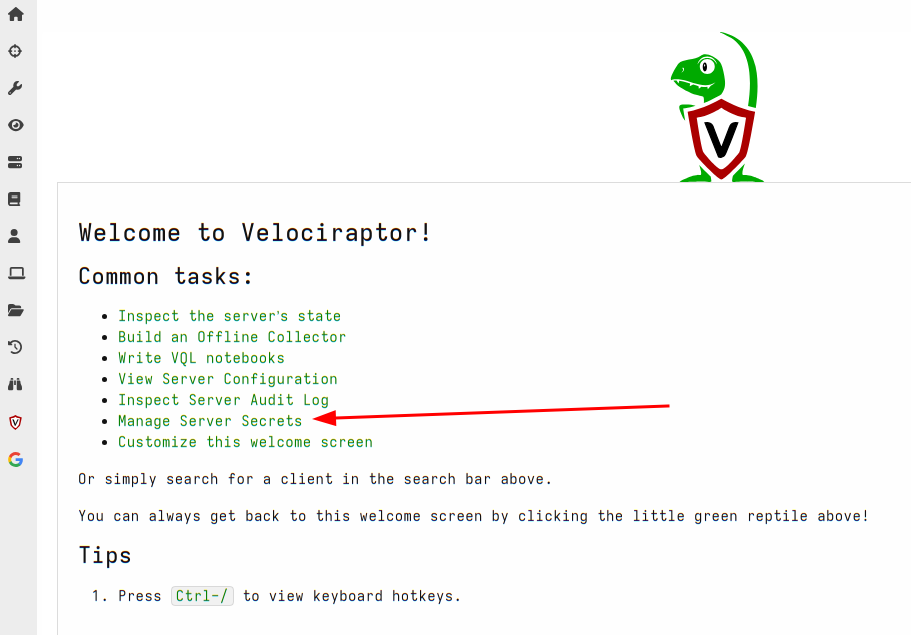
First I will select manage server secrets from the welcome page.
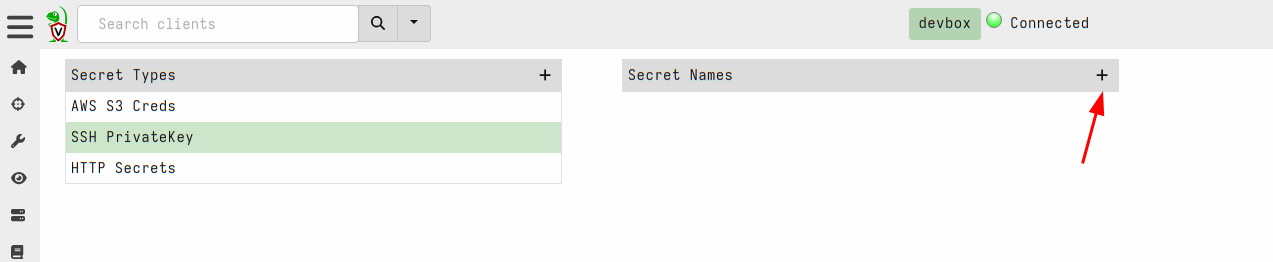
Next I will choose the SSH PrivateKey secret type and add a new
secret.
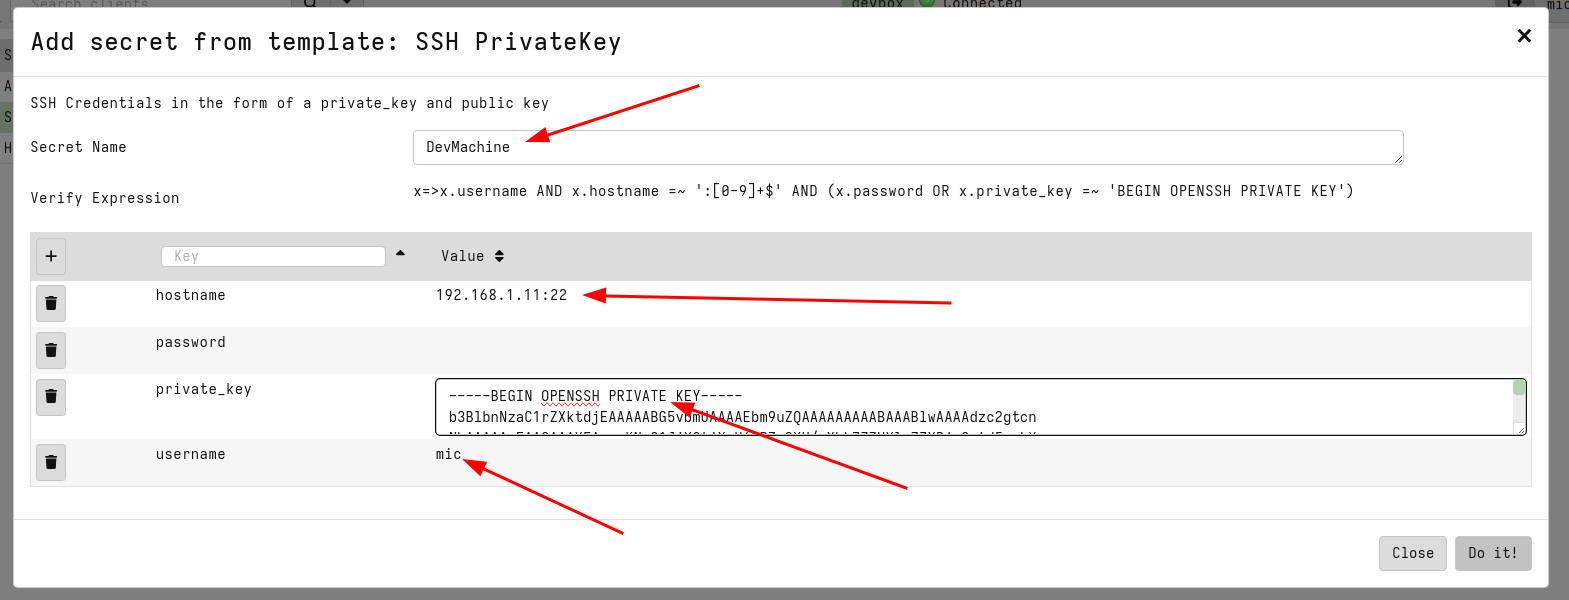
This will use the secret template that corresponds to the SSH private
keys. The acceptable fields are shown in the GUI and a validation VQL
condition is also shown for the GUI to ensure that the secret is
properly populated. I will name the secret DevMachine to remind me
that this secret allows access to my development system. Note that the
hostname requires both the IP address (or dns name) and the port.
Next I will share the secrets with some GUI users

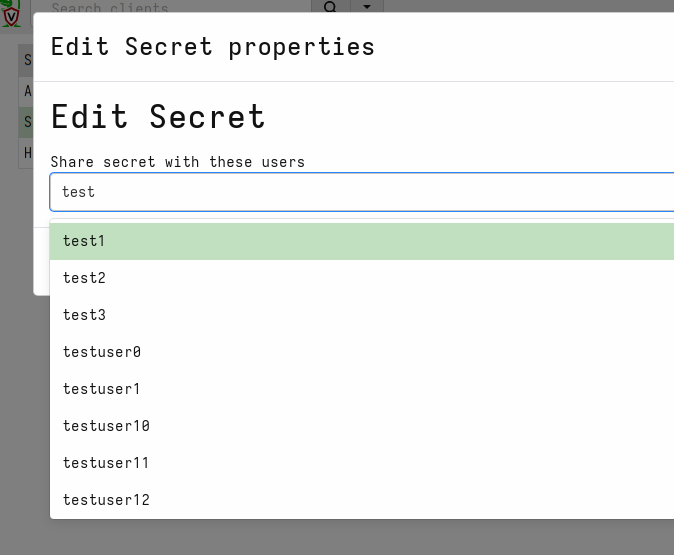
I can view the list of users that are able to use the secret within the GUI

Now I can use the new secret by simply referring to it by name:

Not only is this more secure but it is also more convenient since we
don’t need to remember the details of each secret to be able to use
it. For example, the http_client() plugin will fill the URL field,
headers, cookies etc directly from the secret without us needing to
bother with the details.
Although secrets are designed to control access to the raw
credential by preventing users from directly accessing the secrets'
contents, those secrets are still written to disk. This means that GUI
users with direct filesystem access can simply read the secrets from
the disk.
We recommend not granting untrusted users elevated server permissions
like EXECVE or Filesystem Read as it can bypass the security
measures placed on secrets.
Server improvements
Implemented Websocket based communication mechanism
One of the most important differences between Velociraptor and some older remote DFIR frameworks such as GRR is the fact that Velociraptor maintains a constant, low latency connection to the server. This allows Velociraptor clients to respond immediately without needing to wait for polling on the server.
In order to enhance compatibility between multiple network configurations, like MITM proxies, transparent proxies etc, Velociraptor has stuck to simple HTTP based communications protocols. To keep a constant connection, Velociraptor uses the long poll method, keeping HTTP POST operations open for a long time.
However as the Internet evolves and newer protocols become commonly used by major sites, the older HTTP based communication method has proved more difficult to use. For example, we found that certain layer 7 load balancers interfere with the long poll method by introducing buffering to the connection. This severely degrades communications between client and server (Velociraptor falls back to a polling method in this case).
On the other hand, modern protocols are more widely used, so we found
that modern load balancers and proxies already support standard low
latency communications protocol such as Web Sockets.
In this release, Velociraptor introduces support for websockets as a communications protocol. The websocket protocol is designed for low latency and low overhead continuous communications method between clients and server (and is already used by e.g. most major social media platforms). Therefore, this new method should be better supported by network infrastructure as well as being more efficient.
To use the new websocket protocol, simply set the client’s server URL
to have wss:// scheme:
Client:
  server_urls:
  - wss://velociraptor.example.com:8000/
  - https://velociraptor.example.com:8000/
You can use both https and wss URLs at the same time, Velociraptor
will switch from one to the other scheme if one becomes unavailable.
Dynamic DNS providers
Velociraptor has the capability to adjust DNS records by itself (AKA
Dynamic DNS). This saves users the hassle of managing a dedicated
dynamic DNS service such as ddclient).
Traditionally we used Google Domains as our default Dynamic DNS provider, but Google has decided to shut down this service abruptly forcing us to switch to alternative providers.
The 0.72 release has now switched to Cloudflare as our default
preferred Dynamic DNS provider. We also added noip.com as a second
option.
Setting up Cloudflare as your preferred dynamic DNS provider requires the following steps:
- Sign into Cloudflare and buy a domain name.
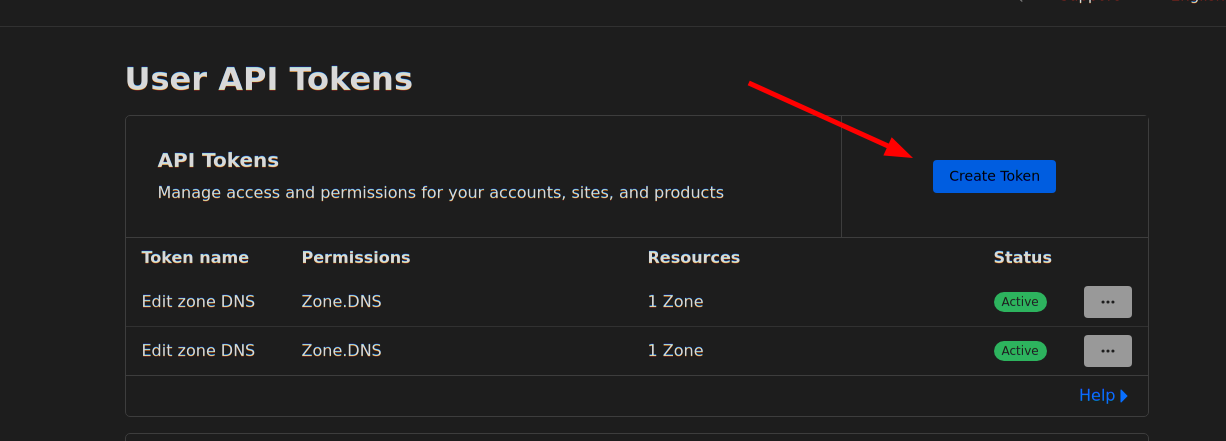
- go to https://dash.cloudflare.com/profile/api-tokens
to generate an
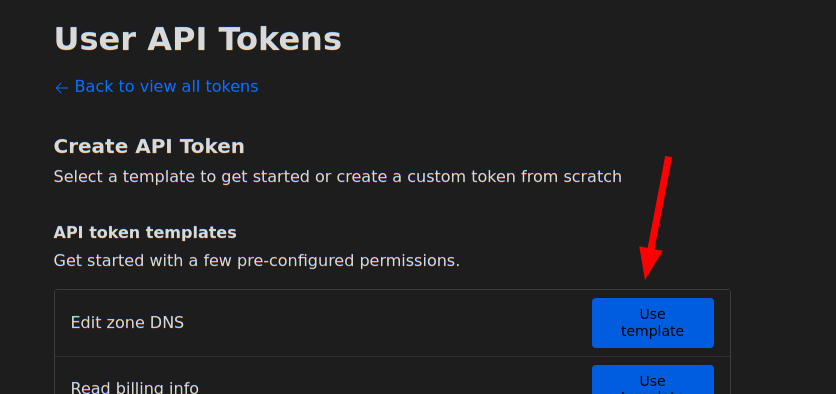
API token. Select
Edit Zone DNSin the API Token templates.
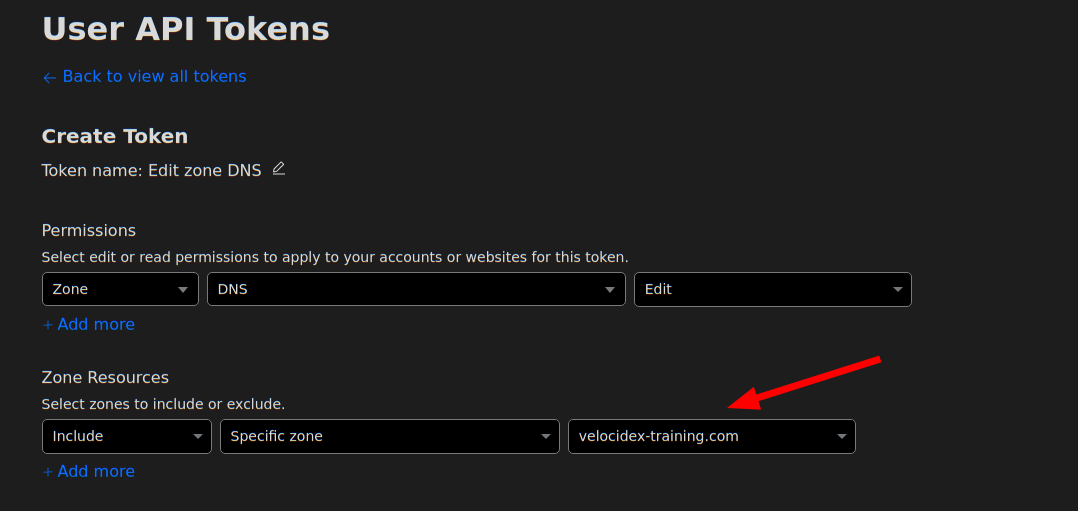
You will require the “Edit” permission on Zone DNS and include the specific zone name you want to manage. The zone name is the domain you purchased for example “example.com”. You will be able to set the hostname under that domain, e.g. “velociraptor.example.com”
Using this information you can now create the dyndns configuration:
Frontend:
  ....
  dyn_dns:
    type: cloudflare
    api_token: XXXYYYZZZ
    zone_name: example.com
Make sure the Frontend.Hostname field is set to the correct hostname to update - for example
Frontend:
  hostname: velociraptor.example.com
This is the hostname that will be updated.
Enhanced proxy support
Velociraptor is often deployed into complex enterprise networks. Such networks are often locked down with complicated controls (such as MITM inspection proxies or automated proxy configurations) which Velociraptor needs to support.
Velociraptor already supports MITM proxies but previously had inflexible proxy configuration. The proxy could be set or unset but there was no finer grained control over which proxy to choose for different URLs. This makes it difficult to deploy on changing network topologies (such as roaming use).
The 0.72 release introduces more complex proxy condition capabilities. It is now possible to specify which proxy to use for which URL based on a set of regular expressions:
Client:
  proxy_config:
    http: http://192.168.1.1:3128/
    proxy_url_regexp:
      "^https://www.google.com/": ""
      "^https://.+example.com": "https://proxy.example.com:3128/"
The above configuration means to:
- By default connect to
http://192.168.1.1:3128/for all URLs (includinghttps) - Except for
www.google.comwhich will be connecting to directly. - Any URLs in the
example.comdomain will be forwarded throughhttps://proxy.example.com:3128
This proxy configuration can apply to the Client section or the
Frontend section to control the server’s configuration.
Additionally, Velociraptor now supports a Proxy Auto Configuration (PAC) file. If a PAC file is specified, then the other
configuration directives are ignored and all configuration comes from
the PAC file. The PAC file can also be read from disk using the
file:// URL scheme, or even provided within the configuration file
using a data: URL.
Client:
  proxy_config:
    pac: http://www.example.com/wpad.dat
Note that the PAC file must obviously be accessible without a proxy.
Automated backups
Velociraptor maintains some critical metadata in various files. In this release we implemented an automated backup and restore framework. This framework is able to backup some critical parts of the server using the VQL plugins backup() and backup_restore() , as well as periodically (by default daily).
- Backup all users and ACLs
- Backup all hunt metadata
- Backup client metadata including labels, and other metadata.
Other notable features
Other interesting improvements include
Process memory access on MacOS
On MacOS we can now use proc_yara() to scan process memory. This
should work providing your TCT profile grant the get-task-allow,
proc_info-allow and task_for_pid-allow entitlements. For example
the following plist is needed at a minimum:
<!DOCTYPE plist PUBLIC "-//Apple//DTD PLIST 1.0//EN" "http://www.apple.com/DTDs/PropertyList-1.0.dtd">
<plist version="1.0">
<dict>
    <key>com.apple.springboard.debugapplications</key>
    <true/>
    <key>get-task-allow</key>
    <true/>
    <key>proc_info-allow</key>
    <true/>
    <key>task_for_pid-allow</key>
    <true/>
</dict>
</plist>
Multipart uploaders to http_client()
Sometimes servers requires uploaded files to be encoded using the
mutipart/form method. Previously it was possible to upload files
using the http_client() plugin by constructing the relevant request
in pure VQL string building operations.
However this approach is limited by available memory and is not suitable for larger files. It is also non-intuitive for users.
This release adds the files parameter to the http_client()
plugin. This simplifies uploading multiple files and automatically
streams those files without memory buffering - allowing very large
files to be uploaded this way.
For example:
SELECT *
FROM http_client(
  url='http://localhost:8002/test/',
  method='POST',
  files=dict(file='file.txt', key='file', path='/etc/passwd', accessor="file")
)
Here the files can be an array of dicts with the following fields:
- file: The name of the file that will be stored on the server
- key: The name of the form element that will receive the file
- path: This is an OSPath object that we open and stream into the form.
- accessor: Any accessor required for the path.
Yara plugin can now accept compiled rules
The yara() plugin was upgraded to use Yara Version 4.5.0 as well as
support compiled yara rules. You can compile yara rules with the
yarac compiler to produce a binary rule file. Simply pass the
compiled binary data to the yara() plugin’s rules parameter.
We do not recommend using compiled yara rule because of their practical limitations:
- The compiled rules can not portable and must be used on exactly the same version of the yara library as the compiler that created them (Currently 4.5.0)
- Compiled yara rules are much larger than the text rules.
Compiled yara rules pose no benefit over text based rules, except perhaps being more complex to decompile. This is primarily the reason to use compiled rules - to try to hide the rules (e.g. from commercial reasons).
The Registry Hunter is launched
As DFIR practitioners, the Windows registry is a treasure trove of information. The Windows registry stores information about system configuration and therefore we can use it to understand what software was installed, how it was configured and hunt for mis-configuration or deliberate compromises to achieve attacker persistence.
This release also introduces the Registry Hunter project - a unified streamlined way to hunt for forensically relevant information through the windows registry.
You can read more about The registry hunter in our blog post.
Conclusions
There are many more new features and bug fixes in the latest release.
If you like the new features, take Velociraptor for a spin ! It is available on GitHub under an open source license. As always please file issues on the bug tracker or ask questions on our mailing list velociraptor-discuss@googlegroups.com . You can also chat with us directly on discord https://www.velocidex.com/discord .